
Jump to Recipe
There’s a particular comfort in the rhythm of Italian cooking. The way simple ingredients transform in your hands, filling the kitchen with earthy scents and promising something truly satisfying. It’s this honest approach to food that I’ve always loved.
Today, we’re exploring a traditional dish pronounced “cheh-CHEE-nah.” This savory creation goes by different names across Italy. In Livorno, it’s called “torta di ceci,” while in Carrara you’ll hear “calda calda.” Ligurians know it as “farinata.”
What makes this preparation special is its beautiful simplicity. You need just four basic components: chickpea flour, water, salt, and good olive oil. The magic happens in how these humble elements come together.
The result is something truly unique. You get wonderfully crisp edges with a center that’s almost custardy in texture. It’s naturally free of gluten and rich in plant-based protein, making it perfect for today’s diverse eating preferences.
I learned to make this living near Livorno, watching local cooks work their magic. Their techniques revealed why each step matters. Now I want to share that knowledge with you.
This guide will help you recreate this specialty in your own kitchen. We’ll cover the traditional method and the reasons behind each instruction. You’ll gain the confidence to make something authentic and delicious.
Key Takeaways
- This traditional dish is known by various regional names across Italy
- It requires only four simple, accessible ingredients
- The texture combines crispy edges with a creamy interior
- It’s naturally gluten-free and high in plant-based protein
- Traditional wood-fired oven baking creates the characteristic golden color
- Proper technique is more important than specialized equipment
- The method respects authentic Italian cooking traditions
Exploring the Rich Story of Italian Chickpea Street Food
The journey of this simple street food spans centuries and continents, beginning with a fortunate accident at sea. Its evolution tells a story of cultural exchange and culinary adaptation.
The Origins and Legends Behind This Culinary Gem
According to legend, this dish originated in 1284 after the Battle of Meloria. A Genoese ship carrying prisoners suffered storm damage that mixed chickpeas, olive oil, and seawater. With supplies low, sailors created a basic mixture from these ingredients.
Some crew members initially refused the creation. They left bowls in the sun where the mixture dried. Hunger eventually led them to try the sun-baked result, which they found surprisingly delicious.
Upon returning to land, Genoese bakers refined the method using ovens. They called their creation “the gold of Pisa” to mock their defeated rivals. The dish quickly spread along the Tuscan coast.
Regional Variations and the Evolution of Cecina
While the legend credits Genoa, the preparation became deeply rooted in Tuscan cuisine. Each region developed its own name and slight variations for this beloved street food.
In early 20th-century Livorno, the “Cinque e Cinque” tradition emerged. Customers would order 5 Lire of bread and 5 Lire of torta di ceci. This satisfying combination remains popular today, often enjoyed with local Spuma soda.
| Region | Local Name | Characteristics | Modern Context |
|---|---|---|---|
| Pisa & Versilia | Cecìna | Thin, golden-brown | Classic street food stalls |
| Livorno | Torta di Ceci | Slightly thicker | Often served in “Cinque e Cinque” sandwiches |
| Carrara | Calda Calda | Hot-served tradition | Market vendors and pizzerias |
| Liguria | Farinata | Similar preparation | Bakeries and casual eateries |
International versions demonstrate how Italian immigrants carried these recipes worldwide. Gibraltar’s calentita, Nice’s socca, and Argentina’s fainà all share common roots with the original preparation.
Understanding this humble beginning helps explain why the recipe remains simple today. It’s traditionally associated with markets and street vendors rather than formal dining.
Essential Ingredients and Their Authentic Role
Authentic results begin with understanding each ingredient’s specific contribution. The four components work in harmony to create the distinctive texture and flavor profile.
Selecting the Perfect Chickpea Flour and Olive Oil
Start with high-quality chickpea flour, sometimes labeled as besan or gram flour. Look for a fine texture and fresh, nutty aroma. Avoid any flour that smells bitter or rancid.
For those with dietary needs, verify the flour is processed in a gluten-free facility. The right chickpea flour creates the foundation of the entire dish.
Extra virgin olive oil serves multiple purposes beyond flavor. It contributes to the golden color and helps achieve crispy edges. Choose a good quality extra virgin variety for the best results.
Balancing Simplicity with Flavor
Water hydrates the flour completely, creating a thin, pourable batter. The ratio of roughly one part flour to three parts water is crucial. This balance creates the characteristic texture contrast.
Salt seasons the preparation properly without overwhelming the delicate flavors. Additional seasoning comes later, so the base remains restrained.
These core ingredients are non-negotiable for traditional preparation. Some regional variations might add herbs as finishing touches rather than mixing them into the batter.
A Step-by-Step Approach to Crafting “cecina tuscan chickpea flatbread”
Proper batter preparation sets the stage for the distinctive texture that defines this dish. We’ll focus on the techniques that ensure success from the very beginning.
Mixing the Batter for a Smooth Consistency
Place your chickpea flour in a large bowl. Begin adding cold water gradually while whisking constantly. Start by pouring small amounts into the center to create a thick paste.
This initial thick mixture is easier to work smooth before thinning to the final consistency. Use a whisk rather than a spoon for better incorporation. Press any stubborn lumps against the bowl’s side to break them down completely.
A lump-free batter matters because unmixed flour pockets create dense, gritty spots. The final mixture should be quite thin, similar to crepe batter rather than pancake batter.
| Mixing Technique | Key Characteristic | Result |
|---|---|---|
| Center-pour method | Adds water gradually to flour center | Prevents lump formation effectively |
| Constant whisking | Maintains smooth incorporation | Ensures even texture throughout |
| Thick paste first | Creates manageable base consistency | Easier to achieve smooth final batter |
Key Techniques for Removing Foam and Ensuring Creaminess
The batter needs to rest at least 2 hours, preferably 5 hours or overnight. Cover the bowl with a kitchen towel during this time. As the mixture rests, foam naturally rises to the surface.
Skim this foam off with a spoon before adding oil and salt. This step reduces any bitter edge and improves the final texture. Stir occasionally during resting to prevent flour from settling.
Add oil and salt only after the resting period. This gives the flour maximum time to hydrate fully in plain water. The longer the batter rests, the creamier your final result will be.
Mastering Resting, Baking, and Finishing Touches
Patience in preparation yields the signature texture that defines this classic dish. The final steps transform your rested batter into something with crisp edges and a creamy center.
Importance of Resting the Batter for Ultimate Texture
Let the batter rest at room temperature for at least two hours. Five hours or overnight is even better. This time allows the flour to fully hydrate.
The longer rest period develops a nutty, mellow flavor. It also creates that custardy interior texture everyone loves. Plan your schedule around this waiting time.
Mix the batter in the morning for evening dinner. Or prepare it the night before for lunch the next day. The active work is minimal despite the longer waiting period.
Choosing the Right Pan and Oven Tips for a Crispy Edge
Preheat your oven to 450°F (230°C). This high temperature requires about 20-30 minutes of preheating time. An oven thermometer helps ensure accuracy.
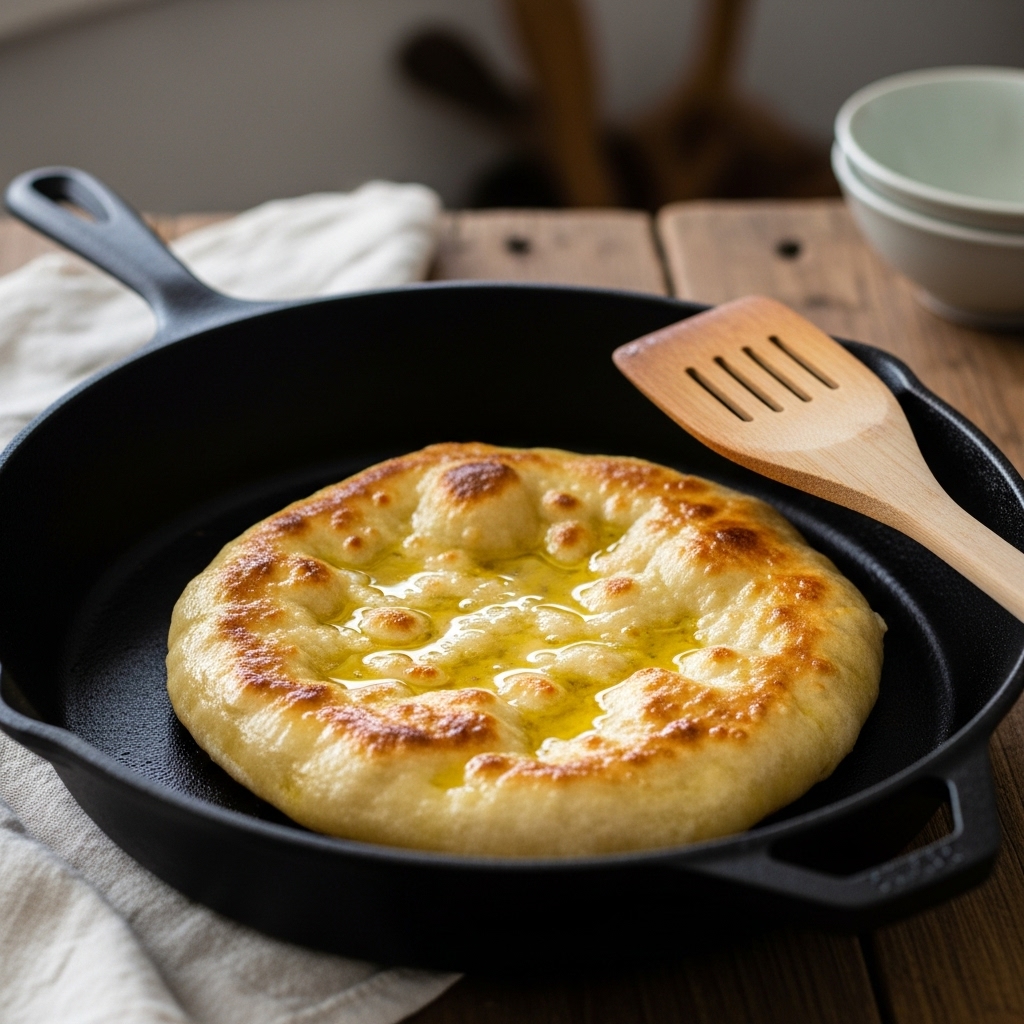
Select a heavy pan or baking tray that won’t warp. Cast iron or thick metal baking sheets work perfectly. They distribute heat evenly for consistent results.
If using cast iron, preheat the pan in the oven. This creates immediate contact heat for extra crispiness. Carefully remove the hot pan with pot holders.
Generously coat the pan with olive oil. Pour the batter slowly over the back of a spoon. This technique prevents breaking the oil layer underneath.
The batter should be about 1/8 to 1/4 inch thick. Thinner preparations create more crispy surface area. Bake for 10-20 minutes depending on your pan type.
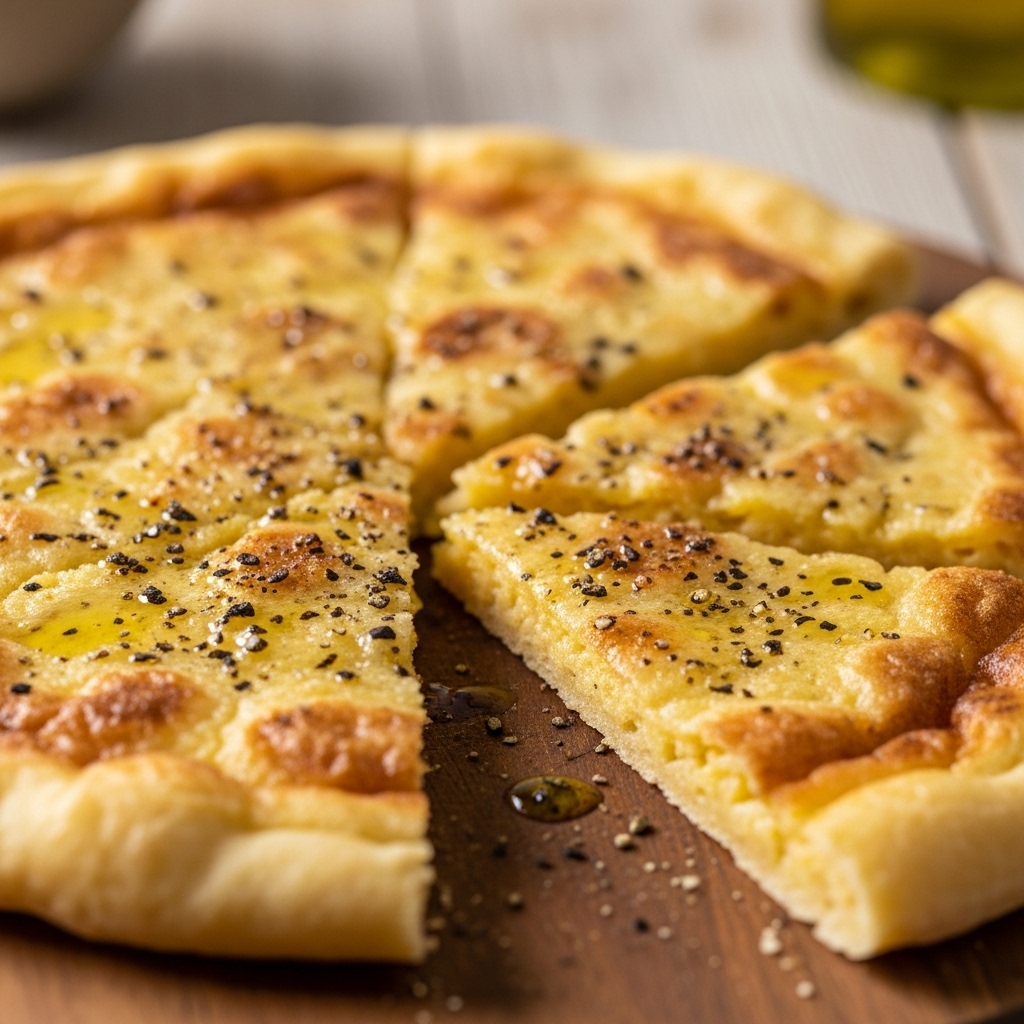
Watch for golden brown edges with some blistering. The center should remain slightly soft. The wonderful aroma signals it’s nearly done.
Make sure to grease your pan well. The batter can stick tenaciously to surfaces. This attention to detail pays off with perfect release.
For another classic preparation using similar ingredients, explore our recipe for Sicilian chickpea fritters.
Pro Tips and Creative Twists for Enhanced Flavor
Once you’ve mastered the basic technique, exploring creative variations can add new dimensions to this traditional favorite. These enhancements respect the original while offering personal touches.
| Variation Type | Preparation Method | Flavor Impact | Best Use |
|---|---|---|---|
| Classic Finish | Drizzle oil and pepper after baking | Enhances natural flavors | Traditional serving |
| Rosemary Addition | Sprinkle on top before baking | Aromatic complexity | Herb-infused version |
| Vegetable Mix-in | Fold cooked vegetables into batter | Heartier texture | Main dish preparation |
| Cheese Variation | Add soft cheese to batter | Rich creaminess | Non-traditional twist |
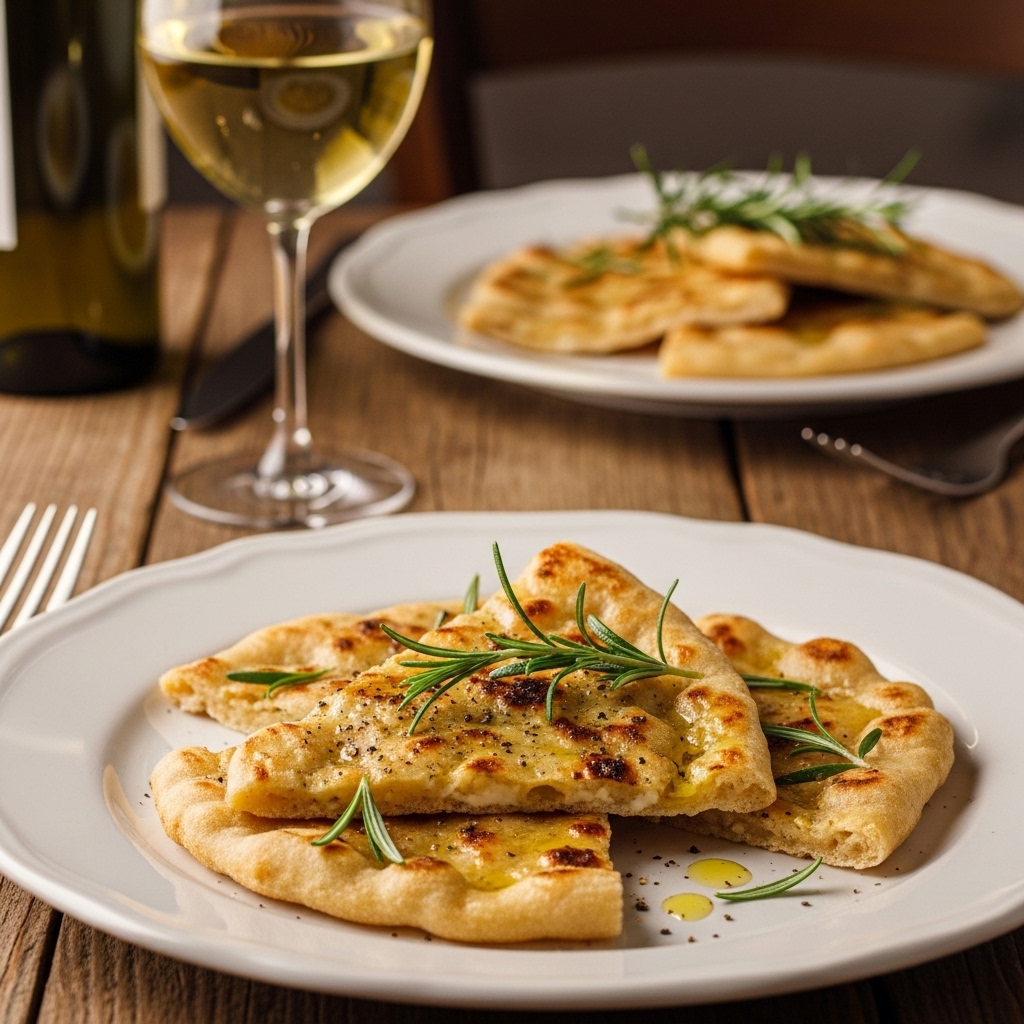
The authentic finish involves a generous drizzle of olive oil and fresh black pepper on top while the dish is still hot. This simple enhancement shouldn’t be skipped.
Innovative Add-ins: Rosemary, Vegetables, and More
For aromatic depth, try a light sprinkle of dried rosemary on the batter surface before baking. This popular variation adds complexity without masking the delicate chickpea flavor.
Vegetable additions create a more substantial version. Use finely chopped cooked vegetables like zucchini, carrots, or onions. Sauté onions first until soft.
Add carrots with a bit of water to steam-cook them. Include zucchini last so everything becomes tender but not mushy. Fold these into your rested batter before baking.
Some cooks experiment with cheese or other vegetables like eggplant. Remember to keep the thickness consistent even with additions. The crispy edges remain the best part.
The plain version showcases pure chickpea flavor best. Try it first to understand the traditional baseline. These additions are about personal preference, not improving perfection.
Serving Ideas and Pairings to Elevate Your Meal
The true pleasure of this preparation comes not just from baking it, but from sharing it at the table. Its versatility makes it perfect for everything from a quick snack to a featured appetizer.
We can explore both time-honored traditions and simple modern adaptations.
Traditionally Served as a Savory Street Snack
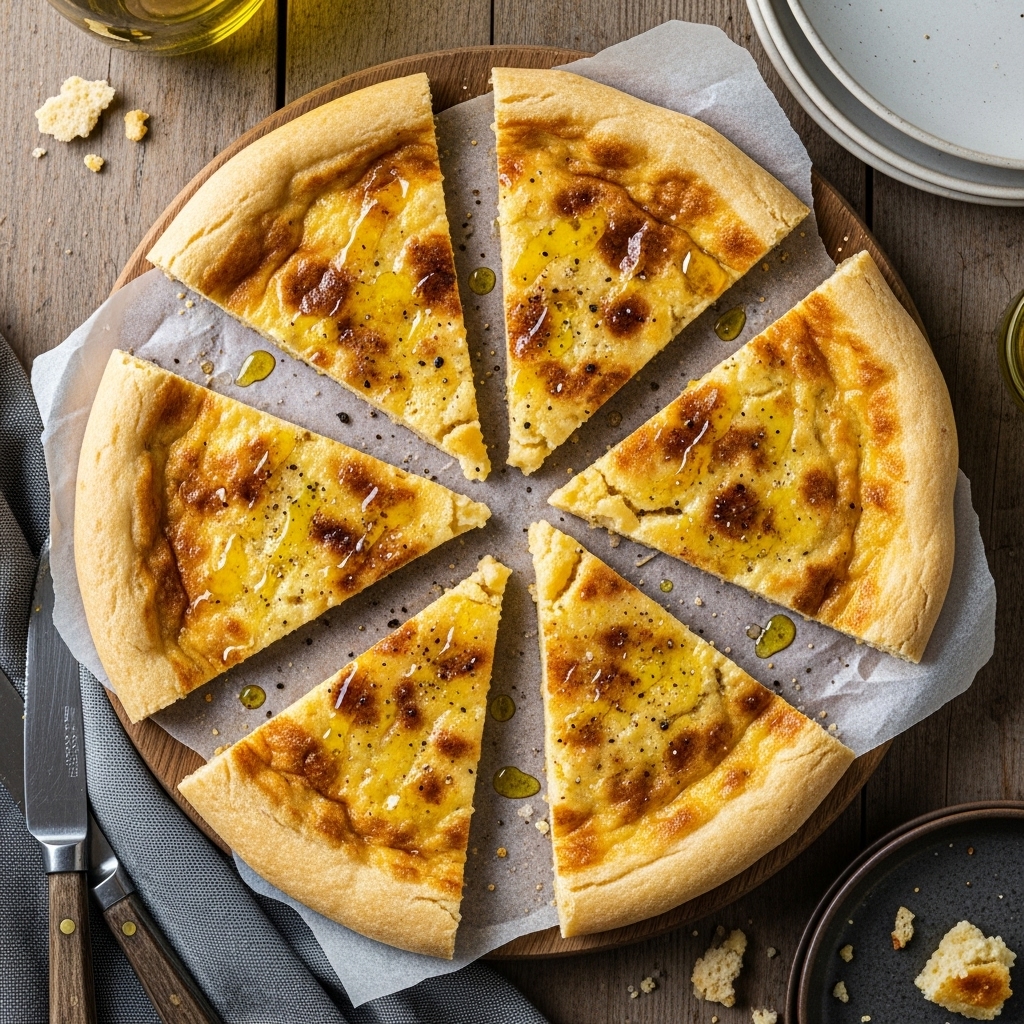
For the most authentic experience, cut the hot chickpea flatbread into large wedges right in the pan. Serve it immediately on a wooden board while the edges are wonderfully crisp.
In Livorno, the classic “Cinque e Cinque” sandwich is street food perfection. The warm, oily slices are tucked between two pieces of plain bread. This balances the rich flavors beautifully.
It also makes a wonderful aperitivo. Offer slices with a glass of crisp white wine or a cold beer. Guests can tear off pieces, enjoying the contrast of textures.
Creative Serving Suggestions: Sandwiches and Appetizers
This dish fits naturally into a pizza night. Serve it as a gluten-free antipasto before the main event. It provides a tasty and satisfying start to the meal.
Your recipe yields about six to eight appetizer servings. If it’s the main attraction, expect fewer servings as people will enjoy more.
Leftovers keep well. Store them in an airtight container in the refrigerator for up to four days. Reheat slices in a hot oven for a few minutes to restore crispness.
Cold leftovers are also versatile. Tuck them into sandwiches with fresh veggies or cube them over a salad for a unique crunch.
Embracing the Cecina Experience and Next Culinary Adventures
Making this traditional recipe connects you to generations of Italian home cooks who valued simplicity. You now understand the history and have the proper technique for authentic results.
Remember that mixing the batter takes just minutes. The resting time requires planning, but the hands-on work is minimal. This approachable recipe rewards patience over complex skill.
Make sure your batter rests adequately at room temperature. Remove the foam before adding oil and salt. Pour into a well-oiled pan and maintain the proper thickness for that golden brown, crispy edge.
If your first attempt needs adjustment, the batter keeps well. Make multiple batches while your oven stays hot. Each try brings you closer to perfection.
When visiting Tuscany, seek out this specialty at casual pizzerias like Torteria da Gagarin. Taste it fresh from the oven to understand the ideal texture.
This chickpea flatbread represents Italian cooking’s resourceful spirit. Simple ingredients, careful technique, and respect for tradition create something special. Halve the recipe for two servings or enjoy leftovers reheated.
Let this be your entry point to exploring Italy’s regional specialties. Each shares the philosophy that quality ingredients need little embellishment to shine.
Cecina (Tuscan Chickpea Flatbread)
Ingredients
Method
- In a large bowl, gradually add the cold water to the chickpea flour while whisking constantly.
- Continue adding water slowly, whisking to form a smooth, lump-free batter. It should be thin, like crepe batter.
- Cover the bowl with a kitchen towel and let the batter rest for at least 2 hours, or ideally overnight. Stir occasionally during the resting period to prevent flour from settling.
- Preheat your oven to 450°F (230°C).
- Coat a heavy baking pan (cast iron or metal tray) generously with olive oil.
- If using cast iron, preheat the pan in the oven for extra crispiness.
- After resting, skim off any foam that has risen to the top of the batter.
- Stir in the olive oil and salt.
- Pour the batter into the preheated pan, spreading it evenly.
- Bake for 10-20 minutes, depending on the thickness and the type of pan. The edges should be golden brown and crispy, while the center remains slightly soft.
- Let the cecina cool slightly before slicing. For the most authentic experience, serve immediately with a drizzle of olive oil and a sprinkle of fresh black pepper.
Notes
- Cecina is best served hot, right out of the oven. Leftovers can be stored in an airtight container for up to 4 days and reheated in the oven to restore its crispy edges.
- This dish is naturally gluten-free and a great source of plant-based protein.
- You can try variations by adding herbs like rosemary or mixing in sautéed vegetables for added flavor.