
Jump to Recipe
I invite you into my kitchen to make Sicily panelle chickpea fritters the way Palermo taught me: simple ingredients, steady hands, and a result that smells of warm oil and lemon. This recipe uses just chickpea flour, water, and salt, cooked until thick, chilled, then sliced and fried to a golden puff.
I’ll show how to read the batter—from ribbon stage to the mashed-potato thickness that cuts clean—and how to spread and chill it so pieces crisp without soaking up oil. I share frying temps, crowding tips, and the small finish of flaky sea salt and bright lemon that turns a street snack into a memorable bite.
Along the way I recommend common U.S. sources for gram or besan, the tools I trust, and tiny timing tricks that make your first pan feel like a practiced hand’s. Let’s cook with care and enjoy something honest, regional, and unmistakably good.
Key Takeaways
- Use chickpea flour, water, and salt for a silky base.
- Cook until thick, chill, then cut thin for clean frying.
- Fry in about 345–375°F in 1/2 inch oil; don’t crowd the pan.
- Finish with lemon and flaky sea salt for balance.
- Common U.S. brands and markets carry gram/besan for ease.
Why panelle wins on flavor and texture, straight from Palermo’s street food scene
I learned in Palermo that technique, not fuss, makes a basic batter sing with flavor and bite. These bites began as cucina povera — simple, filling food sold at market stalls — and they grew into a daily ritual you can taste in every snack bar.
A brief heritage: from peasant staple to iconic street sandwich
In town they sell them hot as antipasti or inside sesame rolls. The sandwich is portable, salty, bright with lemon, and pure market comfort. That history matters: the recipe comes from necessity, turned into something beloved.
How they compare to farinata and why frying changes everything
The batter is polenta-like: quick-cooked flour and water chilled, then sliced. Unlike baked farinata, frying gives chip-like edges and a creamy middle. That contrast in texture makes a squeeze of lemon wake up the nutty notes.
- Simple method, big payoff: thin spread, chill, shallow fry.
- Crunch outside, tender inside — that’s the technique speaking.
- Works as an antipasto or tucked into a sesame bun for a true street bite.
| Feature | Fried version | Baked version |
|---|---|---|
| Exterior | Crisp, chip-like edges | Uniform, softer crust |
| Interior | Creamy, tender | Denser, sliceable |
| Service | Antipasto or bun sandwich | Slice on a plate or board |
For practical tips and a tested approach to the batter and frying times, see classic recipe notes at this guide.
Gather your ingredients and tools for chickpea fritters that actually crisp
Start with well-chosen ingredients and a few reliable tools so your batter sets smooth and your pieces crisp. I keep the pantry simple: chickpea flour, water, salt, oil, lemon, and parsley.
Core ingredients
Use finely ground chickpea flour (also labeled garbanzo, gram, or besan) for a silky batter that slices clean. Measure roughly 2:1 water to flour or about 3 cups liquid for 1 cup flour if you prefer a looser mix. Finish with fresh lemon and a handful of parsley.
Smart equipment
- Stainless steel pot and metal whisk to prevent lumps.
- Rimmed baking sheet lined with paper parchment for spreading and chilling.
- Flexible spatula, thin sharp knife, thermometer, slotted spoon, and wire rack.
- A heavy pan for shallow frying; aim for 345–375°F to puff, not soak.
Pro sourcing tips (U.S.)
Bob’s Red Mill is reliable in mainstream stores. Whole Foods, Indian and Middle Eastern markets, Amazon, and Thrive Market also carry good options. Labels—chickpea, garbanzo, gram, besan—mean the same flour you want.
| Item | Purpose | Alternative | Where to buy |
|---|---|---|---|
| Chickpea flour | Body and nutty depth | Fine besan/garbanzo | Whole Foods, Amazon, Indian markets |
| Stainless pot & whisk | Lump-free cooking | Heavy saucepan + sturdy whisk | Kitchen stores, online |
| Baking sheet + parchment | Even spreading and clean lift | Oiled rimmed pan | Supermarkets, Amazon |
| Thermometer & wire rack | Correct oil temp and draining | Instant-read thermometer, paper towels | Hardware or grocery stores |
Sicily panelle chickpea fritters: step-by-step method with chef cues
Let’s walk through the method step by step so every batch turns out crisp at the edges and tender inside. I’ll keep cues you can see and feel—ribbons, pull-away, and that mashed-potato thickness—so you know when to move on.
Off-heat whisking and ideal ratio
Off the heat, whisk 1 cup flour into room-temp water until perfectly smooth. Starting cold prevents lumps and gives a silky start for this panelle recipe.
Cook to ribbon, then to mashed-potato texture
Return to medium heat and whisk constantly until the batter falls in thick ribbons from the whisk. Switch to a spatula as it tightens and stir until it looks like creamy mashed potatoes and pulls away from the pan, about 7–10 minutes total.
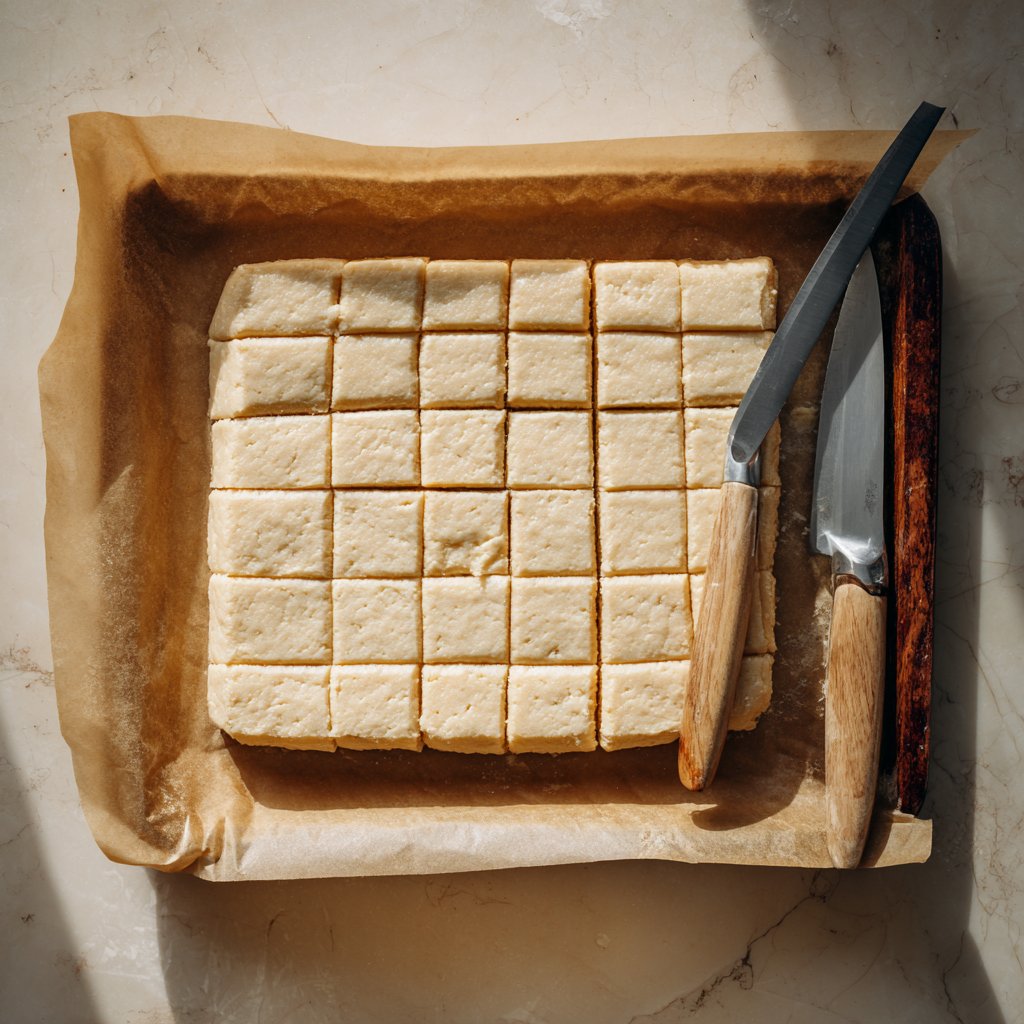
Spread, chill, and slice for even frying
- Spread hot batter on a greased baking sheet to 1/8–1/4 inch thickness with a lightly oiled spatula.
- Chill 30–60 minutes until firm; slice with a thin knife into uniform pieces.
- Consistent size equals consistent cook time and a golden finish in the pan.
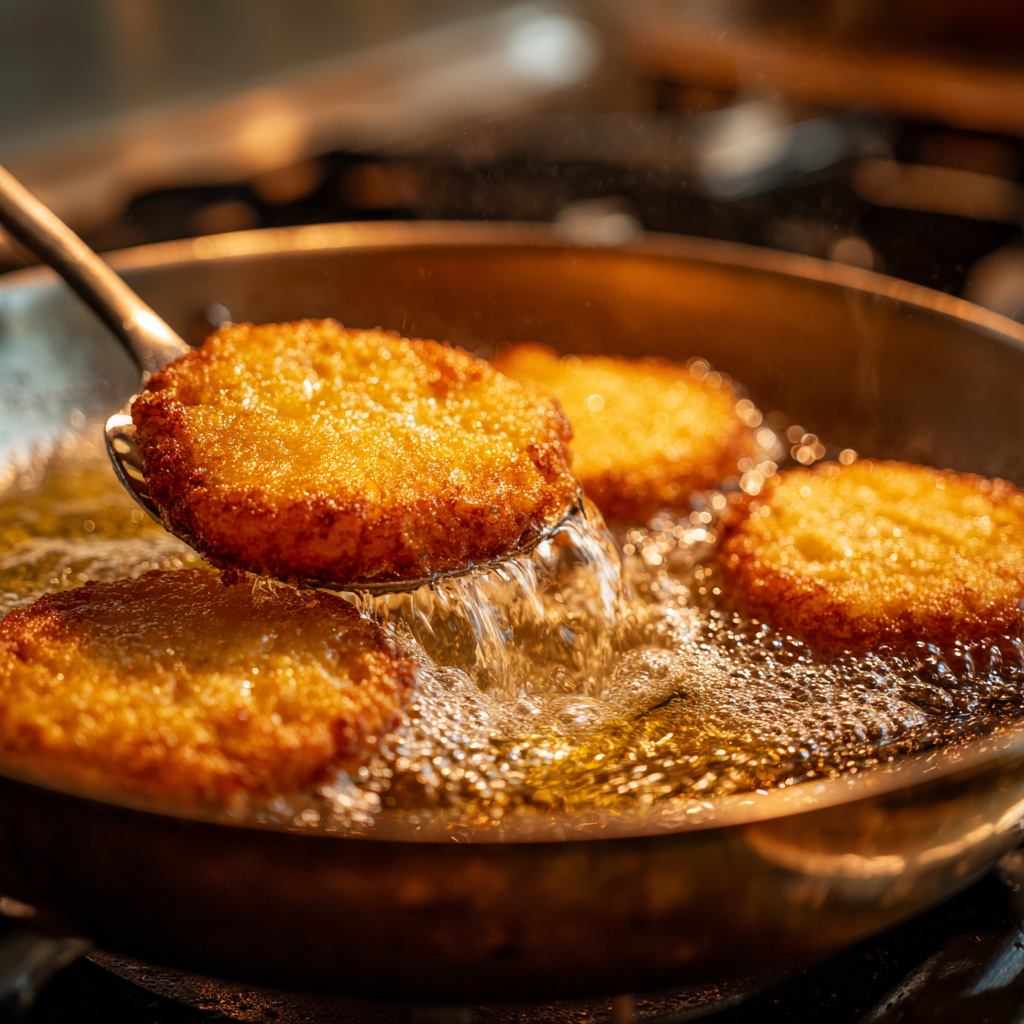
Frying panelle like a pro: oil temperature, timing, and that golden brown finish
Heat and timing decide whether these little rounds come out crisp and light or flat and greasy. I use a wide pan with about 1/2 inch of oil and a thermometer to hit the sweet spot: 345–375°F. This removes guesswork and keeps texture consistent.
Heat guidance and pan setup
Preheat the oil until it reaches the target. Use a mix of neutral and a splash of olive oil for flavor while maintaining a safe smoke point.
Flip, puff, and drain
Slide a few pieces into the hot oil at a time; don’t crowd the pan. Fry 2–3 minutes per side until golden brown and slightly puffed. Flip once with a spatula to protect the tender interior.
- Keep heat at medium between batches so the oil rebounds quickly.
- Drain on a rack over a tray or paper towels so air circulates and prevents sogginess.
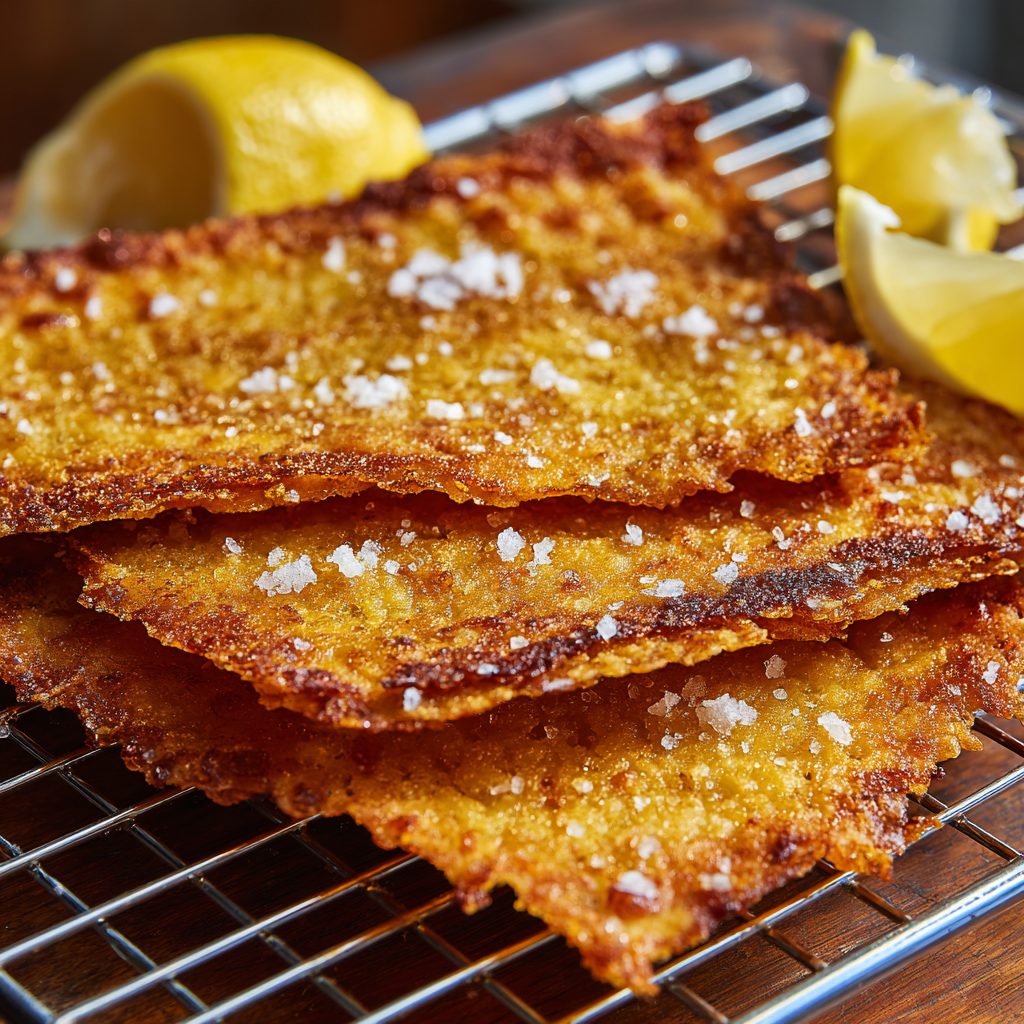
- Season immediately with sea salt; serve right away for the best snap and creamy center.
- If batch-frying, hold finished pieces in a 200°F oven while you finish the rest.
| Parameter | Recommendation | Why it matters |
|---|---|---|
| Oil depth | About 1/2 inch | Shallow fry gives crisp edges and a tender middle without full submersion. |
| Temperature | 345–375°F | Steady heat produces puffing and prevents oil absorption. |
| Cooking time | 2–3 minutes per side | Short, controlled frying keeps interiors creamy and exteriors golden brown. |
| Handling | Flip once with a spatula; don’t press | Preserves steam and prevents greasy, dense pieces. |
Serve it right: lemon, sea salt, and simple sides that brighten every bite
Serve these warm, crisp rounds the moment they leave the pan to keep the exterior snappy and the interior tender. Heat is part of the experience, so plan to plate and pass lemon wedges immediately.
Classic finish is simple: a squeeze of lemon juice and a light sprinkle of flaky sea salt. The citrus lifts the nutty flour base and the salt sharpens each bite in just seconds.
Easy upgrades and quick sides
- Grate Pecorino Romano over hot pieces for a salty, melty lift.
- Spoon on basil or red pepper pesto to add herbal color and kick.
- Offer a spoonful of eggplant caponata for a sweet‑sour contrast.
- Whisk Greek yogurt with lemon, parsley, salt, and pepper for a cooling dip.
- Keep simple sides: a fennel‑orange salad or marinated olives play well next to warm food.
A light dusting of parsley finishes the plate with color and freshness. If you’re entertaining, fry in small waves so every guest gets a hot serving right away.
This is honest food meant to be shared and eaten with your hands—just pass extra lemon at the table and enjoy the blend of crisp, golden brown edges and a tender center.
Pane e panelle: build the beloved Sicilian sandwich
A great sandwich starts with sturdy rolls that cradle the warm filling and keep each bite intact. Choose sesame or semolina bread with a firm crumb so the warm pieces don’t collapse the roll.
The right bread
Look for rolls with structure and a slightly chewy crust. Toast or warm them for a minute so the crust becomes supple and the crumb can hug the filling without compressing.
Assembly tips
Layer two to three golden pieces in the roll and leave a little space for steam to escape. Drizzle lemon juice over the hot rounds just before closing to brighten flavor without soaking the bread.
- Swipe a thin layer of ricotta under the filling for creaminess, or grate Pecorino for a salty contrast.
- If you want heat, add a light smear of pesto or chile crisp—use sparingly to preserve texture.
- Press gently and eat right away; the sandwich tastes best within minutes of assembly.
- Serve with a citrusy salad or marinated olives as a bright side to cut richness.
Flavor twists and variations without losing authenticity
A few simple swaps and a sprig of herbs let you make the dish your own while staying true to tradition. These tweaks keep the base honest and invite small experiments that reward you quickly.
Herbs and heat
Fold in chopped parsley, snipped chives, or fennel fronds for a bright, herbal lift. For a gentle kick, trade black pepper for a pinch of crushed red pepper; a little goes far in a delicate batter.
Liquid swaps
Swap up to one third of the water for unsalted vegetable or chicken stock to deepen savory notes without hiding the chickpea. Keep the 1:2 flour-to-liquid ratio so the set stays reliable.
Shapes, toppings, and oven notes
- Press sesame seeds onto the surface before chilling for a nutty crust.
- Cut rectangles for sandwiches, sticks for snacks, or triangles for antipasti.
- If you choose baking, brush tops lightly with oil for better color and crunch.
| Change | Effect | Use |
|---|---|---|
| Herbs (parsley, chives) | Fresh aroma | Mix before chilling |
| Stock swap | Richer savor | Replace up to 1/3 water |
| Sesame press | Nutty surface | Press before chilling |
These small accents highlight the sicilian chickpea character. Tweak with care, make notes, and you’ll have your favorite of these panelle recipes in no time.
Bake, air-fry, or make ahead: options when you’re not deep-frying
When frying isn’t possible, the oven and air fryer step in cleanly. Each method changes texture a bit, but you can still get a pleasing golden brown finish and good flavor if you follow a few clear steps.
Baked alternative
Brush the chilled slab with olive oil and set it on a greased baking sheet lined with parchment or directly on the pan. Roast in a hot oven or under the broiler at about 400°F until the top turns golden brown. A thin spatula helps lift delicate edges without tearing.
Air-fryer timing and texture
Lightly oil both sides, place pieces in a single layer, and cook at 375–425°F for about 10–12 minutes, flipping once. Expect a slightly drier crunch and less interior puff than frying, but a fast, tidy result with less oil and cleanup.
Storing, reheating, and make-ahead strategy
- Make ahead: pour and chill the batter up to 24 hours; slice when ready to cook.
- Reheat: refresh cooked pieces in a 375°F oven or hot pan until crisp—avoid the microwave, which softens the crust.
- Drain finished pieces on paper towels or a wire rack so steam won’t soften the underside.
- For parties, cook slightly ahead and re-crisp briefly in the oven just before serving.
| Method | Temp | Result |
|---|---|---|
| Bake | 400°F (oven/broiler) | Even color, gentle crisp, less puff |
| Air fry | 375–425°F (10–12 minutes) | Faster, drier crunch, minimal oil |
| Frying | 345–375°F | Gold standard: puffed edges, tender center |
For a tested sandwich assembly and serving tips after baking or air-frying, see the authentic panelle sandwich recipe.
From first sizzle to last bite: bring Sicily home tonight
A hot pan, steady hands, and a squeeze of lemon make a simple dinner feel like a celebration. I walked you through the batter—how it ribbons, pulls from the pot, then chills ready to slice and fry to golden brown.
Fry last‑minute in a little oil over medium heat, season with sea salt and lemon juice, and serve while pieces stay crisp. For holding, a low oven works well.
Build a sandwich with sturdy bread, tuck in a few panelle, add ricotta or Pecorino if you like, and pass parsley and extra lemon at the table.
If you’re short on time, make the batter ahead or use the oven or air fryer for a lighter finish. This recipe brings street flavor home—so warm the pan and cook tonight.

Sicilian Panelle (Chickpea Fritters)
Ingredients
Method
- In a pot off the heat, whisk chickpea flour into room-temperature water until completely smooth. No lumps.
- Add salt and keep whisking.
- Place pot over medium heat.
- Whisk nonstop until the mixture turns thick and falls in heavy ribbons.
- Switch to a spatula as it tightens.
- Cook until the batter looks like creamy mashed potatoes and pulls away from the sides of the pot (about 7–10 minutes total).
- Quickly spread the hot batter onto a greased or parchment-lined baking sheet. Aim for ⅛–¼ inch thickness.
- Smooth the top with an oiled spatula.
- Chill for 30–60 minutes until firm.
- Once set, slice the slab into uniform rectangles, squares, or triangles. Thin pieces crisp better and cook evenly.
- Heat about ½ inch oil in a wide pan to 345–375°F.
- Add a few pieces at a time—don’t crowd the pan.
- Fry for 2–3 minutes per side until golden brown and slightly puffed.
- Flip once.
- Drain on a wire rack or paper towels.
- Sprinkle flaky salt and squeeze lemon juice right away.
- Serve hot as a snack, appetizer, or inside a sesame roll with lemon and optional ricotta or Pecorino.
Notes
- Whisking the flour into cold water first is the secret to a smooth batter.
- Spread the batter thin—this is what gives panelle their crisp bite.
- The oil should stay hot. Too cool and the fritters get heavy and greasy.
- Serve immediately. Panelle taste best the moment they come out of the pan.
- For lighter versions, you can bake or air-fry, but frying gives the true Palermo texture.