
Jump to Recipe
I pull this pan from the oven with the same calm as a neighbor bringing over Sunday supper: the top is browned, sauce sighs at the edges, and steam carries a memory of home. I’ve made it a hundred times, so I know which small choices keep the pasta saucy and the cheese creamy without turning greasy.
Expect a straightforward path: loose tomato sauce so the bake stays juicy, a trio of cheese for pockets of cream, and a short rest so each scoop holds tall. I’ll show you when to season, when to layer, and how to finish hot for that bronzed top that people reach for first.
This dish walks the line between regional roots and an American pantry; you can swap meat or make it meatless, and still get the same comforting result. Timing, a few simple ingredients, and one honest pan are all you need to make baked goodness feel like a ritual.
Key Takeaways
- Keep the tomato sauce loose to avoid a dry bake.
- The three cheeses create creamy pockets without excess grease.
- Bake hot (around 400°F) until bubbly, then rest about 10 minutes.
- Choose pasta shapes that hold sauce for best texture.
- Decide meat or meatless before you start to streamline prep.
Why this baked ziti hits the Italian‑American comfort food sweet spot
I lift the tray and the kitchen fills with a warm, tomato-scented welcome. This dish borrows lasagna’s layered joy but trades the marathon assembly for a forgiving, scoopable pan that fits weeknight life.
Lasagna vibes, half the effort
Think of the same rhythm—pasta, sauce, cheese—but looser. Short pasta holds sauce in its hollows, so every forkful is saucy and satisfying.
Ricotta adds cream without grease, mozzarella gives stretch, and a sprinkle of parmesan cuts through with savory brightness.
A nod to Southern Italy with a distinctly American pantry
My version channels pasta al forno: from Neapolitan polpettine to Sicilian besciamella. I replicate those ideas with pantry staples—good canned tomatoes, fresh basil, and basic cheeses—so this dish feels rooted and reachable.
- Bright tomato sauce balances rich cheese for true comfort food harmony.
- Short pasta shapes hold sauce better than long noodles in a casserole.
- Season the sauce well so the whole dish needs less finish‑salt at the table.
| Feature | Lasagna | This dish |
|---|---|---|
| Effort | Higher—many layers | Lower—simple assembly |
| Texture | Structured sheets | Scoopable, saucy pockets |
| Pantry access | Specialty sheets | Common pasta and canned tomatoes |
Baked Ziti Italian American Recipe
Before I heat the oven, I make sure the pantry has the exact components that keep every bite saucy and balanced. This quick check saves time and keeps the dish from drying out while it bakes.
What you’ll need at a glance
- Short pasta: ziti, penne, or rigatoni (choose a shape that holds sauce).
- One 26–28 oz can of quality tomatoes (San Marzano preferred) plus olive oil, garlic, salt, and pepper.
- Whole‑milk ricotta, one egg, freshly grated Parmigiano‑Reggiano, and chopped parsley for the ricotta layer.
- Mozzarella cut into cubes (or shredded if you prefer) for molten pockets.
- Optional: sweet or hot Italian sausage, browned and cooled.
- Equipment: a large pot for pasta, a measuring cup to reserve a cup of pasta water, and a well‑oiled 9×13‑inch baking dish.
The big three cheeses: ricotta, mozzarella, Parmesan
I build a ricotta mix with whole‑milk ricotta, an egg for stability, grated Parmigiano‑Reggiano, and parsley. It makes a creamy, scoopable layer that won’t slide out when served.
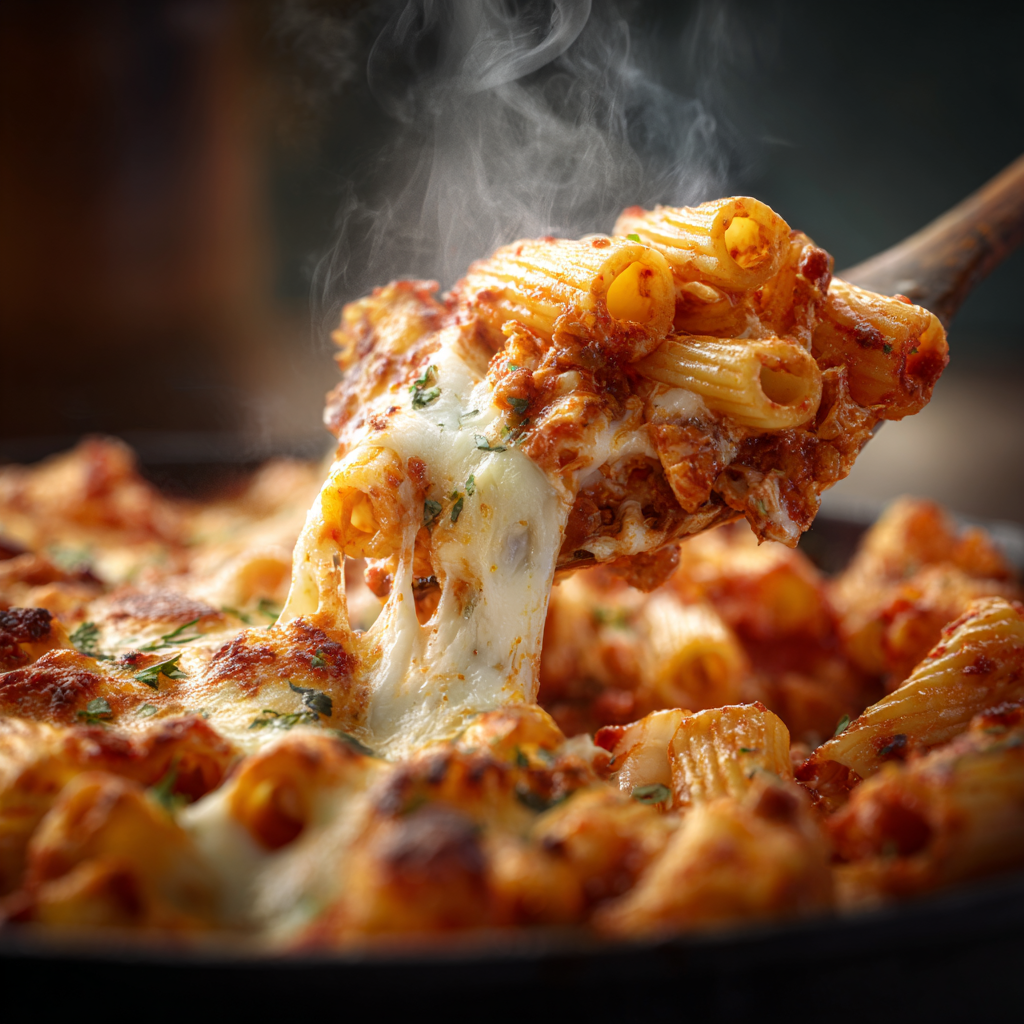
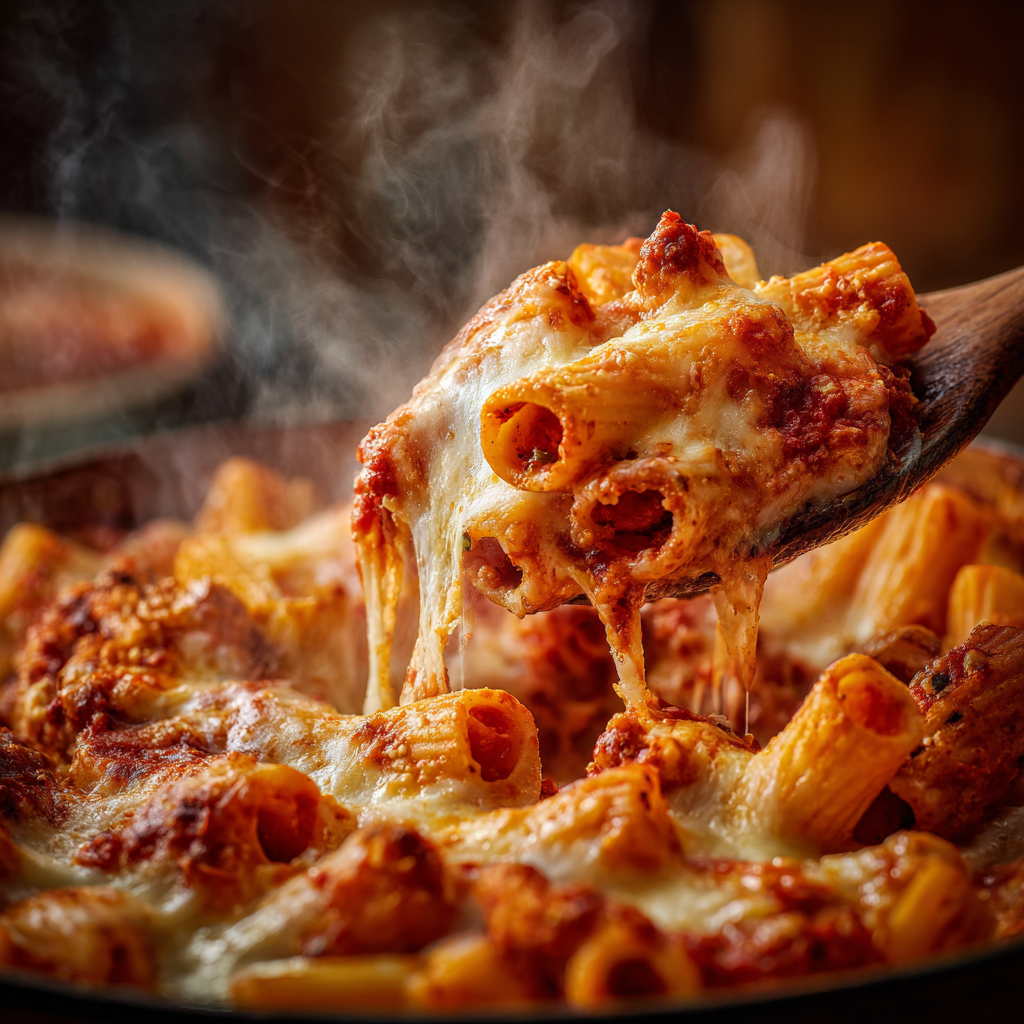
Mozzarella cubes melt into pockets of stretch; shredded works, but cubes give those little molten bites that everyone chases.
Ziti, penne, or rigatoni — which pasta shape works best
Choose a sturdy short pasta that traps sauce in its grooves or hollow. Rigatoni and penne both hold sauce well; ziti pasta has a smooth tube that also performs nicely in a casserole.
Cook pasta just shy of al dente in a large pot, drain, toss with a first pass of sauce, and reserve a cup of starchy water to adjust looseness before layering.
| Item | Why it matters | Sensible swap |
|---|---|---|
| Ricotta blend | Creates creamy pockets and structure with an egg and Parm | Whole‑milk cottage cheese, beaten smooth + egg |
| Mozzarella | Melts into gooey, stringy bites when cubed | Provolone or shredded mozzarella |
| Pasta shape | Hollows and ridges hold sauce for saucy bites | Penne, rigatoni, or any sturdy short pasta |
| Tomatoes & sauce | Quality canned tomatoes keep the dish bright and loose | Crushed tomatoes or a jarred marinara you trust |
Choose your sauce path: bright marinara or hearty meat ragù
On a cool evening I decide which sauce will carry the meal—bright and quick, or slow and meaty. Your choice changes timing and texture, so pick with purpose.
Tomato sauce that stays loose in the oven
For a bright marinara I heat plenty of olive oil, gently soften garlic, then add crushed tomatoes and a pinch of salt. Keep the heat low so the sauce barely simmers; it should remain loose because the oven will concentrate it.
Add a splash of water if it looks too thick. Taste and finish with torn basil so the tomato flavor stays vivid after baking.
Meat sauce option: ground beef and/or Italian sausage
For a ragù, sauté aromatics, brown ground beef and crumble in italian sausage, and deglaze the pan with a cup of dry white wine if you like. Stir in crushed tomatoes, basil, and pepper, then simmer slowly.
Simmer up to two hours for depth, adding water as needed to keep the sauce saucy—not paste thick. Beef gives roundness; sausage adds fennel and spice. Mix them to layer flavors.
Olive oil, basil, garlic, and a touch of pepper — balanced seasoning
Salt gradually and taste often. A whisper of sugar only helps if the tomatoes are sharp. Finish with basil and a drizzle of olive oil to lift and round the sauce.
- Make sauce on gentle heat so flavors develop without over‑reducing.
- Texture goal: sauce should slide off a spoon and coat pasta evenly.
- Deglaze with a cup of wine, or add a splash of water, to loosen fond and balance intensity.
| Style | Quick marinara | Meat ragù |
|---|---|---|
| Prep time | 15–30 minutes | 1–2 hours |
| Key trait | Loose, bright tomato | Rich, savory depth |
| Best when | Want fresh basil lift | Want hearty, meat-forward dish |
Step‑by‑step: from stovetop to bubbling baking dish
I start by preheating the oven to 400°F so the finish is hot and quick. While it reaches temperature I oil the baking dish with olive oil; this helps the edges caramelize and prevents sticking.
Prep the pan and cook the pasta
Bring a large pot of well‑salted water to a boil. Cook pasta one minute less than the package time so it finishes perfectly in the oven.
Make the ricotta cream
Whisk ricotta with an egg, grated Parmigiano‑Reggiano, chopped parsley, salt, and pepper until glossy. It should fall from the spoon in soft dollops that hold shape.
Layer for saucy, cheesy pockets
- Toss drained pasta with a cup or two of warm sauce so the first layer is protected from drying.
- Layer: pasta, more sauce, grated Parm, ricotta dollops, and mozzarella cubes; repeat for even pockets.
- If using ground meat or sausage, scatter browned crumbles thinly for balanced bites.
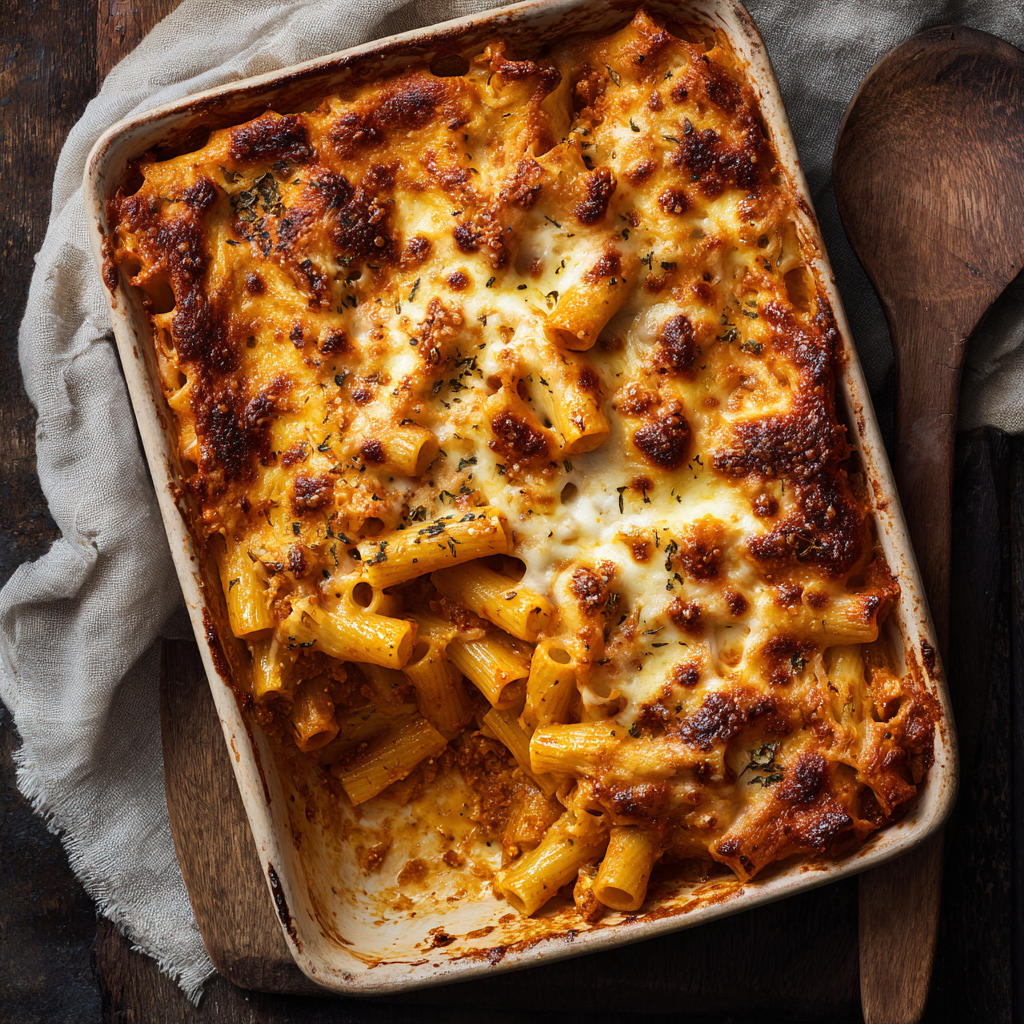
- Make sure the top has pasta, a slick of sauce, and cheese so it browns without drying.
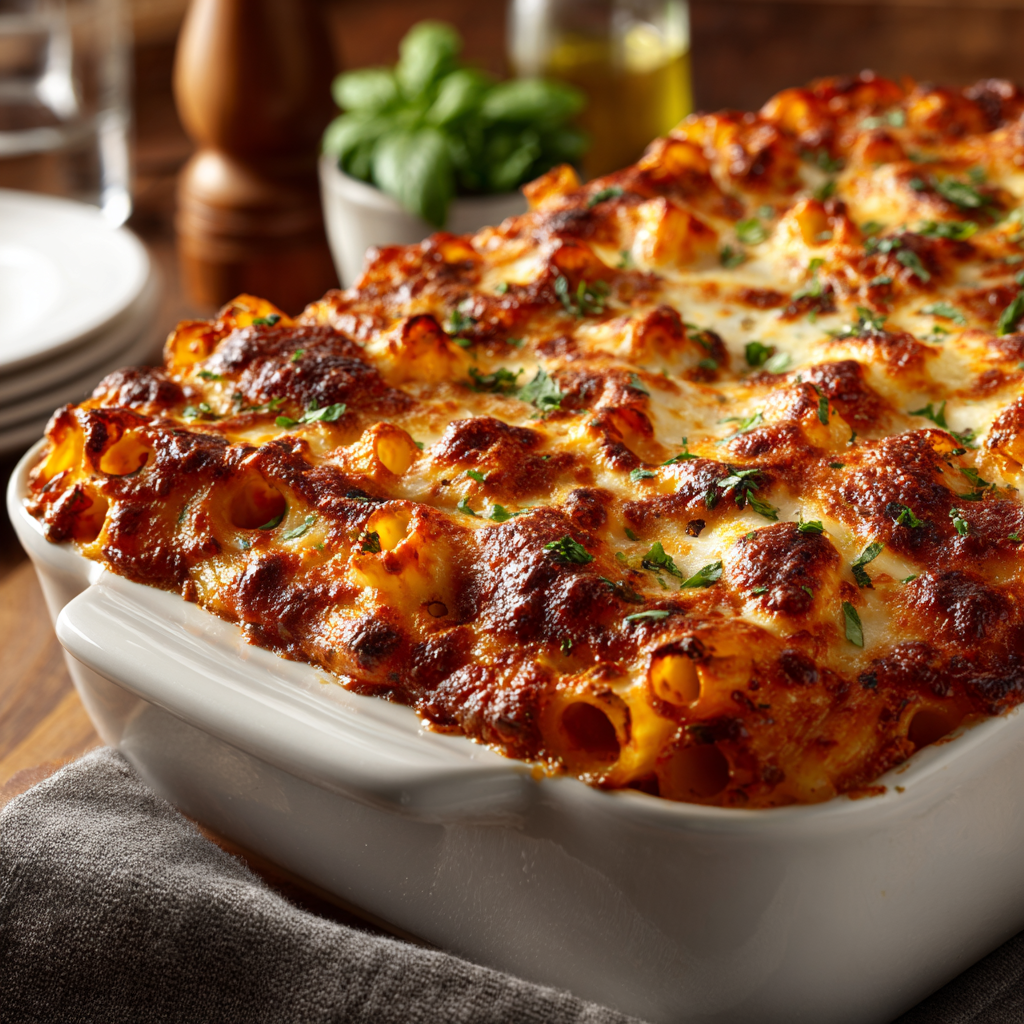
Cover loosely if your oven runs hot, then bake minutes toward the lower end and check; uncover to finish until the top is bubbling and lightly browned. Let the dish rest 10 minutes before serving so slices hold and the cheese settles.
| Bake Time | Visual Cue | Action |
|---|---|---|
| 20 minutes | Bubbly edges | Check, uncover if not browned |
| 25 minutes | Lightly browned top | Remove and rest 10 minutes |
| 30 minutes | Deep color | Lower heat next time to avoid drying |
Pro tips to avoid dry baked ziti and get a bronzed, bubbly top
I rely on sight and feel more than the clock. Start with a sauce that is quite loose because the oven will reduce it further and the pasta will continue to absorb moisture as it rests. Thirty minutes is a safe maximum for many pans; pull it while it’s still saucy and let carryover finish the cook.
Keep the sauce loose, and don’t overbake
Use more sauce than you think and keep it thin enough to slide off a spoon. That prevents the pasta from sucking up all the liquid while the top browns.
Foil on, foil off: when to cover and when to uncover
If your oven runs hot or the sauce is thicker, cover the dish with foil for the first stretch to trap steam and keep the interior tender. Remove the foil for the last 8–10 minutes so the top can caramelize into a bronzed, bubbly crust.
- Start checking at 20 minutes; bubbling edges are your cue.
- If the top looks tight out of the oven, tent with foil for 5 minutes to let steam soften the surface.
- For quick color without drying, broil briefly with the rack lowered—watch closely.
Reserve extra sauce for serving
Always keep a warm pot of sauce on hand. Spoon it over plates for instant insurance against dryness and to boost flavor at the table. Make sure to season the sauce fully before assembly so you don’t chase flavor by overcooking.
| Concern | Action | Timing cue |
|---|---|---|
| Dry pasta | Use extra loose sauce | Pull while still saucy |
| Thin top | Uncover for final minutes | 8–10 minutes uncovered |
| Over-browning | Tent with foil or brief broil | Check at 20 minutes |
Meaty, meatless, and sausage‑forward versions
Choose a style and I’ll show you how to make it sing—meat‑forward, light, or purely veg. Each version follows the same layering and sauce rules so every scoop stays balanced and saucy.
Ground beef vs. sausage: choose your backbone
For mellow richness use ground beef; it gives a steady, familiar base. Swap in crumbled sausage for fennel, spice, and a bolder flavor profile.
A 50/50 blend of ground and sausage often yields the best of both worlds. If your sausage is salty, reduce added salt in the sauce and taste as you go.
Vegetarian ideas that don’t skimp on umami
Sautéed mushrooms add savory depth; diced eggplant brings silky texture. Add extra basil at the end so the sauce stays bright and fresh.
Regional inspirations and luxurious options
Roll tiny polpettine and simmer them in the sauce for tender, juicy bites. For a richer approach, try a thin veil of besciamella between layers beneath the ricotta and mozzarella.
- Keep cheese measured so pasta and sauce lead the dish.
- Bake covered, then uncover to brown the top and finish bubbling.
- Choose your version to match the occasion—simple weeknight, hearty dinner, or celebratory meal.
| Version | Key swap | Best when |
|---|---|---|
| Meaty | Ground beef + sausage blend | Want depth and savory fat |
| Sausage‑forward | Sweet or hot sausage | Crave fennel and spice |
| Vegetarian | Mushrooms or eggplant, basil brightened | Want umami without meat |
Cheese talk: ricotta blends, mozzarella melt, and Parmesan punch
Cheese does the heavy lifting here: it defines texture, salt, and those golden notes on the top. I explain how each cheese behaves in heat so your pasta dish comes out creamy, not gummy.
Ricotta cream with egg and Parmigiano‑Reggiano
I whisk ricotta with one egg, grated Parmigiano‑Reggiano, minced parsley, salt, and pepper until glossy. The egg gives structure; the Parm adds savory lift.
Salt the ricotta lightly at first—parmesan already brings salinity. If the mix looks grainy, beat it briefly; the oven will relax it into a silky layer.
Fresh mozzarella cubes vs. shredded — melt and texture
Fresh mozzarella cubes melt into delightful pockets of creamy stretch. Shredded mozzarella distributes more evenly and creates consistent melt throughout.
- Use cubes when you want molten bites; use shreds for even coverage.
- Mix both for variety: pockets plus uniform stretch across the top.
- Finish with a cup‑measured sprinkle of freshly grated Parm for browning and savory punch.
| Cheese | Behavior in oven | When to use |
|---|---|---|
| Ricotta blend | Bakes into creamy, stable pockets | Layered dollops for silky interior |
| Mozzarella (fresh cubes) | Melts into gooey pockets, mild flavor | For stretchy, molten bites |
| Parmesan (grated) | Dries slightly, browns, adds umami | Sprinkle on top for color and bite |
Make‑ahead, refrigerate, and freeze without losing comfort‑food magic
I often prep the whole dish the day before so the oven finish is calm and confident. Planning saves you time, and it keeps the texture close to fresh when done right.
Same‑day baking yields peak texture — here’s why
Same day is best because the pasta keeps a saucy bite. As it sits, pasta absorbs more sauce and the center firms.
For peak texture, bake fully the day you assemble. That seals creamy pockets and gives the top its bronzed color.
Smart make‑ahead: underbake now, finish later
If you need to prep early, underbake about 15 minutes so the interior sets without drying. Cool, cover, and refrigerate.
When ready to serve, preheat oven to 350°F and finish for 15–20 minutes uncovered to color. Add a half cup of fresh sauce over the top to restore moisture.
Freezing tips: foil pans, tight wrapping, and reheating times
- Assemble in a sturdy foil pan and wrap tightly with plastic, then a layer of foil to prevent freezer burn.
- Thaw overnight in the fridge, preheat oven, and bake minutes at 350–375°F until hot and bubbly in the center; uncover to brown the top.
- Store leftovers up to 4 days refrigerated; reheat covered at 350°F for 30–40 minutes.
- If the pasta looks thirsty, drizzle a splash of water around the edges before covering to create steam.
| Action | Timing | Why it matters |
|---|---|---|
| Underbake | About 15 minutes | Prevents drying during finish |
| Finish from fridge | 15–20 minutes | Restores color and heat evenly |
| Reheat leftovers | 30–40 minutes | Heats through without overbaking |
Make sure to label pans with date and contents so you can track time in the freezer. Keep a small pot of extra sauce warm on the stove; spooning a little over each plate brings that first‑day juiciness back and makes your ready bake feel freshly served.
Substitutions, swaps, and dietary tweaks
When guests need a swap for the classic crowd-pleaser, I reach for simple, tested substitutions that keep texture and flavor intact. These choices let you adapt the dish for allergies, preferences, or what’s in the pantry without losing its comforting core.
Gluten‑free short pasta that holds up al forno
Pick sturdy short shapes labeled for baking. Look for rice‑ or corn‑based penne rigate, rigatoni, or mostaccioli with good structure.
Cook them very al dente so they stay firm in the oven. Firmness prevents a mushy center after the bake and rest.
Dairy alternatives for ricotta, mozzarella, and Parmesan
Plant‑based ricotta cheese works well when it’s creamy and slightly salted. Use a meltable vegan mozzarella for pockets and a vegan parmesan for finish.
Taste as you go; alt cheeses vary in salt, so season sauce and the ricotta layer with modest salt and pepper.
Pasta water, wine choices, and herb variations
Reserve a cup of starchy pasta water to loosen a thick sauce — it helps sauce cling without thinning it too much.
Deglaze with white wine for brightness, or swap in vegetable broth if you avoid alcohol. Fold chopped basil into the ricotta layer or scatter it on top after baking for a fresh lift.
- Swap ziti with rigatoni, penne, or mostaccioli for similar sauce capture.
- Use ground turkey or chicken to lighten the meat; brown well and season boldly.
- For vegetarian depth, sauté mushrooms or eggplant until golden before adding to the sauce.
| Need | Smart swap | Why it works | Tip |
|---|---|---|---|
| Gluten‑free | Rice/corn penne or rigatoni | Sturdy tubes hold sauce and resist overcooking | Cook firmer than usual, test early |
| Dairy‑free | Plant‑based ricotta, vegan mozzarella, vegan parmesan | Mimics cream, melt, and savory finish | Adjust salt and use a touch of olive oil for richness |
| Lighter meat | Ground turkey or chicken | Lower fat but good texture if well‑browned | Season generously and add a splash of wine or broth |
| No meat | Sautéed mushrooms or diced eggplant | Provide umami and soak up tomatoes and olive oil | Salt early to draw out moisture and caramelize |
Bring it to the table: serving ideas, timing, and leftovers
Let the pan sit a few quiet minutes so the molten cheese and sauce settle into neat, spoonable slices. I usually rest it 10–15 minutes; that time keeps each portion tidy and lets the flavors calm.
Bring the baking dish to the table family‑style with a warm ladle of extra sauce and a small bowl of grated cheese. Keep sides simple: a lemony green salad and crusty bread finish the meal without stealing the spotlight.
If you added beef or sausage, scatter chopped parsley or torn basil and a fresh grind of pepper before serving. Taste again at the table — chilling can mute salt and spice.
Store leftovers up to 4 days refrigerated. Reheat covered with foil at 350°F for 30–40 minutes until piping hot, adding a spoon of sauce if the pasta looks tight. Freeze portions up to 3 months; thaw overnight and heat until hot and bubbly for a quick ready bake on a busy night.
For more handheld inspiration, try this Stromboli inspiration to pair with slices and bread: Stromboli inspiration. Serve with a smile—this dish is comfort food that brings people together.
Baked Ziti Italian American Style
Ingredients
Method
- First layer: sauced pasta
- Add sauce, ricotta dollops, mozzarella, and a light sprinkle of Parmesan
- Add meat if using
- Repeat layers
Notes
Cubed mozzarella gives creamy pockets. Shredded spreads more evenly.
Pull the dish while still saucy. Rest finishes the cook.
Hold extra warm sauce for serving. It fixes dryness at the table.