
Jump to Recipe
My nutella stuffed cookies italian line is what I bring to family gatherings — warm, fragrant, and molten at the center so every bite feels like a hug from Nonna.
I share this recipe the way we make it at home: practical steps, pantry-friendly ingredients, and clear cues so you can bake with confidence. Freeze small portions of filling, use barely melted butter, and watch for the surface to lose its shine and for a faint lightening around the bottom third at 350°F — that’s how I judge doneness.
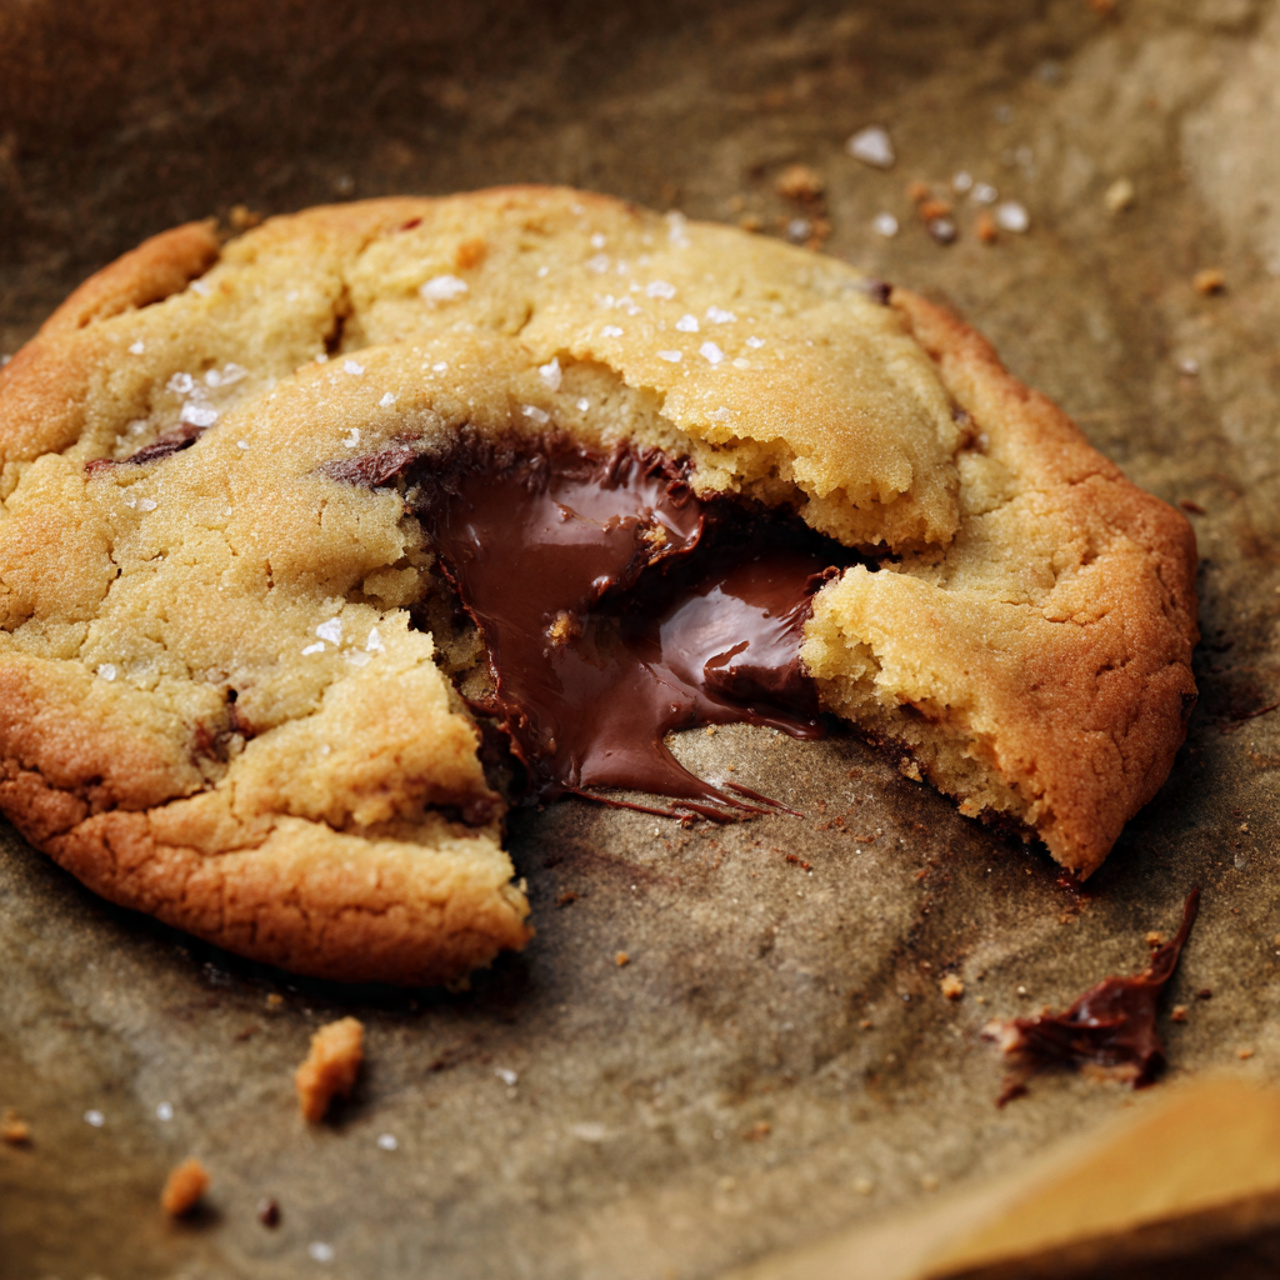
The flavor is simple and honest: toasted hazelnut notes from the filling, a buttery dough with balanced sugar, and a scatter of flaky sea salt to brighten each bite. Cool the tray for ten minutes, then move to a rack and plan to serve at the fifteen-minute peak for the perfect texture trio — tender crumb, crisp edge, and molten heart. A few quick tips make this forgiving recipe repeatable and reassuring.
Key Takeaways
- Freeze the filling so it stays molten without leaking.
- Bake at 350°F and watch for loss of surface shine to tell doneness.
- Use barely melted butter and a teaspoon of honey or corn syrup for moisture and browning.
- Finish with flaky sea salt to balance sweetness.
- Cool on the tray 10 minutes, then transfer to a rack; peak eating at ~15 minutes.
- Recipe is forgiving — double the batch if you like to share.
A little Italian heart in every bite
I keep a small ritual for each batch: freeze the filling, seal the dough like a dumpling, and watch the tray as the edges whisper golden. These hands-on steps give the cookie its home-style character and make the result forgiving at bake time.
What makes these cookies “Italian” at home
For us, it’s less about labels and more about method. We work by feel, let the dough rest so the gluten relaxes, and trust visual cues over timers. A light sprinkle of flaky salt before baking lifts the sugar and chocolate notes and keeps sweetness lively rather than heavy.
The texture promise: molten center, tender crumb, crisp edge
The aim is three textures in one bite: a molten heart, a delicate tender crumb, and a rim that gives a quiet crunch. Freeze portions of filling so they stay fluid inside, and seal fully to prevent leaks.
Look for edges just golden while the center looks set but soft. Serve warm for the melty center; room temperature firms the spread, and a brief reheat brings it back.
- Family touch: fold, pinch, and trust your hands.
- Visual cues over strict minutes—edges, center, and surface shine.
- Good butter and a hint of brown sugar help the crumb stay tender.
| Cue | How it looks | What to do |
|---|---|---|
| Edges | Light golden rim | Remove from oven, cool on tray 10 minutes |
| Center | Set but soft, slight jiggle | Serve warm or reheat briefly to liquefy |
| Surface | Loss of shine, tiny cracks | Trust this as your doneness signal |
Ingredients that matter, and why they work
Good baking starts with clear choices: the right flour, fat, and sweetener. Below I explain each ingredient’s role so your dough behaves predictably and the flavor sings.
All-purpose flour, butter, sugar, egg
All-purpose flour gives the framework that holds the filling and sets the crumb. Use a US cup measure, spooned and leveled for consistency.
Unsalted butter supplies fat and flavor. Use barely melted butter—milky but not fully liquid—to boost buttery taste and keep the dough tender.
I favor brown sugar for moisture and caramel notes, with a touch of granulated sugar if you like more spread and surface crackle.
One large egg at room temperature binds and adds a little lift; if oversized, measure 2 1/2 tablespoons to control spread.
Hazelnut-chocolate spread, leaveners, and the smidge trick
The hazelnut chocolate center gives both flavor and a creamy texture; freeze portions to keep the center molten without leaking.
Baking soda deepens color and chew. Baking powder will work, but expect paler, slightly cakier results.
A teaspoon of honey or corn syrup holds moisture and speeds even browning. Finish with flaky sea salt—Maldon if you have it—for contrast.
- All-purpose flour: structure
- Butter (barely melted): flavor and tenderness
- Sugar mix: moisture and spread control
| Ingredient | Role | Practical tip (US) |
|---|---|---|
| All-purpose flour | Structure, chew | 1 cup spooned & leveled |
| Unsalted butter | Fat, flavor | Barely melted, cooled slightly |
| Baking soda vs. powder | Color and spread | Soda = browner/chewier; powder = paler |
| Honey or corn syrup | Moisture, browning | 1 tsp per batch |
Freeze-first method for oozing centers
Start by firming the filling in the freezer so each bite yields a clean, molten center. Portion the filling as 1-inch balls (about 2 level teaspoons) or press into ~8mm-thick discs on a parchment paper–lined sheet.
Freeze nutella for at least 30 minutes. One to three hours makes shaping easiest; overnight is fine for prep. Keep both dough and filling cold as you work to prevent sticking and spreading.
How to portion and handle
- Make balls for quick scooping or discs for a wider melt-pocket.
- Lift the frozen pieces on the paper sheet so they stay firm and neat.
- If filling softens, pause and return the sheet to the freezer for a few minutes.
Sealing and leak prevention
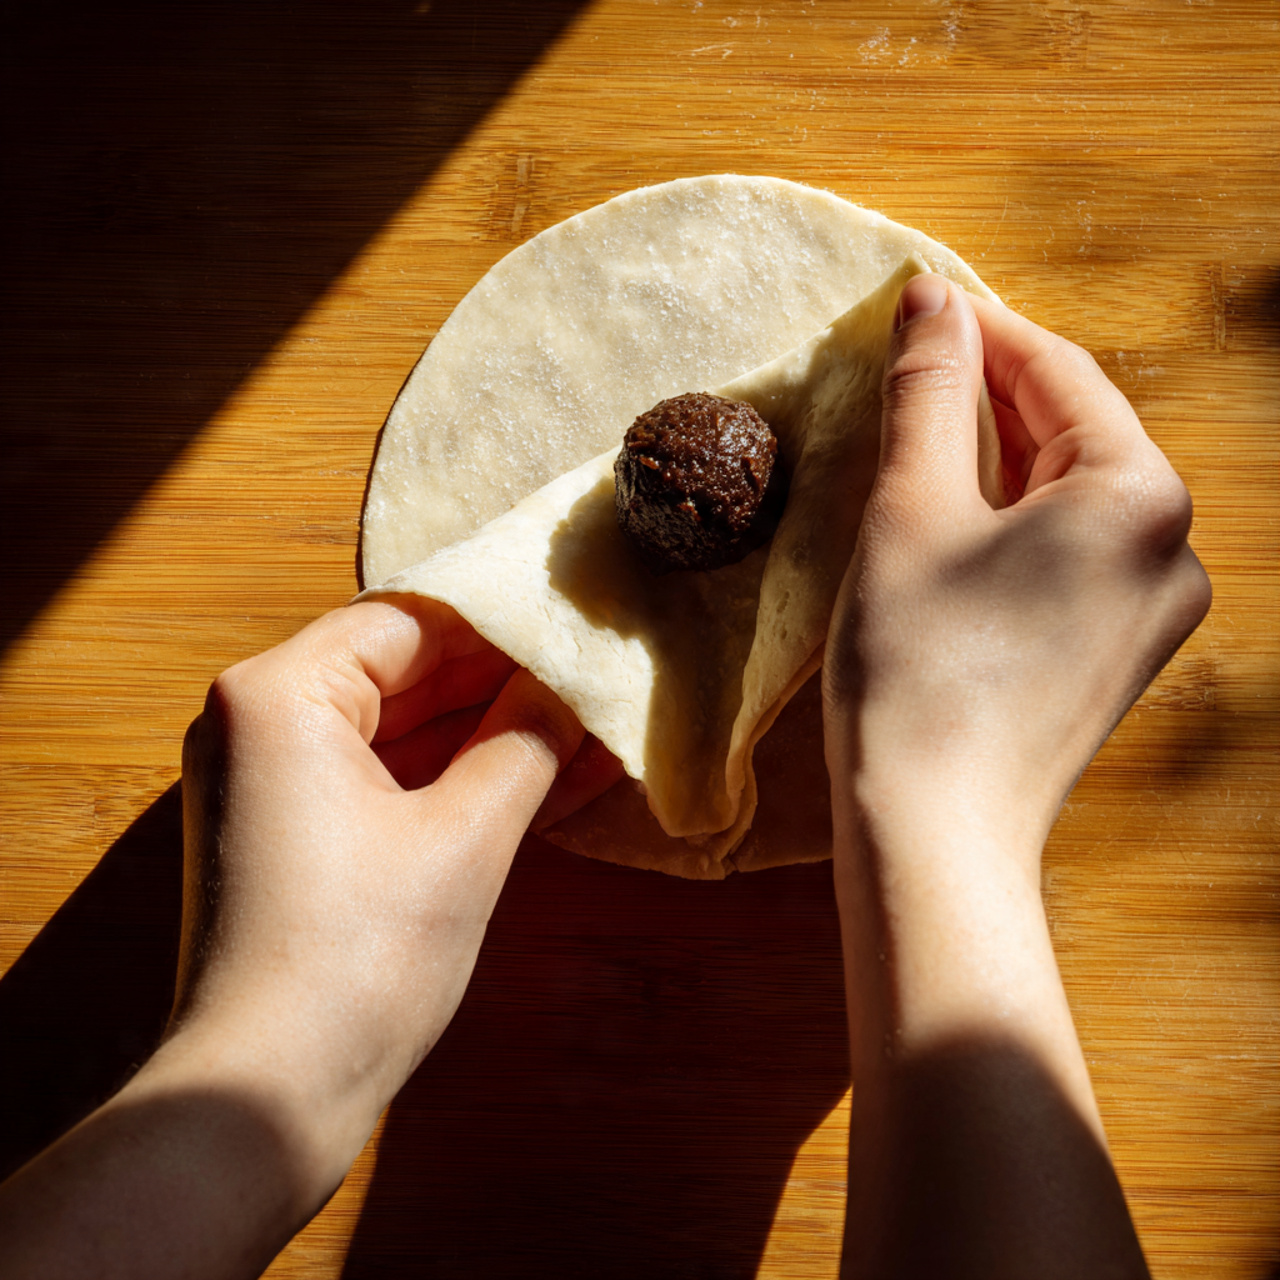
Flatten a dough piece, place the frozen ball or disc in the center, gather edges, and pinch the base to seal — like a dumpling. Smooth the seam by rolling gently in your palms.
| Portion | Freeze time | Handling tip |
|---|---|---|
| 1-inch ball (2 tsp) | 30 minutes – 3 hours | Scoop, place on lined sheet; work quickly |
| ≈8mm disc | 30 minutes – overnight | Press thin for broad molten pocket; lift on paper |
| Dough & filling | Keep cold throughout | Return to freezer if dough gets sticky |
Dough done right: the mixing method that keeps cookies chewy
I’ve learned that simple timing and the right butter temp turn ordinary dough into something worth sharing. The method you choose guides texture, flavor, and how tidy the shaping will be.
Creamed vs. hand-mixed: choosing the approach
Creaming with a mixer gives a lighter lift and a slightly airier crumb. If you want that, beat butter and sugar until pale, then add the egg and dry ingredients.
Hand-mixed dough is forgiving and rustic. Stir in the flour by hand and you’ll get a softer, chewier bite without a stand mixer.
Barely melted butter for deeper buttery flavor
Microwave the butter briefly and stir until it looks milky, not clear. That barely melted cue helps the fat marry with sugar and carry more buttery flavor into the bake.
Chilling the dough: when and how long
Cover the bowl and chill the cookie dough in the fridge about 1 1/2 hours. It should feel like soft modeling clay—firm enough to shape but not rock hard.
If the dough warms while you work, a five-minute trip back to the fridge resets it and prevents excess spread.
Room temperature eggs and why size matters
Use one large egg at room temperature for steady emulsification. If your egg is oversized, whisk and measure 2 1/2 tablespoons to avoid too much moisture and runaway spread.
- Keep ingredients cool but workable to control spread.
- A pinch of baking soda promotes browning and chew; don’t overdo powder or warmth.
- Texture cue before shaping: soft, not sticky, and easy to roll.
| Method | Result | When to use |
|---|---|---|
| Creamed (mixer) | Liftier, lighter crumb | When you want extra rise |
| Hand-mixed | Denser, chewier center | Quick, rustic batches |
| Barely melted butter | Deeper buttery flavor | All methods |
nutella stuffed cookies italian: shaping, baking, and timing
When I shape the dough, I think of wrapping a small gift—tight seams, smooth finish, ready for the oven. Work with cool hands and chilled filling so the center stays put and the bake is tidy.
Flatten, wrap like a dumpling, then roll smooth
Press each dough piece into a small round. Set the frozen center in the middle, bring edges up, pinch the base, then roll gently between your palms until the seam is smooth.
Parchment-lined sheet, spacing for spread, and oven at 350°F
Line a sheet with parchment and place the formed cookies 3 inches apart for even airflow. Preheat the oven to a steady 350°F and use the middle rack for balanced color.
Visual doneness cues: edges golden, center just set
Bake about 12 minutes (8–10 minutes for thinner styles). Look for lightly golden edges, a paler top with a little shine gone, and a center that is set but still soft.
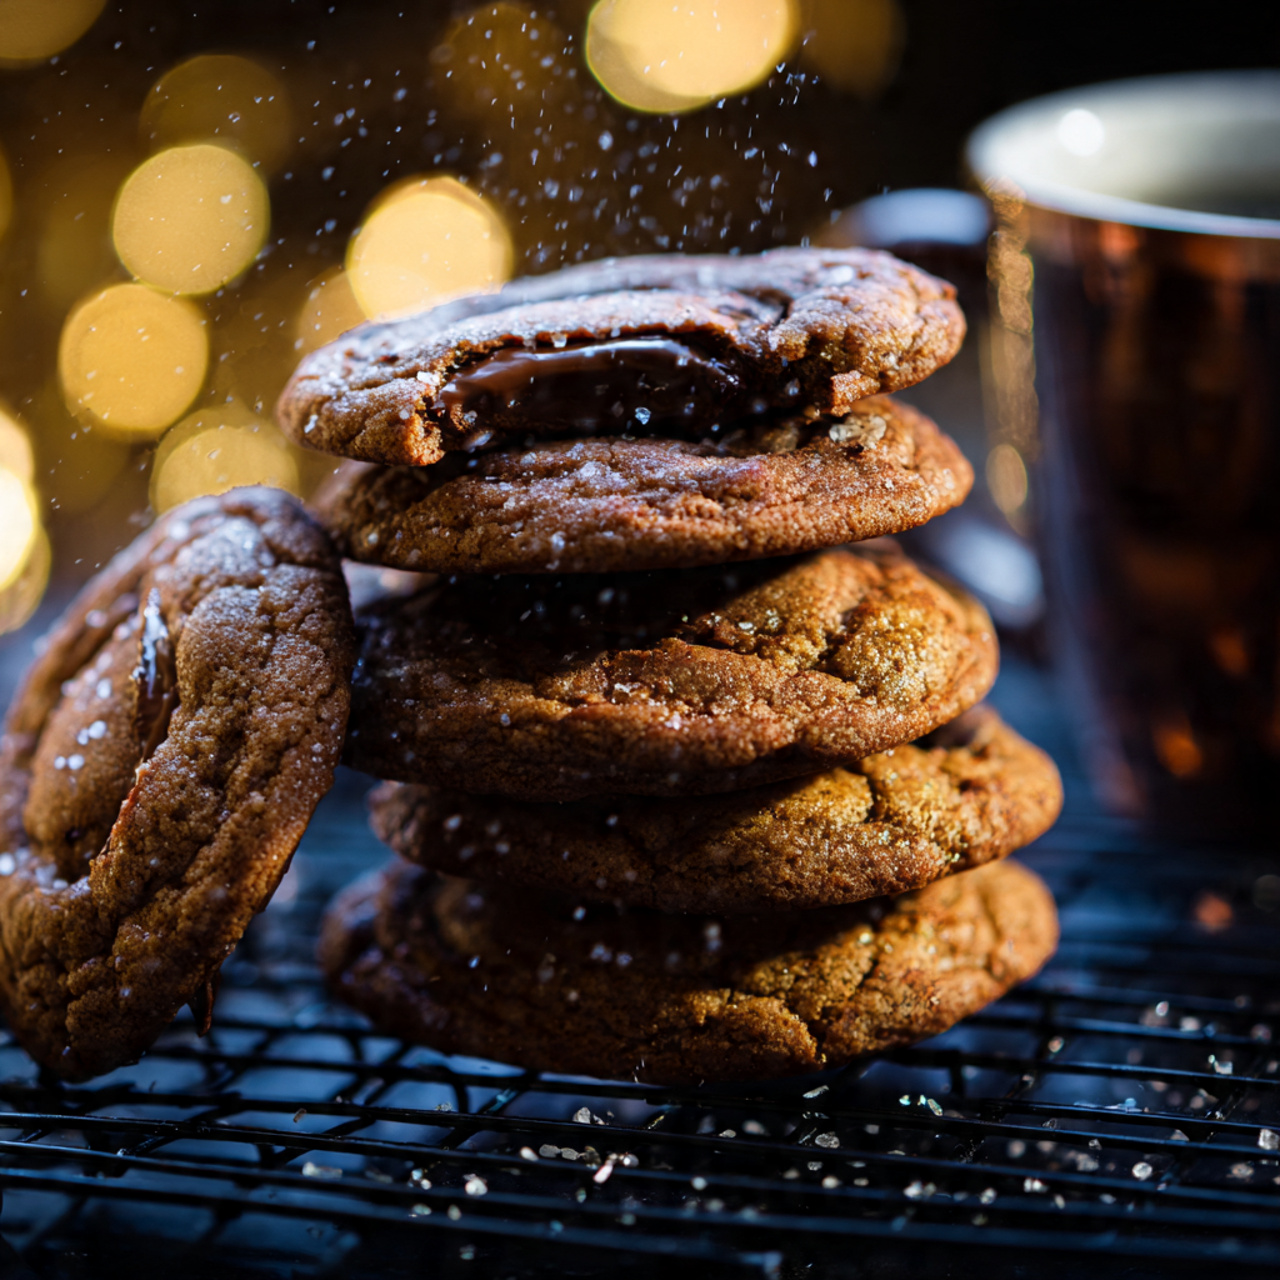
Cooling on tray, then rack for the perfect texture
Cool on the hot tray 10 minutes so the centers finish gently. Transfer to a rack for at least 5 minutes to keep bottoms crisp. The best window to eat is around nutella flowing warmly—about 15 minutes after baking.
- Keep unused dough and filling chilled while you work to prevent excess spread.
- Trust visual cues over strict minutes when the oven and dough vary.
| Step | Visual / Tactile Cue | Minutes |
|---|---|---|
| Shape & seal | Smooth seam, firm ball | — |
| Bake | Edges golden, top less shiny | 8–12 |
| Tray cool | Cookie firms but center soft | 10 |
| Rack rest | Bottoms stay crisp | 5+ |
Pro baker notes: texture control, troubleshooting, and fixes
A little chill or a little warmth will often rescue a balky dough. Here are compact, no-nonsense notes to fix common issues while you work.
If dough gets sticky: quick fridge/freezer resets
If your cookie dough turns sticky, I first return the bowl to the fridge for 5–10 minutes. That firms the butter and calms the dough so shaping is tidy.
I also keep the filling in the freezer between pieces to keep the center firm. Short pauses in the fridge or on the counter are powerful.
Cracks or leaks: sealing sides and base
See a crack? Stop and reseal the seam like closing a small raviolo. Pinch the base and smooth the surface with your palm to prevent leaks during baking.
Too much spread or too little: adjust egg size and chill time
Two levers control spread: egg amount and dough temperature. If cookies spread too much, trim an oversized egg to 2½ tablespoons and increase chill time.
If they barely spread, let portioned cookie dough sit at room for 5–10 minutes or press tops lightly before baking.
Paler cookies? When to swap in baking powder—and what to expect
Swap baking soda for baking powder only if you need more lift. Expect a paler surface and a slightly less chewy bite—still pleasant, just different.
- I troubleshoot stickiness first: fridge resets (5–10 minutes) and frozen filling keep things neat.
- I seal leaks by pinching the sides and base until smooth.
- I manage spread with egg adjustment and chill time; short room rests help when too firm.
| Problem | Likely cause | Quick fix |
|---|---|---|
| Sticky dough | Warm butter or humid room | Chill bowl 5–10 min; keep filling frozen |
| Cracks / leaks | Poor seal around filling | Reshape and pinch seam; smooth with palm |
| Too much spread | Oversized egg or warm dough | Use 2½ tbsp egg if large; chill longer |
| No spread | Dough too cold | Let sit at room 5–10 min or press tops |
Smart swaps, add-ins, and US-friendly variations

Try a few tested swaps and you’ll get fresh flavors without changing the core method. Small tweaks keep the bake reliable and let you personalize the batch for family, parties, or weeknight treats.
Alternate spreads that freeze and behave well
Use other hazelnut spreads, peanut butter, or Biscoff as a direct swap—only if the filling freezes solid. That firmness is key so the center stays molten but contained when baking.
Note from testing: peanut butter works beautifully in dough, but a peanut butter center inside peanut butter dough can taste one-note. I often pair peanut butter dough with a Biscoff or chocolate center for contrast.
Chocolate finishes for extra pools and texture
Press dark chocolate chips or chopped 70% chocolate onto the tops and sides before baking. This adds glossy pools and a handsome edge once cooled. It’s a small lift that reads like a baker’s flourish.
Finishing salts: kosher vs. flaky
Sprinkle kosher salt for a quiet, even balance. Choose flaky sea salt like Maldon for a light crunch and a sparkling look that makes cookies made for guests feel special.
- Freezer-friendly swaps: non-nutella hazelnut spread, peanut butter, Biscoff—must freeze hard.
- Flavor tip: avoid matching a peanut center with peanut dough unless you want intense nuttiness.
- Chocolate: press chips or chopped 70% chocolate on top pre-bake for extra pools.
- Salt finish: kosher for subtle balance; flaky sea salt for texture and shine.
- Small tweaks: a pinch of espresso powder or a touch of orange zest lifts chocolate notes without changing the recipe; keep cup measures and standard US substitutions for butter and sugar so results are steady.
| Swap | Behavior when frozen | Flavor note |
|---|---|---|
| Non-nutella hazelnut spread | Freezes firm; easy to wrap | Classic hazelnut-chocolate balance |
| Peanut butter | Freezes solid but softer than chocolate spread | Rich and savory; can be intense with same dough |
| Biscoff | Freezes very firm; bakes clean | Caramelized spice note; great contrast with dark chocolate |
Make-ahead, storage, and the best moment to serve
Prep smart and you’ll be relaxed when guests arrive. Portion and freeze frozen nutella discs or balls up to a week ahead, then store them in a labeled bag in the freezer.
Chill dough about 1½ hours or portion dough balls and refrigerate until baking day. Bake at 350°F on a parchment-lined sheet and cool 10 minutes on the hot tray before moving to a rack.
Once cool, keep cookies made in an airtight tin at room temperature; edges stay crisp and centers stay chewy for 3–4 days (still fine on day 5). The peak moment is roughly 15 minutes after they leave the oven—plan coffee or dessert around that time.
To revive centers, reheat briefly in 5–10 second bursts. For parties, bake in waves: keep shaped dough chilled and the filling in the freezer so each tray arrives warm and just-right.
Nutella-Stuffed Cookies (Italian-Style Home Bake)
Ingredients
Method
- Scoop Nutella into small 1-inch balls (about 2 teaspoons each) or press into thin discs.
- Place on a parchment-lined tray and freeze for 30 minutes to 3 hours (overnight is also fine).
- Keep frozen until the moment you shape the cookies.
- Melt butter gently until milky but not fully liquid.
- Stir in brown sugar (and a little white sugar if using).
- Add egg and honey/corn syrup and mix until smooth.
- Add flour, baking soda, and salt. Stir until a soft dough forms.
- Cover and chill for about 1½ hours until firm like modeling clay.
- Scoop a portion of dough and flatten it into a small round.
- Place a frozen Nutella center in the middle.
- Bring the dough edges up like a dumpling, pinch shut, and roll gently to smooth the seam.
- Keep unused dough and filling chilled between batches.
- Preheat oven to 350°F (175°C).
- Line a baking sheet with parchment.
- Place cookies 3 inches apart.
- Bake 8–12 minutes until:
- Edges are lightly golden
- Surface loses its shine
- Center looks set but still soft
- Let cookies cool on the hot tray for 10 minutes (the centers finish gently).
- Transfer to a rack for at least 5 minutes.
- Sprinkle flaky sea salt while warm.
- Best served about 15 minutes after baking for a molten center.
Notes
- Freezing the filling is the secret to the molten center without leaks.
- Barely melted butter gives a deeper buttery flavor than creamed butter.
- Egg sizing matters: too much egg = overspreading.
- Trust the loss of surface shine as your doneness cue.
- These cookies are very forgiving — small pauses in the fridge fix sticky dough.
- Eat warm for a flowing Nutella center; reheat gently to bring it back.