
Jump to Recipe
I still remember my Nonna pressing a warm crust into her tin, the room smelling of butter and wilted greens. We laugh about the old tale of 33 thin layers while we tuck whole eggs into a bright ricotta-and-spinach filling that feels like a family secret made public.
Here I share a clear, weekday-friendly roadmap for this Ligurian classic: which greens work best, how to squeeze and drain them to avoid sogginess, and when using puff pastry makes sense. I give exact oven cues (375–400°F) and cooling tips so the cross-section slices cleanly every time.
Expect trusted substitutions and storage notes so the pastry keeps its texture, whether you serve it warm, at room temperature, or chilled. We honor tradition while keeping the method doable for American home cooks.
Key Takeaways
- Drain ricotta and squeeze greens well to prevent a soggy base.
- Use puff pastry for a shortcut, or make layered pastry for a traditional feel.
- Bake at 375–400°F until golden and set; cool before slicing.
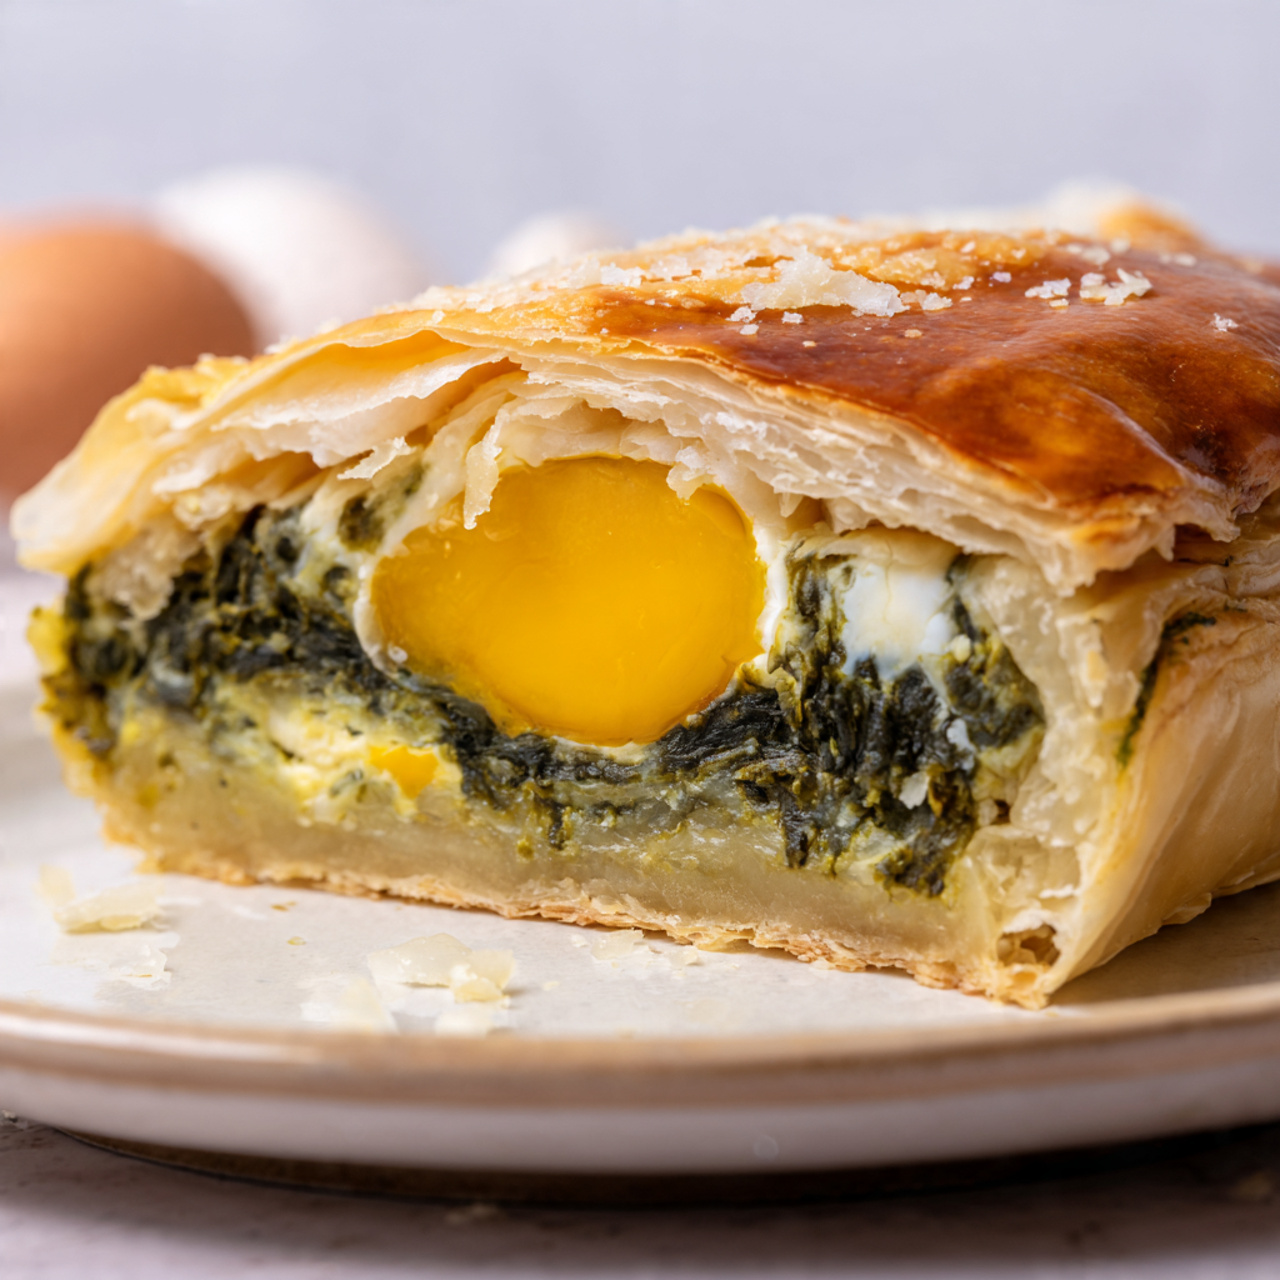
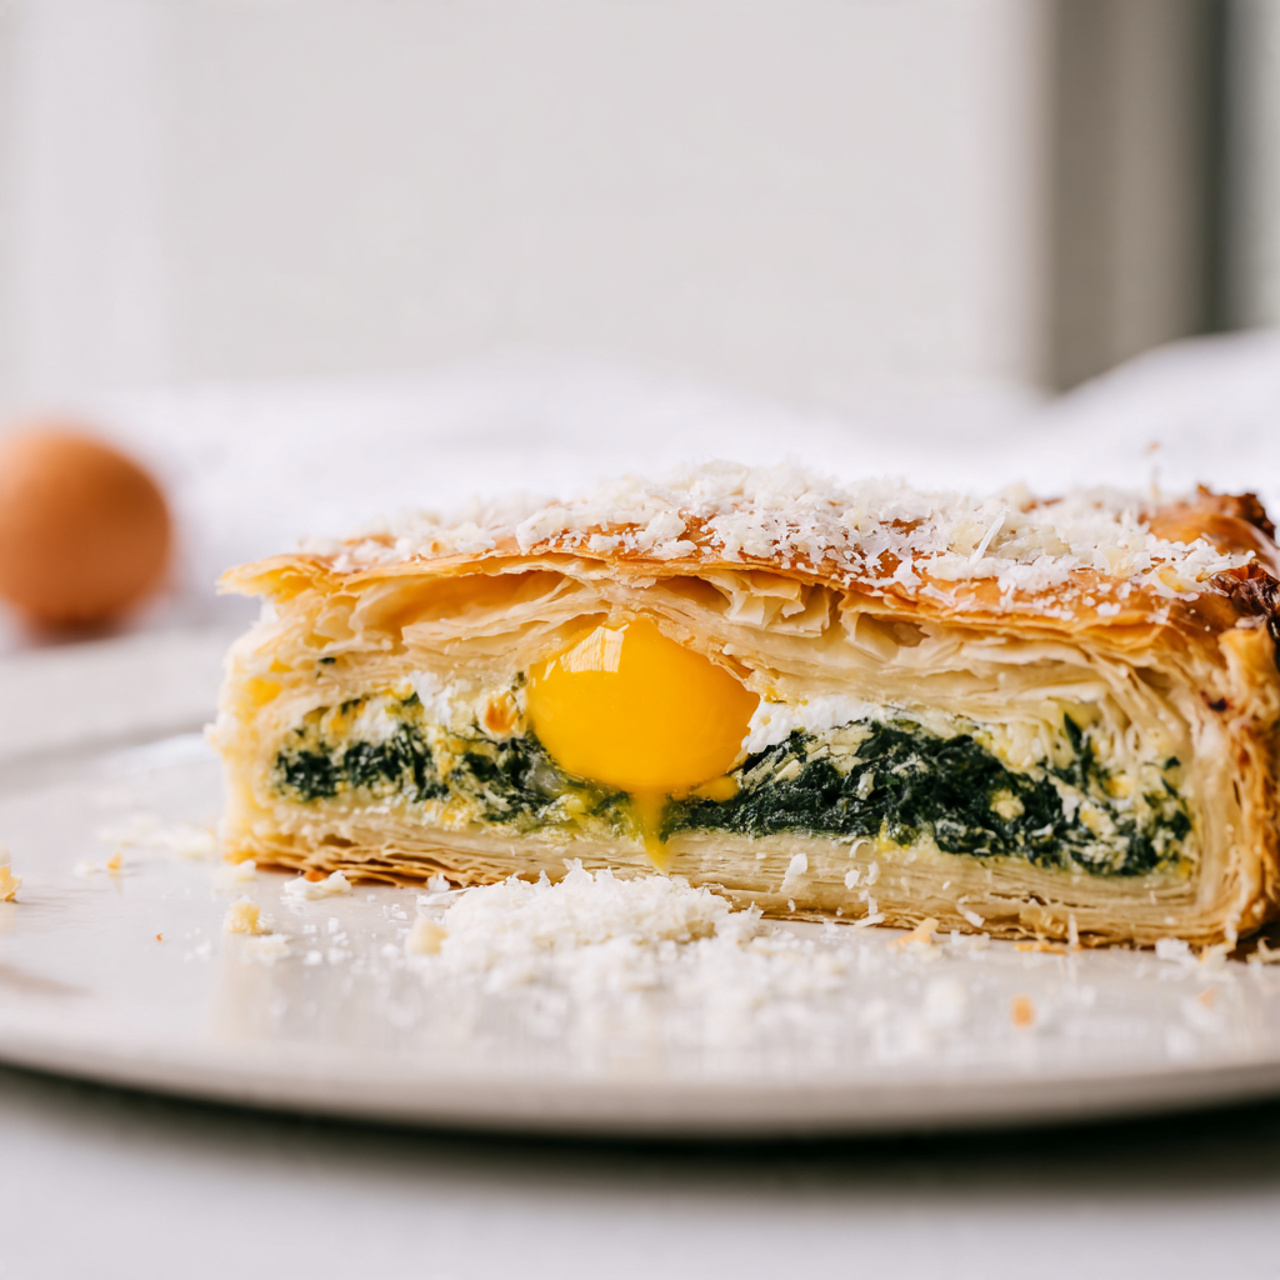
- Whole eggs create the classic cross-section and festive surprise.
- Store in the fridge for several days or freeze up to 3 months.
A Ligurian classic with a festive surprise inside
Every family has its version, but the instant a slice reveals those bright yolks still stops the room. This is the heart of torta pasqualina, an italian easter staple born in medieval Liguria. It blends humble greens, creamy cheese, and eggs into a single showpiece.
Traditionally cooks used many thin layers and local curd like prescinseua with Swiss chard. Today most of us choose ricotta and spinach for ease and a reliable texture. You can tuck raw eggs into wells or place soft‑boiled ones for a neater look.
Why it captivates
Simple ingredients become celebratory when the slice surprises guests. The contrast of tender greens and flaky pastry feels light but festive. It serves well warm, at room temperature, or cold, so it fits brunches, picnics, or long family lunches.
Traditional roots, modern tweaks you’ll use
- Swap curd for ricotta for a milder, creamier filling.
- Use puff pastry to save time or make layered dough for authenticity.
- Choose raw eggs for runny centers or soft‑boiled for defined rings.
| Element | Traditional | Modern option |
|---|---|---|
| Greens | Swiss chard | Spinach |
| Cheese | Prescinseua (regional curd) | Ricotta + Parmesan |
| Pastry | Many thin layers | Puff pastry or shortcrust |
Ingredients and smart substitutions for an authentic result
I learned early that the right greens and a well-drained cheese make the difference between soggy and stunning. Start by planning moisture control: drain ricotta and squeeze cooked leaves hard so the filling sets and the pastry stays crisp.
Greens: spinach, Swiss chard, or artichokes without the soggy crust
Choose spinach for the classic, mild flavor or swiss chard for an earthier note; cook stems first, then press the leaves in a towel. If you prefer artichokes, fold in canned or jarred hearts only after pressing out their liquid.
Cheeses and eggs: ricotta, Parmesan or Pecorino, and the yolk factor
Use drained ricotta (whole-milk or part-skim) so the mixture won’t weep. Stir in a small amount of parmesan or Pecorino for savory depth. Eggs bind the filling and create the visual surprise—nest raw eggs in wells for custardy centers or add soft-boiled eggs for neat rings.
Pastry choices: puff pastry, shortcrust, or phyllo
Puff pastry is fast and flaky; shortcrust gives sturdier, quiche-like support; phyllo creates a delicate crunch. Each choice changes bake time and handling, so keep pastry cold and avoid overworking dough.
Flavor boosters: olive oil, garlic, nutmeg, salt, and pepper
- Season lightly with nutmeg, salt, and pepper to lift the greens without masking them.
- Add a touch of olive oil and a smashed garlic clove while cooking the leaves for rounded flavor.
- Mix the filling gently until cohesive; overworking can make it weep and tighten texture.
| Pastry | Texture | Bake note |
|---|---|---|
| Puff pastry | Flaky, light | Shorter bake at moderate heat |
| Shortcrust | Sturdy, rich | Longer bake to set base |
| Phyllo | Crunchy, thin | Layer and brush with olive oil; watch closely |
Tools that make this pie easier
Good tools take the guesswork out of assembly and let the filling shine. Below I explain which pan choices and small gadgets actually change your result, and why they matter for structure and slicing.
Pan choices and why depth matters
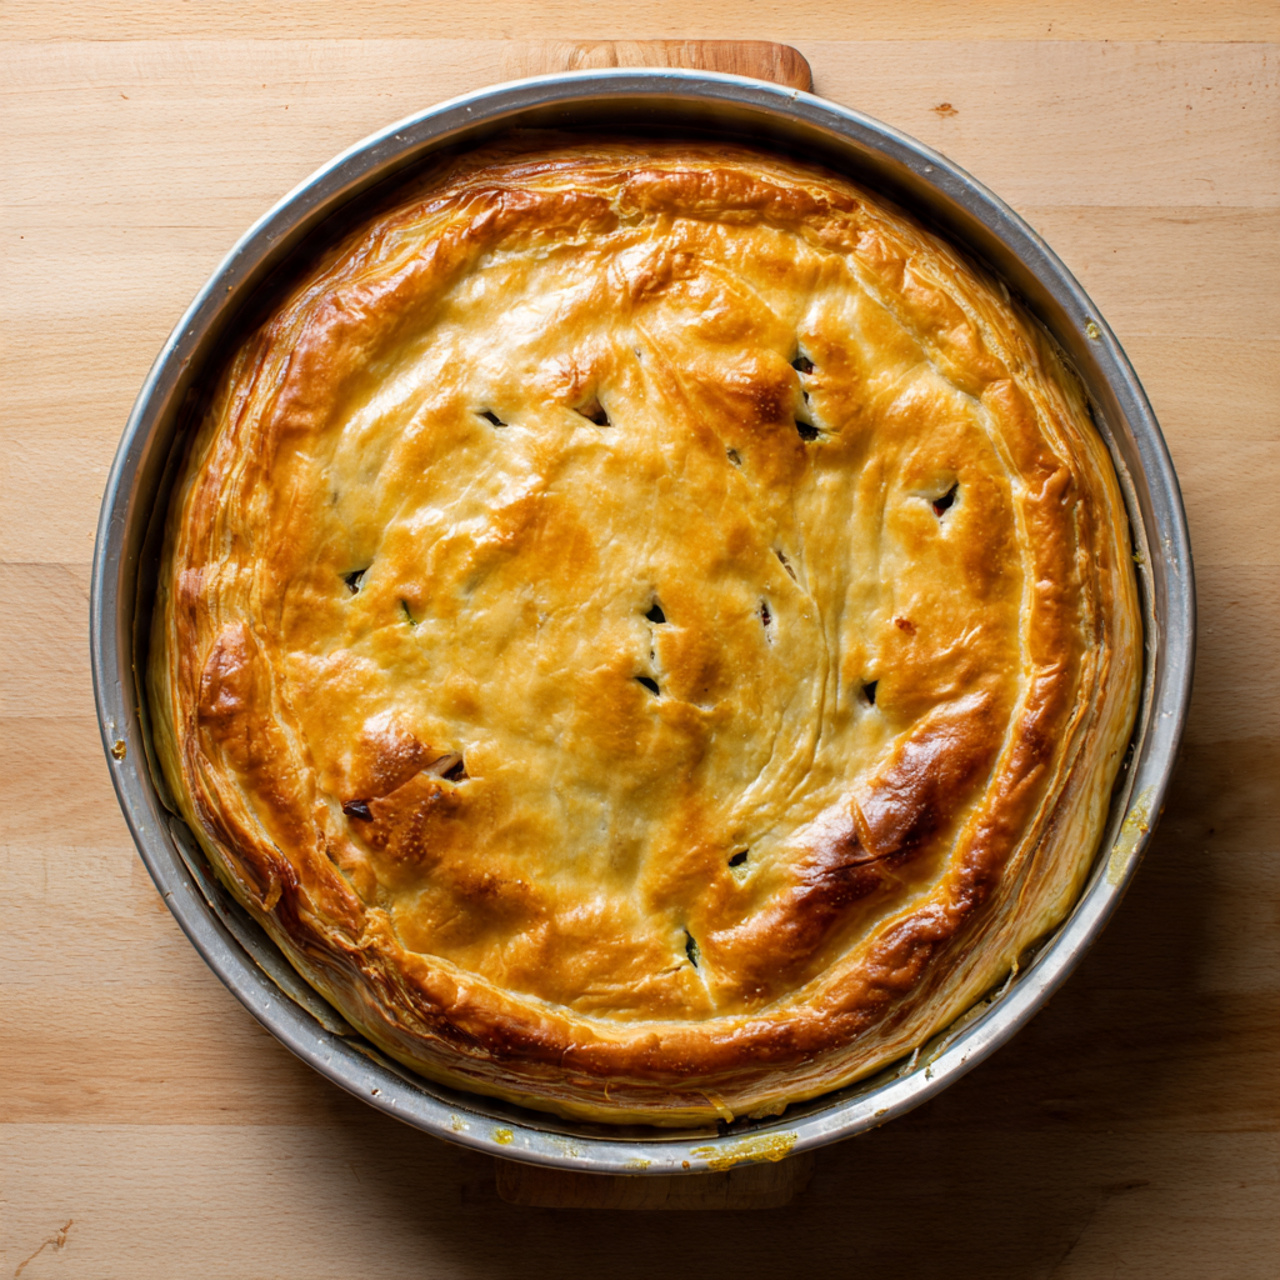
I reach for a springform pan when I want a clean release and a dramatic cross-section. Use an 8–10 inch springform; pick taller sides if you plan to tuck whole eggs in place.
A 9–10 inch pie pan works when you’ll serve straight from the pan. It’s simpler, and you avoid any unmolding mishaps—just expect a slightly shallower interior.
Small tools that make big differences
- A sharp knife trims excess pastry, creates neat vents, and helps you cut clean slices once the pie rests.
- Work on a cool, lightly floured surface to roll and patch dough without tearing pastry layers.
- An offset spatula smooths the filling and tucks edges precisely for even baking and attractive edges.
- Form egg wells with the back of a tablespoon for consistent depth when adding raw eggs.
- A wire rack speeds cooling so the structure sets and slices hold their shape.
- Use a silicone pastry brush for even oil or egg wash coverage without pulling delicate layers.
| Tool | Best use | Size or note | Why it helps |
|---|---|---|---|
| Springform pan | Assembly and unmolding | 8–10 in, taller sides if adding whole eggs | Releases ring for intact layers and a dramatic reveal |
| Pie pan | Serving from pan | 9–10 in standard | Classic presentation, less risk when slicing in place |
| Sharp knife & offset spatula | Trimming, venting, slicing | Keep knife sharp; small spatula 6–8 in | Clean vents and neat servings, tidy edges |
Torta Pasqualina Easter Pie Recipe step-by-step
Start by setting a calm pace—this filling rewards gentle hands and clear timing. Gather chilled puff pastry, drained ricotta, a clean bowl, and an 8–10 inch springform pan. Preheat oven to 375–400°F so it’s ready when assembly finishes.
Prep: thaw, drain, and grease
Thaw puff pastry in the fridge. Drain ricotta cheese in a sieve while the pastry relaxes. Lightly grease the springform with olive oil so the dough releases cleanly.
Cook and squeeze the greens
Cook the spinach just until wilted. Cool briefly, then squeeze with your hands or a towel until almost dry. Removing water here keeps the pastry crisp and stops the filling from becoming loose.
Mix the filling
In a bowl, combine ricotta, grated hard cheese, eggs, a pinch of nutmeg, salt, and pepper. Stir until creamy but not watery—aim for a spreadable mixture that holds shape.
Assemble in the pan
On a cool surface, line the pan with one sheet of pastry, patching dough to cover sides and edges. Spread half the filling, then press deep wells with the back of a spoon. Gently crack one egg into each well (or nest soft‑boiled eggs for rings).
Seal, vent, and brush
Spoon the remaining filling around the eggs, top with the second sheet of pastry, trim and fold edges to seal. Use a knife to cut small vents. Brush top with olive oil for a gentle sheen and even browning.
Bake and rest
Bake on the middle or lower rack. Start checking at 35–40 minutes; total time may be 30–60 minutes until puffed and golden brown and the center feels set. Cool on a wire rack at least 30 minutes before releasing the springform—this firms the structure for neat slices.
| Step | Key cue | Why it matters |
|---|---|---|
| Preheat oven & prep | 375–400°F | Ensures even bake and proper rise of pastry |
| Squeeze greens | Almost dry | Prevents soggy filling and weak dough |
| Bake | 35–60 minutes | Color and set center indicate doneness |
Pro tips to avoid soggy layers and get clean slices
A reliable crust begins long before the oven—control water, temperature, and timing. These small, repeatable moves keep the filling firm and give you neat slices every time.
Moisture control for spinach and ricotta
Drain ricotta in a sieve until the whey stops dripping; damp cheese leaks into the crust. After wilting spinach, spread it on a towel, then squeeze by hand until almost dry. Evaporate extra water while cooking if leaves steam instead of fry.
Keeping puff pastry cold and vented
Keep puff and other pastry cold so layers stay distinct. If dough warms, chill 20–30 minutes; this preserves lift. Cut a few vents in the top to release steam—controlled airflow prevents trapped moisture under the lid.
- Line the pan quickly and avoid overworking dough; pressing flattens layers and reduces rise.
- Use a lightly floured surface to roll without adding raw taste; brush off excess flour before assembly.
- A thin coat of oil or egg wash browns the top, but it won’t fix wet filling—manage water earlier.
- Cool the pie on a rack until just warm before slicing; the filling firms and you get bakery-level wedges.
- Reheat slices in a hot oven on a sheet to re-crisp the crust rather than microwaving.
| Check | Why it matters | Quick fix |
|---|---|---|
| Spinach moisture | Prevents soggy crust | Squeeze and dry on towel |
| Pastry temperature | Keeps layers puff | Chill if soft 20–30 min |
| Top vents | Releases steam | Cut 4–6 small slits |
Variations you’ll love, from eggs to greens to pastry
Changing one element—egg method, greens, or pastry—gives this savory pie a fresh personality. I like to offer clear cues so you can pick a path that matches your time and texture goals.
Raw vs soft‑boiled eggs for the center
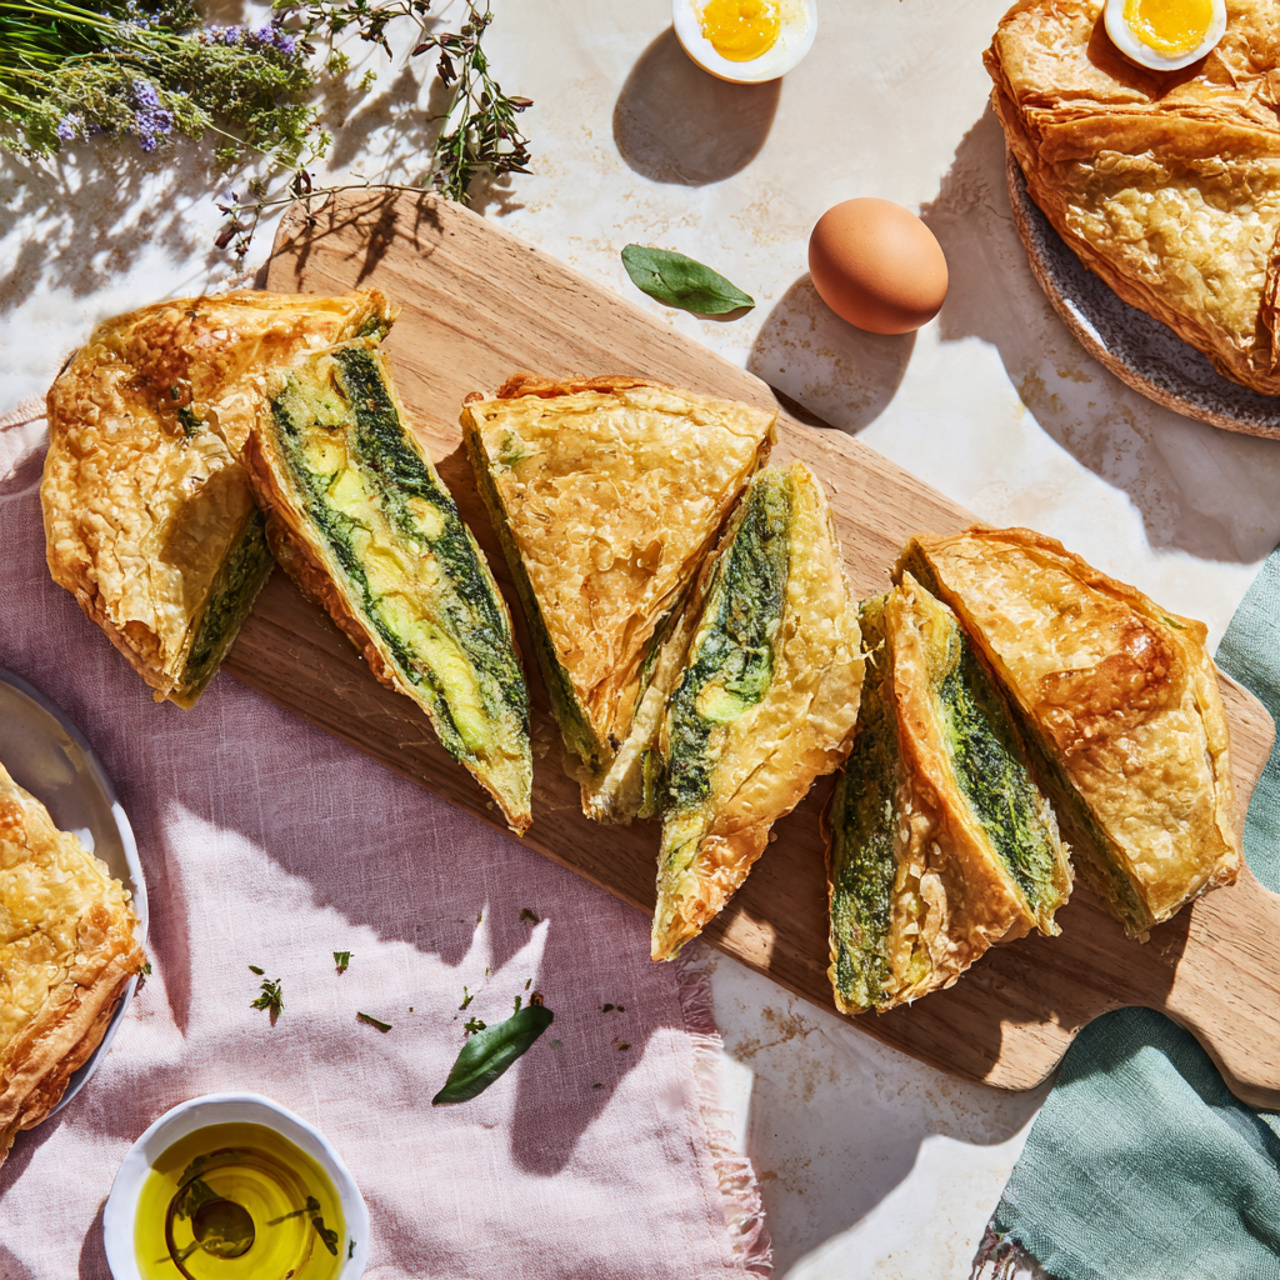
For striking halves, soft‑boil eggs 5–7 minutes, chill, peel, and nestle them into the filling. They hold shape and create neat rings when sliced.
For creamier pockets, crack raw eggs into deep wells; these need steady oven heat until the filling sets but still feels custardy.
Greens: spinach, swiss chard, or a spinach‑artichoke mix
Spinach cooks fast and keeps color, while swiss chard adds body and earthiness; stems need extra minutes before mixing. Fold in well‑squeezed artichoke hearts for a tangy twist, but remove excess liquid first.
Pastry choices and bake‑time adjustments
Puff pastry bakes quickest and puffs dramatically—watch the top after about 25–35 minutes. Pie dough needs a few more minutes for the base to crisp; move the rack lower so the bottom cooks through without burning the top.
Phyllo browns fast; layer and brush each sheet, and check color every few minutes to avoid overbrowning.
Cheese swaps and herb additions
Mix ricotta with grated parmesan or Pecorino for savory depth. Add chopped parsley, marjoram, or oregano for aroma. If you skip whole eggs, stir in an extra beaten egg to help the filling hold shape.
- Test doneness by a firm center and a crisp top when you tap the crust.
- Brush top with oil for a soft sheen or an egg wash for richer color; adjust minutes if browning too fast.
| Swap | Effect on texture | Oven/time cue | Tip |
|---|---|---|---|
| Soft‑boiled eggs | Defined halves, firm yolk edge | Nest after filling; bake until filling set, ~20–30 minutes | Chill and peel eggs before placing |
| Spinach + swiss chard | Balanced color and body | Cook stems longer; squeeze dry before mixing | Extra minutes for stems prevent sogginess |
| Puff pastry vs pie dough vs phyllo | Flaky & high vs sturdy base vs crisp & delicate | Puff: shorter; Pie dough: +5–10 minutes; Phyllo: watch browning | Lower rack for thicker dough; check top color often |
How to serve, pair, and enjoy your Italian Easter pie
When I bring this dish to a gathering, people always drift closer to the pan to see the cross-section. Serving is part ritual and part practicality: the same tart shines warm, at room temperature, or chilled depending on the moment.
Warm, room temperature, or chilled
Serve warm for comfort and a softer interior. A brief rest lets the filling set enough for clean slices.
Room temperature gives the best texture. It travels well for picnics and holds on a buffet without fuss.
Chilled is handy when you need a make‑ahead option. Cold slices cut neatly and keep their shape for transport.
What to serve alongside
For brunch, pair slices with a bright Caprese of cherry tomatoes and basil or a rustic panzanella to balance richness.
At lunch, add peppery arugula and a citrus vinaigrette to cut through the creamy center. For dinner, offer roasted asparagus, marinated beans, or a small charcuterie board with aged cheese and olives.
- Drizzle with good olive oil and finish with a few shavings of aged cheese for a simple garnish.
- Serve straight from the pan for casual family style, or unmold and place on a board for a centerpiece moment.
- Keep the top intact until the table reveal—those egg-cross sections make people smile.
| Occasion | Best serving temp | Suggested sides |
|---|---|---|
| Brunch | Warm or room temp | Cherry tomato Caprese, crusty bread |
| Picnic/Buffet | Room temp or chilled | Panzanella, marinated olives, sliced salami |
| Dinner | Warm | Roasted asparagus, lemony green salad, light pasta |
For inspiration on a similar savory crowd-pleaser, see my notes on a classic pizza rustica for homestyle baking here.
Make-ahead, storage, and freezing for busy holidays
Plan a short timeline the day before and your holiday cooking suddenly feels calm and simple. Cooked slices keep well if you follow a few clear steps that preserve the crust and filling.
Refrigerating, reheating, and next-day flavor
Refrigerate a cooled, cooked pie up to 3–5 days in an airtight container or wrapped tightly. I usually unmold from the springform after it cools to avoid trapped steam softening the edges.
To reheat, place slices on a sheet in a 350–375°F oven for 10–15 minutes. This brings the center up to temperature and helps the crust come back to a light, flaky texture without sogginess.
Freezer tips to preserve texture
Freeze whole slices or the assembled pie for up to 3 months. Wrap tightly in plastic and foil, label with date and reheating instructions, then thaw overnight in the fridge before using the oven to restore crispness.
- Bake a day ahead: flavors meld and slicing is cleaner.
- Store tightly covered; brush a little oil on exposed crust before reheating for an even golden brown finish.
- Avoid microwaving whole slices—use the oven so the puff pastry and crust revive in minutes.
| Storage | Duration | Reheat | Tip |
|---|---|---|---|
| Refrigerator | 3–5 days | 350–375°F, 10–15 minutes | Unmold from springform to reduce condensation |
| Freezer | Up to 3 months | Thaw overnight, then 350–375°F until warm | Wrap in plastic + foil; label with date and instructions |
| Prep ahead (components) | 1 day | Assemble and bake next day | Cook greens and mix ricotta filling in advance |
Conclusion
Trust the process: well-drained spinach, firm ricotta, and a rested crust make all the difference. Follow the steps—work cold dough on a floured surface, line the springform pan, and patch edges so the filling stays put.
Preheat the oven and bake until the top is golden brown and the center feels set. Brush the top with a little olive oil for sheen, then give it the minutes it needs to cool before you lift the ring.
Use a sharp knife for clean slices that show the eggs and layers. Serve warm, room temperature, or chilled; refrigerate for several days or freeze slices up to three months. I hope this torta pasqualina becomes a celebratory dish you return to year after year.
Torta Pasqualina (Italian Easter Pie)
Ingredients
Method
- Thaw puff pastry in the fridge until flexible.
- Drain ricotta in a sieve for 30–60 minutes.
- Lightly grease an 8–10 inch springform pan with olive oil.
- Cook spinach or chard until just wilted.
- Cool slightly, then squeeze out as much water as possible with your hands or a towel.
- Chop the squeezed greens.
- In a bowl, mix drained ricotta, greens, grated cheese, 2–3 eggs, nutmeg, salt, and pepper.
- Stir gently until creamy but not watery.
- Place one puff pastry sheet into the springform, letting it come up the sides.
- Patch any gaps so the filling won’t leak.
- Spread half the filling into the pan.
- Use the back of a spoon to make 3–4 deep wells.
- Crack one egg into each well (or use peeled soft-boiled eggs for firmer yolk rings).
- Spread the rest of the filling around the eggs.
- Place the second pastry sheet on top.
- Trim, fold, and crimp edges to seal.
- Cut 4–6 small vents.
- Brush the top lightly with olive oil or egg wash.
- Bake at 375–400°F on the middle or lower rack.
- Start checking at 35–40 minutes. Bake until the top is puffed, deep golden, and the center feels set (about 40–55 minutes total).
- Cool at least 30 minutes on a wire rack before slicing.
- Use a sharp knife for neat wedges that show the eggs.
Notes
- Draining the ricotta and squeezing the greens well is the biggest factor in avoiding a soggy crust.
- If the pastry starts getting too brown, tent the top with foil.
- This pie tastes even better the next day and slices beautifully when chilled.
- Reheat slices in a hot oven, not the microwave, so the crust stays crisp.
- You can swap spinach with chard or add a few well-drained artichoke hearts without changing the bake time.