
Jump to Recipe
I knead the dough on my kitchen table and watch fine semolina mix with a touch of 00 flour until it feels supple under my palms. The filling—mashed potato, tangy pecorino, and mint or garlic—smells like home, and the braid I press into the edge takes me back to a long afternoon with family.
I’ll guide you through shaping the spighitta, cutting 8 cm circles, rolling sheets to about 1 mm, and the quick 4–6 minute boil until they float. We’ll also talk dough choices, sealing tips, and a simple tomato sauce with grated cheese to finish the plate.
Key Takeaways
- Hands-on steps for a supple dough and a creamy filling.
- How to form the spighitta braid and a forgiving crescent seal.
- Dough options: semolina + water or mixes with 00 flour.
- Sheet thickness ~1 mm, cutter ~8 cm, cook 4–6 minutes until floating.
- Serve with sauce underneath and a shower of grated pecorino.
What makes them special (and why they’re worth your time)
A tight braid along a pasta edge can feel like holding a piece of a town in your hands. In Ogliastra, on the island’s east coast, families have taught this closure for generations. That small wheat-shaped seal ties a plate to harvest, gratitude, and community.
A brief origin and the grain-shaped seal
These heritage pieces come from homes where each house has its own touch. The fold — called the spighitta — mimics a wheat grain and honors abundance. Fillings shift from minty to garlic-forward, and the cheese is often nutty pecorino sardo.
Protected status and what authenticity means
The EU granted PGI status in 2015, which recognizes regional roots and techniques. Making them at home links you to that protected tradition. It’s more than cooked dough; it’s a living custom.
- They’re not just stuffed pasta; they are Ogliastra’s culinary emblem.
- The braid symbolizes wheat and gratitude.
- PGI recognition protects the craft and its local identity.
- Unlike ravioli, each piece closes with a braided ridge, creating a distinct bite.
I invite you to try the fold and accept small imperfections. The reward is a plate that tastes like memory — tender pasta, creamy potato, and bright cheese with a simple sauce. For detailed guidance, see a trusted sardinian culurgiones guide.
culurgiones sardinian dumplings recipe
I outline a short, practical plan so you know what to expect from start to finish. This helps when you schedule time for mixing, resting, and shaping the pasta by hand.
Quick glance: yield, timing, and what to expect from start to finish
Expect about 1½ to 2 hours hands-on work: 10–15 minutes kneading the dough, a 20–30 minute rest, then rolling, cutting, and shaping. Cooking is a quick 4–6 minutes in boiling water until they float.
- Yield: roughly 20 pieces for a beginner batch; double easily once you’re confident.
- Sheets: aim for 1–3 mm thickness—about 1 mm for silkier texture, up to 3 mm for easier handling.
- Cutter size: 3 inches (≈8 cm) gives enough rim to braid without overfilling.
- Work in three lanes: make and rest the dough, prepare the filling, then roll and seal.
- Keep a small bowl of water for fingertip-dabbing to help edges stick when sealing.
| Stage | Time | Tip |
|---|---|---|
| Knead & rest | 30–45 minutes | Rub with a little water if dough feels dry |
| Roll & shape | 45–60 minutes | Work in batches to keep dough covered |
| Cook | 4–6 minutes | Boil in salted water; remove when they float |
Plan to serve immediately for best texture, or freeze shaped pieces in a single layer for later use. Follow each step with patience and you’ll enjoy satisfying, handmade pasta that honors tradition.
Ingredients you’ll need for authentic flavor
Gathering the simple ingredients is the best way to begin—each one shapes the final taste and texture. I lay everything out so the process feels calm and reliable.
For the pasta dough
Use fine semolina flour (rimacinata) for that slightly toothy bite and rustic hold. If you prefer silkier sheets that pleat easily, blend in some 00 or all-purpose flour. Add cold water, a spoonful of olive oil, and a pinch of salt to make a pliable dough.
For the potato filling
Choose Yukon Golds for a creamy mash; red potatoes work if you want a firmer crumb. Mix mashed potatoes with grated pecorino cheese—Pecorino Sardo offers a mild, rounded sheep’s-milk flavor, while Pecorino Romano is sharper and saltier. Taste and adjust salt when you use Romano.
For the sauce and finishing
Make a quick tomato sauce with onion, good canned tomatoes, and a splash of water while it simmers. Finish with fresh basil and a shower of grated pecorino cheese. Extra-virgin olive oil and either mint or garlic complete the filling, depending on whether you want a bright or warm note.
- Keep a small bowl of water nearby to moisten edges when sealing.
- Use olive oil sparingly in dough and filling for tenderness.
| Ingredient | Choice | Why it matters |
|---|---|---|
| Flour | Semolina or 00 blend | Semolina gives bite; 00 softens and smooths sheets |
| Potatoes | Yukon Gold / Red | Yukon is creamy; red holds shape better |
| Pecorino cheese | Sardo / Romano | Sardo is milder; Romano adds sharp saltiness |
| Finishing | Tomato sauce + basil | Simple sauce highlights the filling and cheese |
Tools that make shaping and rolling easier
A handful of accessible kitchen items helps you roll, cut, and seal with confidence. These tools keep work tidy and make consistent pieces easier to produce at home.
Essentials for an efficient station
- Pasta machine — streamlines rolling to even thickness; use a rolling pin if you don’t own a machine. Lightly flour the surface and go slow.
- Cutter (3-inch round or a sturdy glass) — punches clean circles that seal predictably and help your braid sit on a neat rim.
- Large pot — plenty of boiling, well-salted water prevents sticking and gives the pasta room to float as it cooks.
- Slotted spoon — lifts each piece gently so seams stay intact and plates stay dry of excess water.
Nice-to-have items and useful swaps
- Potato ricer — for an ultra-smooth filling that won’t tear thin dough; a fork works if you push and mash thoroughly.
- Digital scale — makes dough and filling portions consistent so sealing goes faster and more even.
- Bench scraper and a small bowl of water — tidy trimmings and moisten edges as needed before you braid.
Mixing the pasta dough for supple, workable sheets
A patient, rhythmic knead is how I coax the dough from shaggy crumbs to a smooth, elastic ball. Start with semolina flour and a pinch of salt, then add water slowly until the mixture just draws together into a firm, pliable mass.
Classic semolina with water
Bring the flour and semolina to a mound, make a well, and pour in cool water a little at a time. Work the mixture until it forms a rough ball, then knead 10–15 minutes until the surface turns satiny and the dough springs back from a gentle poke.
Alternative blends and fat options
Blend in a bit of 00 or all-purpose flour if you want thinner, easier-to-roll sheets. A teaspoon or two of olive oil softens the bite and prevents cracking. For color and extra structure, some cooks add a small egg, though the traditional mix is semolina and water.
Hand, machine, or food processor
Hand-kneading builds feel; a stand mixer with a dough hook saves effort; a food processor speeds initial mixing. Adjust in small increments — add a teaspoon of water for dryness, or a light dusting of flour if the ball becomes sticky.
- Wrap tightly and rest 20–30 minutes to relax gluten and hydrate the paste.
- If dough tears when rolled thin, give it more rest time.
| Method | When to use | Result |
|---|---|---|
| By hand | Small batch, tactile control | Best feel, builds confidence |
| Stand machine | Large batches, save time | Even knead, less effort |
| Food processor | Quick mixing start | Fast, then finish by hand |
Building the filling: creamy potatoes meet nutty pecorino
I trust warm, just-cooked potatoes for the smoothest mash; steaming off excess water is the secret. Cook potatoes until tender, drain, and let them sit a few minutes so surface water evaporates.
Rice or mash while still warm to avoid lumps and to help the cheese and olive oil blend evenly. Work gently until the texture feels creamy but firm enough to hold a heaped teaspoon without slumping.
Cheese choices and seasoning
Pecorino Sardo gives a round, buttery sheep’s-milk note. Pecorino Romano is sharper and saltier; use less and taste before adding extra salt.
- For a mild finish, add grated pecorino cheese slowly and adjust salt to taste.
- Drizzle extra-virgin olive oil to bind the mash and add fruity depth without greasiness.
- Warm a garlic clove in oil to infuse, discard the clove, then stir the oil in for a soft garlic presence.
- Or fold in chopped mint leaves for the bright, local touch many families prefer.
| Element | Pecorino Sardo | Pecorino Romano / Seasoning |
|---|---|---|
| Flavor | Buttery, mild sheep’s-milk | Sharp, salty, intense |
| How to use | Add more freely; taste at end | Use sparingly; reduce added salt |
| Seasoning note | Mint brightens the mix | Garlic-warmed oil gives savory warmth |
Finish the filling by tasting, cooling, and checking firmness. A properly set filling will seal cleanly and stay put while you shape and cook.
Roll, cut, and prep: turning dough into neat wrappers
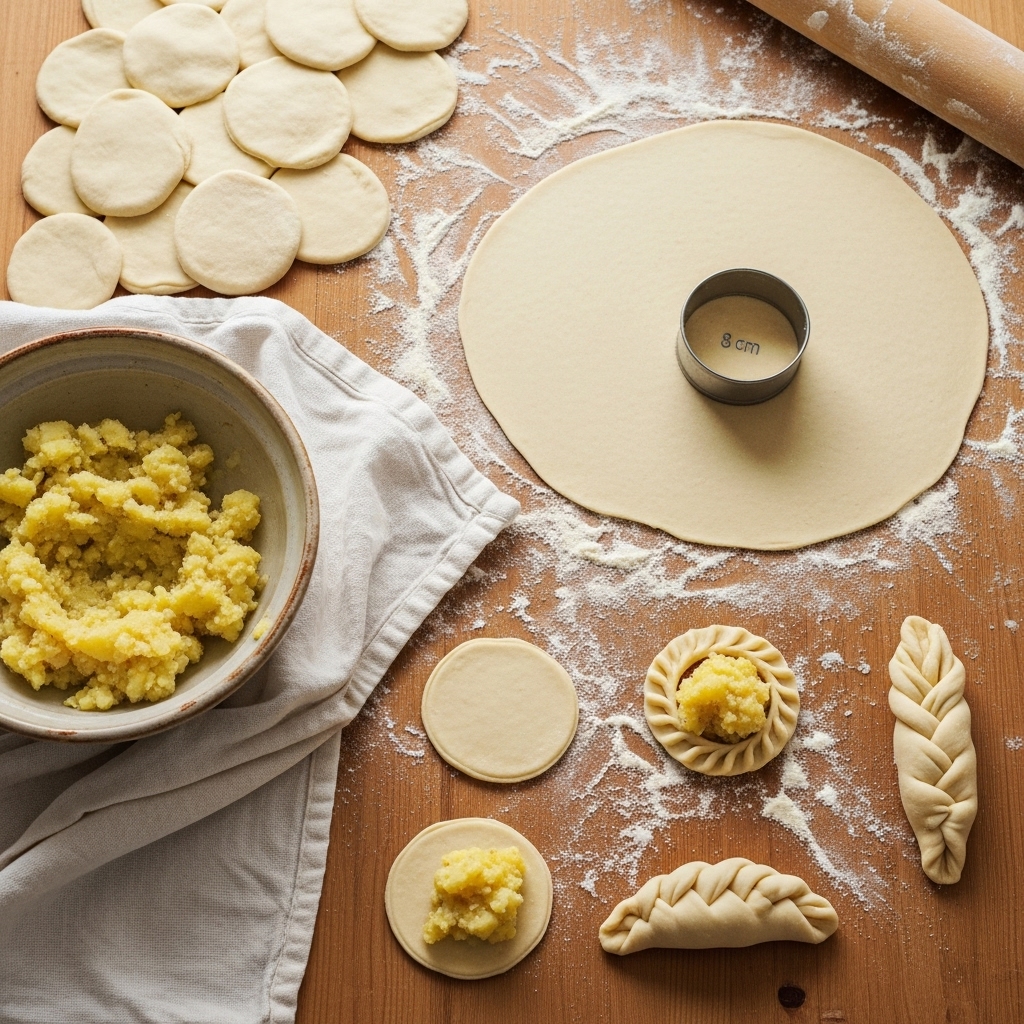
I like to work in small portions so each sheet gets even pressure and a confident edge. Divide the rested dough into pieces you can roll in one go, keeping the unused portions covered with a damp towel so they stay flexible.
Sheet thickness and cutter size for the right bite
Roll sheets with a pasta machine or a pin to between 1 and 3 mm. Aim for about 1 mm for a delicate finish, or up to 3 mm if you want a sturdier wrapper that’s easier to braid.
Keep dough supple: cover and time your workflow
- Use a 3-inch (≈8 cm) cutter or glass for consistent circles; uniform rounds make sealing predictable.
- Lightly dust with flour, but avoid excess — too much prevents edges from sticking when you seal with a little water from a bowl.
- Park cut rounds in a single layer under a damp towel; dry edges are the main cause of leaks.
- Re-roll trimmings once only; repeated passes toughen the pasta. Test one wrapper with a heaped teaspoon of filling before cutting the whole batch.
- Work in short bursts: cut a dozen, fill and seal, then cut the next set so nothing dries out. Each shaping stage should take only a few minutes so sheets stay pliable.
| Step | Target | Why it matters |
|---|---|---|
| Roll | 1–3 mm | Thin = tender; thick = easier braid handling |
| Cut | 3 inches / 8 cm | Provides rim for a secure seal |
| Rest & cover | Damp towel | Prevents drying and torn edges |
How to shape culurgiones like a local
Begin with a single circle in your non-dominant hand and focus on a snug base. This simple start makes every later pinch predictable and steady.
Hand position and the zipper pleat
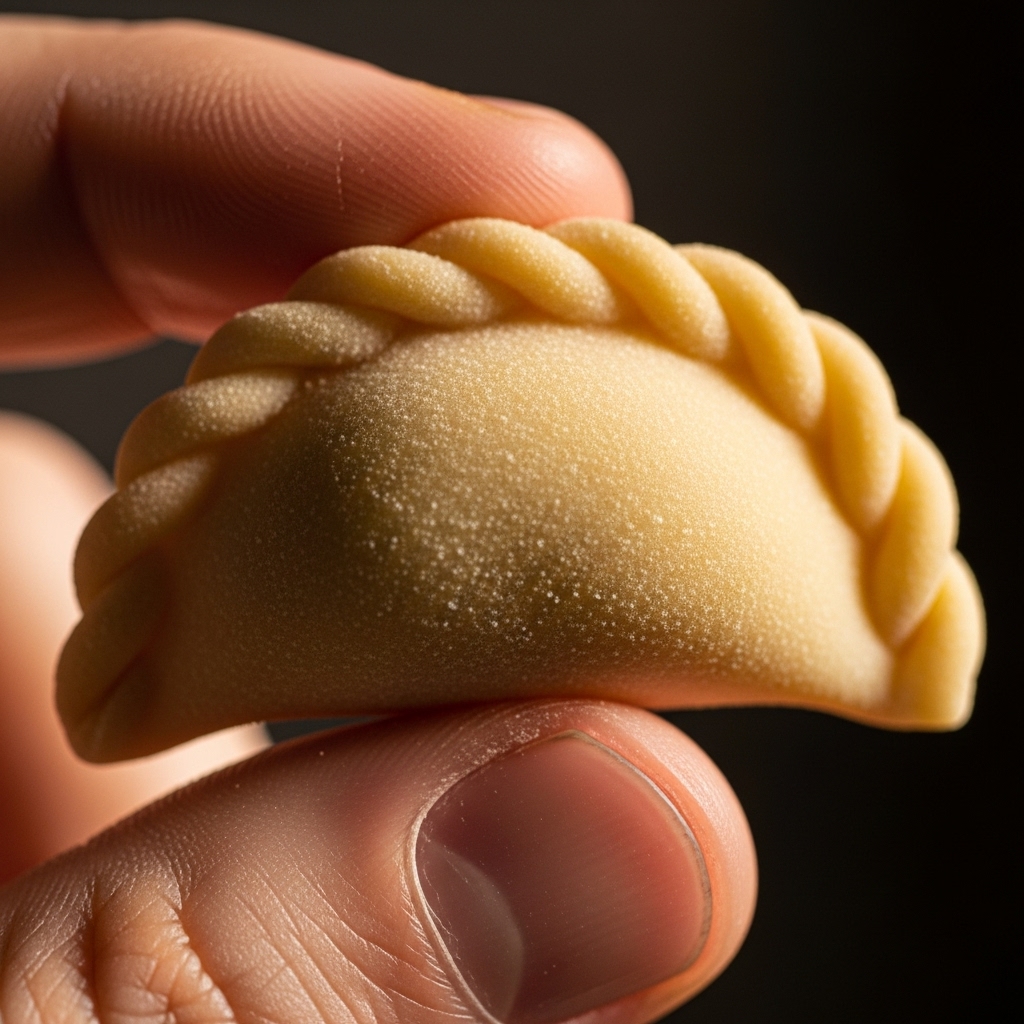
Place a circle in your palm, mound the filling, and use your index finger to nudge the base so no air remains. Start at the bottom: fold left over center and pinch, then fold right and pinch. Repeat this zipper rhythm up to the top so the braid resembles a wheat grain.
Troubleshooting seals
If edges won’t stick, dab a tiny touch of water on the rim and press firmly. Overfilling leads to leaks—aim for a heaped teaspoon so a clean rim shows around the mound. For tears, patch with a thin scrap of dough, press to seal, and continue braiding.
Quick alternative when braid is hard
If the spighitta feels tricky, make a crescent with a double pinch along the seam. It won’t be braided, but it holds well while cooking and still pairs perfectly with a simple sauce.
- Final pin at the tip tidies the end and creates that classic top finish.
- Work with a calm rhythm: left, right, pinch. Repeat.
Cook them right: boiling (and optional frying) for perfect texture
Bring a large pot of water to a lively boil, add a generous pinch of salt, then lower the heat so the surface moves but is not violent. This gentler simmer protects the seam while the pasta finishes cooking.
Drop pieces in batches so they don’t crowd. Stir once to stop sticking, then watch for the float test: when they rise, give them another 30–60 minutes—sorry, seconds—usually totaling 4–6 minutes depending on thickness.
Finish and serve with confidence
- Lift each one with a slotted spoon and let excess water drain before plating or slipping directly into warm sauce.
- For a crisp appetizer, shallow- or deep-fry until golden and serve with a pecorino crema or bright sauce.
- To marry flavors, toss briefly in a simmering tomato sauce for a minute so the filling and sauce blend without overcooking.
- Taste one from the first batch to lock in your ideal minute mark for the rest; keep cooked pieces warm on a lightly oiled tray between batches.
| Method | Guide | Why it helps |
|---|---|---|
| Boiling then simmer | 4–6 minutes total | Gentle heat protects the seam and yields tender pasta |
| Frying | Golden, quick fry | Crisp exterior, creamy interior; great appetizer |
| Finish in sauce | 30–60 seconds | Marries flavors without softening wrapper too much |
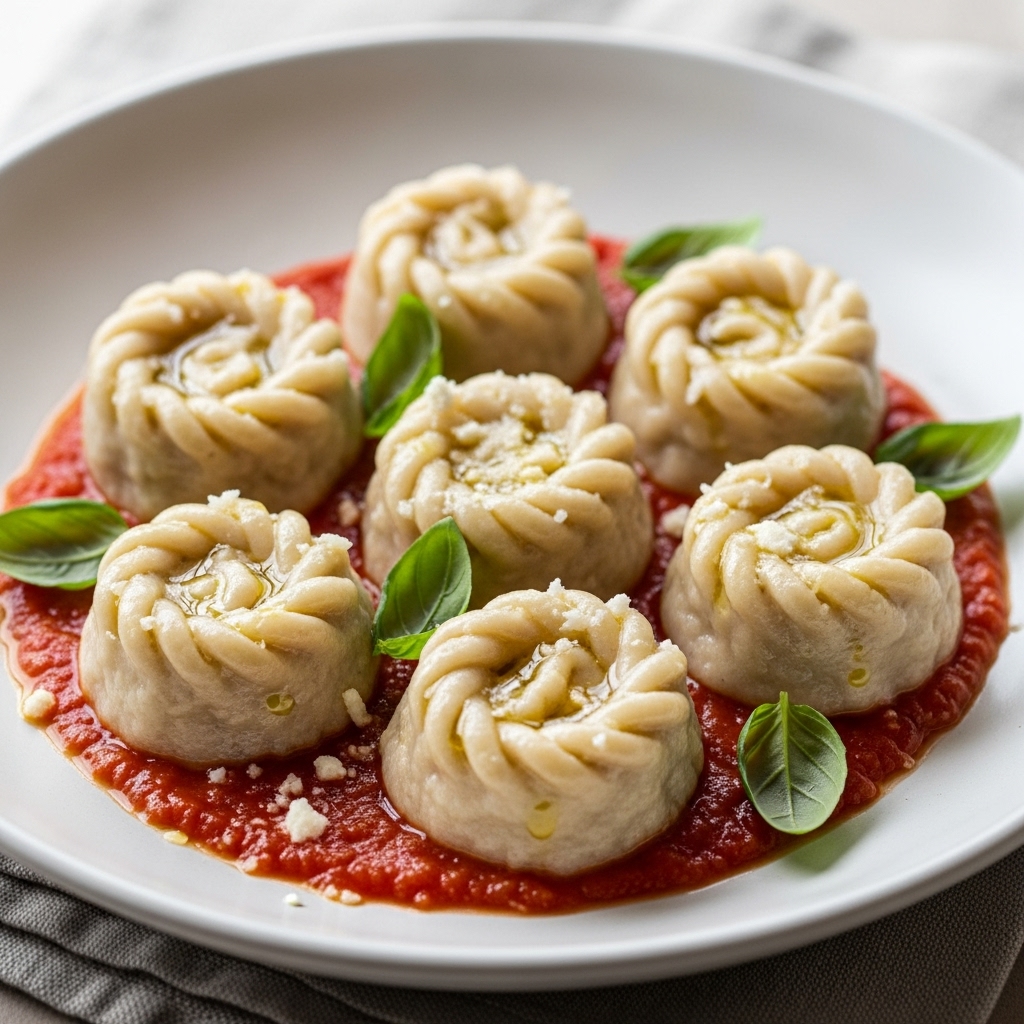
Serve like Sardinia: simple tomato sauce, basil, and pecorino on top
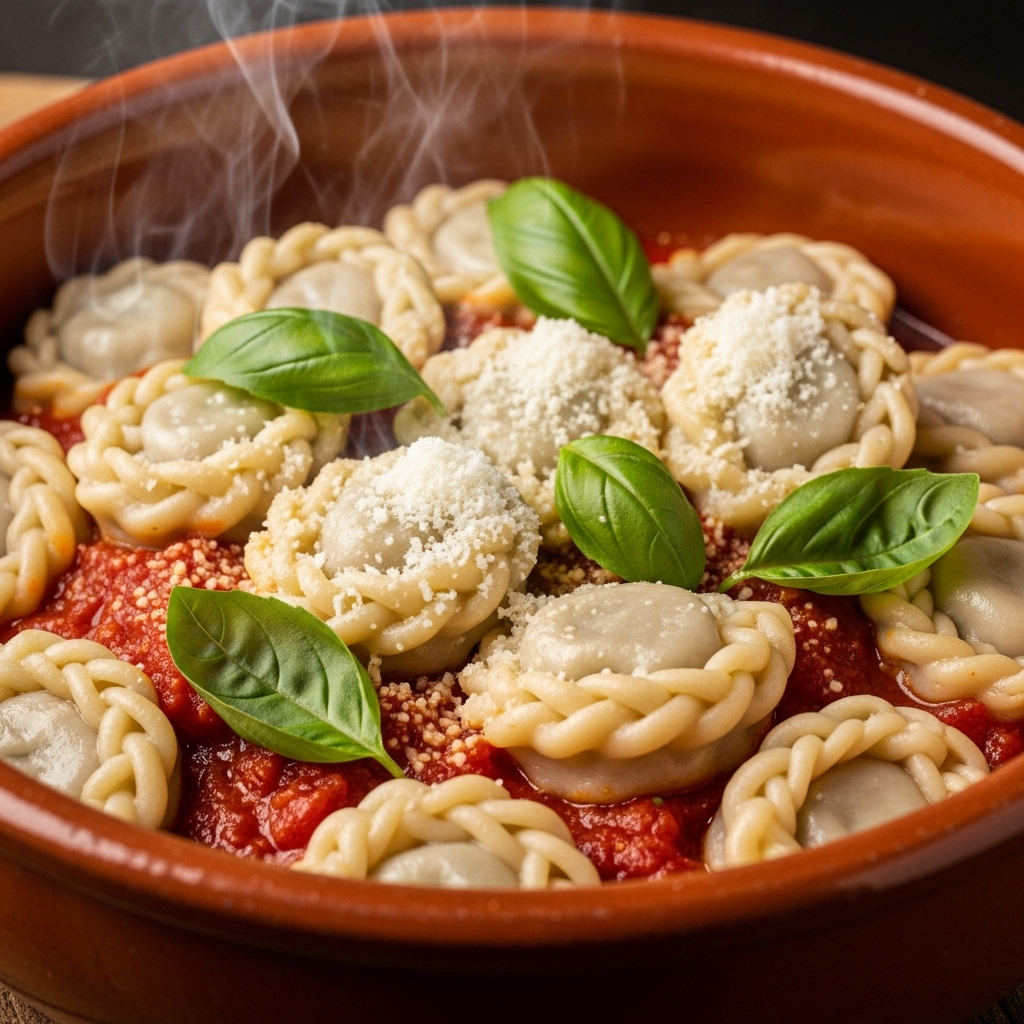
Serve these little parcels with a bright tomato base and a scatter of fresh leaves. A clean, warm sauce under each piece highlights the potato, cheese, and the delicate pasta wrapper.
Fast homemade tomato sauce the traditional way
Warm a splash of olive oil in a pan and soften a diced onion until translucent. Add chopped tomatoes or canned plum tomatoes—San Marzano if you have them—and simmer 5–10 minutes until slightly thickened.
Season with salt and pull the pan off the heat. Stir in torn basil leaves so they keep their fragrance. This quick tomato sauce is bright and lets the filling remain the star.
Alternative sauces: red pepper crema or pecorino crema
For a twist, roast red peppers and blend them with olive and a little cream for a silky red pepper crema. Or stir warm cream into grated pecorino for a tangy pecorino crema that’s perfect for dipping or drizzling.
Plating tips: sauce base, pasta on top, and a glossy olive oil finish
- Make a warm pool of sauce on each plate, then nest the pieces on top so the braid stays visible.
- Finish with a shower of grated pecorino and a few basil leaves for perfume.
- Add a light thread of extra-virgin olive oil to lend gloss and fruitiness.
- If you finish the pieces briefly in sauce, keep contact short so seams stay defined and texture stays tender.
Variations, make-ahead, and storage
A few simple changes to the dough or filling can shift the whole character of the dish without adding work. Below I share regional spins and clear steps to make ahead, refrigerate, and freeze so your efforts last.
Regional spins and flavor ideas
In Ogliastra many households fold in fresh mint leaves for a bright finish. Other towns prefer a garlic-forward filling or mixes with ricotta, cooked meats, saffron, or spinach.
Local cheeses such as fisidu appear in Barbagia, and Villagrande Strisaili sometimes fries the parcels for a crisp result. Use these variations to match your pantry and taste.
Make-ahead timeline and workflow
Mix and rest the dough first so gluten relaxes. Cook and cool the potatoes-based filling, then shape in relaxed batches so rounds don’t dry out.
Work in stages: dough resting, filling cooling, then shaping. This keeps seams neat and speeds final assembly when you want to serve.
Refrigerating and freezing: keep texture intact
- Refrigerate cooked pieces up to 4 days. Store in a single layer with a light brush of olive oil to prevent sticking.
- To freeze, cook, cool fully, freeze on a tray in one layer, then transfer to a bag for up to 2 months.
- Reheat gently: plunge into simmering water until warmed through or finish briefly in a warm tomato or basil-kissed sauce so the pasta and sauce marry.
Conclusion
Bring a sense of calm to your kitchen and let this simple craft connect you to a long culinary story. Use a supple semolina dough, a balanced potato-and-pecorino filling with mint or garlic, and practice the spighitta seal until it feels natural.
Cook gently, serve over a light tomato sauce with basil, and finish with a snowfall of cheese. This approach honors the PGI tradition from Ogliastra while fitting easily into home rhythms.
You now have a clear path to make culurgiones that taste of place and family. Keep practicing the fold; each batch improves. Try the full recipe, share the meal, and enjoy how this pasta brings people closer.
Culurgiones (Sardinian Potato & Pecorino Dumplings)
Ingredients
Method
- Combine semolina, salt, and optional 00 flour on your work surface.
- Add water slowly and start bringing everything together.
- Knead 10–15 minutes until smooth, firm, and elastic.
- Add a splash of olive oil and knead it in.
- Wrap and rest for 20–30 minutes so the gluten relaxes.
- Boil potatoes whole with the skin on until tender.
- Drain and let them steam-dry a few minutes.
- Peel and rice/mash them while still warm.
- Mix in grated pecorino, olive oil, and mint or garlic-infused oil.
- Season lightly with salt (Romano is saltier—taste as you go).
- Let the filling cool and firm up.
- Warm olive oil in a pan and cook the onion until soft.
- Add tomatoes and simmer 5–10 minutes.
- Season with salt and finish with torn basil.
- Divide the dough into pieces and keep them covered with a damp towel.
- Roll each piece to 1–3 mm thick (1 mm for delicate, 3 mm for easier handling).
- Cut out circles with an 8 cm / 3-inch cutter.
- Keep the circles covered so they don’t dry out.
- Place a round in your palm and add a heaped teaspoon of filling.
- Push out air from the bottom.
- Start the spighitta braid: pinch left over center, then right over center, repeating up the seam.
- Finish with a tight last pinch at the tip.
- If braiding is too tricky, seal into a crescent shape with a double pinch.
- Bring a large pot of salted water to a gentle boil.
- Drop in dumplings in batches.
- Cook 4–6 minutes, or until they float and feel tender.
- Lift gently with a slotted spoon.
- Spoon tomato sauce on the plate.
- Place culurgiones on top so the braid shows.
- Finish with grated pecorino, basil, and a thread of olive oil.
Notes
- Resting the dough makes it easier to roll thin without cracking.
- Keep the cut circles under a damp towel—dry edges are the main cause of broken seams.
- Don’t overfill; you always need a clean rim for a tight braid.
- Mint is traditional in many Sardinian homes, but garlic-infused oil is also common—either works beautifully.
- If you freeze them, cook straight from frozen and add 1–2 extra minutes.