
Jump to Recipe
There’s a particular comfort in the rhythm of the kitchen, especially when a few simple ingredients come together to create something truly special. The scent of citrus zest and the feel of a smooth, rich cheese in a bowl signal the start of something good. It’s a process that feels both timeless and deeply personal.
This particular dessert has become a favorite in my home because it balances elegance with approachability. The creamy filling provides a luxurious texture, while the bright, sunny flavor cuts through the richness perfectly. It’s a combination that never fails to impress, yet it feels completely grounded in everyday cooking.
What I appreciate most about this recipe is its flexibility. You can take a quick path using quality store-bought components for a fantastic result in no time. Or, you can embrace a more traditional, from-scratch approach. Both methods honor the core principle: letting excellent ingredients shine with simple, careful handling.
The process is wonderfully forgiving. The main component for the filling is naturally smooth and stable, making it reliable for bakers of all skill levels. This trustworthiness means you can prepare it ahead of time, making it a practical choice for entertaining. It’s one of those dependable desserts that feels just right.
Key Takeaways
- This dessert combines a creamy, rich filling with a bright, citrus flavor for a balanced taste.
- It is designed to be approachable for home cooks, requiring no advanced pastry skills.
- You can choose from multiple preparation methods to fit your schedule and preference.
- The process is forgiving, making it a reliable choice for consistent results.
- The finished product holds well, allowing for preparation ahead of time.
- It emphasizes using quality ingredients treated with simple, respectful techniques.
- This is a versatile addition to your collection of favorite desserts.
Gathering Fresh Ingredients and Essential Tools
I find that taking a few minutes to organize my tools and ingredients sets the stage for an enjoyable baking session. This approach saves time and prevents interruptions once you begin mixing. Having everything within reach makes the process feel calm and controlled.
Quality matters with the core components. The cheese should feel dense and show no separation when you open the container. Cold heavy cream incorporates better, creating a smooth texture rather than a grainy one.
Tool Checklist for a Smooth Baking Experience
A tart pan with a removable bottom is essential for clean release. Choose an 8 or 9-inch size for best results. This design protects the delicate crust during serving.
Your mixing bowl should be large enough to prevent splashing. Stainless steel or glass maintains cold temperatures better than plastic. Keep a flexible spatula nearby for scraping the sides.
An offset spatula helps create smooth surfaces. For decoration, piping bags with star tips offer beautiful finishing touches. These tools make assembly straightforward.
Ingredient Substitutions and Conversion Tips
Measurements can vary between recipes. A digital scale provides more accuracy than volume measurements for consistent results. This is especially helpful with ingredients where texture affects volume.
While some recipes combine cream cheese with other components, the unique consistency of mascarpone doesn’t translate perfectly. Technique matters more than substitutions here.
Remember that most steps allow for pauses. Dough can rest, baked shells wait comfortably, and the filling comes together quickly when components are ready. This flexibility makes timing manageable.
Mastering the Buttery Tart Shell
Working with pastry dough can feel intimidating, but a few simple techniques make the process approachable for any home cook. The foundation you build here supports everything that follows.
Creating a Flaky, Golden Crust
I prefer the pressed-dough method for its simplicity. You work butter into flour and sugar until the mixture resembles coarse sand. This creates a tender, buttery pastry without rolling.
Press the mixture firmly into your tart pan. Pay special attention to the corners where the sides meet the bottom. Even thickness prevents uneven baking.
Baking time and temperature are crucial. An oven set to 350°F typically yields perfect results in about 15-18 minutes. Watch for a golden brown color and fragrant aroma.
Handling Dough and Preventing Excess Moisture
Trim any excess dough that rises above the pan rim. This ensures clean edges when you unmold the finished dessert. A perfectly baked shell should feel crisp and dry.
Let the shell cool completely on a wire rack before adding filling. A warm crust meeting cold ingredients creates condensation. This moisture leads to soggy bottoms.
For an easier alternative, a graham cracker crust requires minimal effort. The texture will be more crumbly than traditional sweet pastry, but it works beautifully.
Crafting the Creamy Mascarpone Filling
Creating the perfect filling requires understanding how different dairy components interact when combined. The character of your dessert truly comes alive in this stage.
Each method offers distinct advantages depending on your desired outcome. The key lies in handling the ingredients with respect for their individual properties.
Mixing Techniques for a Smooth, Spreadable Texture
Temperature control is essential for achieving the right consistency. Always use chilled ingredients straight from the refrigerator.
For the no-bake version, gentle whisking creates a soft, spreadable mixture. Stop as soon as the components blend smoothly to avoid graininess.
The mousse-style approach incorporates cream cheese for added structure. This method allows for decorative piping while maintaining a light texture.
Balancing Mascarpone, Heavy Cream, and Lemon Curd
Proper proportions ensure your filling tastes rich without becoming overwhelming. The balance between creamy richness and bright acidity defines the final flavor profile.
When using lemon curd, start with smaller amounts and adjust to taste. The goal is complementary flavors rather than competition.
| Filling Method | Key Ingredients | Best Use | Texture Result |
|---|---|---|---|
| No-Bake | Cold mascarpone, double cream, lemon curd | Quick preparation | Soft and spreadable |
| Mousse-Style | Mascarpone cheese, cream cheese, heavy cream | Decorative piping | Light and airy |
| Baked Custard | Mascarpone, eggs, sugar, lemon juice | Firm slices | Set and sliceable |
Each technique requires different approaches to mixing. The baked custard method involves whisking mascarpone into egg and sugar mixtures rather than whipping.
Regardless of your chosen method, patience and attention to detail yield the best results. The creamy mascarpone filling should hold its shape while remaining luxuriously smooth.
Elevating Flavors with Lemon Zest and Curds
The bright, citrus notes in this dessert transform it from simply rich to perfectly balanced. This harmony comes from understanding how to work with fresh fruit components effectively.
Infusing Fresh Lemon and Zest for a Vibrant Kick
Working with zest requires careful attention. Use a microplane to remove only the yellow outer layer. The white pith underneath adds unwanted bitterness.
Rubbing the zest with sugar before mixing releases aromatic oils. This technique intensifies the citrus flavor throughout the filling. It creates tiny bursts of fresh fruit essence.
When incorporating juice, balance is crucial. Direct addition in large quantities can affect texture. Many preparations use curd to deliver concentrated flavor without compromising consistency.
| Flavoring Method | Key Components | Flavor Intensity | Best Use Case |
|---|---|---|---|
| Fresh Zest Only | 2 tsp zest rubbed with sugar | Subtle, aromatic | Delicate, creamy fillings |
| Lemon Curd Base | 6 tbsp curd mixed in | Bold, concentrated | No-bake preparations |
| Juice & Zest Combo | ⅓ cup juice + 2 tsp zest | Bright, acidic | Baked custard versions |
| Artisan Flavoring | 2 tsp specialty extract | Consistent, potent | When fresh fruit unavailable |
Quality store-bought curd works perfectly for time-saving preparation. Homemade versions allow custom tartness control. Both options deliver excellent results when handled properly.
Reserve a couple tablespoons of curd for topping. The bright yellow color creates beautiful visual appeal. It also reinforces the citrus theme for your guests.
Step-by-Step lemon mascarpone tart recipe for Perfect Results
The final assembly of this dessert is where precision meets patience for perfect results. Each method follows a logical sequence where proper technique prevents common issues. We’ll walk through the key steps for each variation.
Assembly and Chilling Tips for Optimal Texture
Always start with a completely cooled shell. Even slightly warm pastry creates condensation that leads to soggy bottoms. This is the most important rule for success.
For no-bake versions, gently spoon your mixture into the shell. Use an offset spatula to spread it evenly toward the edges. Work carefully to avoid disturbing the crust.
The mousse-style approach requires reserving about one cup of filling before assembling. This reserved portion becomes your decorative piping material. Smooth the main portion with your spatula first.
Baked versions need immediate action. Pour your prepared mixture into the hot crust right after baking. Return it to a 325°F oven for 20-25 minutes until set.
| Method | Assembly Key | Chilling Time | Final Texture |
|---|---|---|---|
| No-Bake | Spread cooled filling into cooled shell | 20 minutes minimum | Firm but creamy |
| Mousse-Style | Pipe decorations with reserved filling | 1 hour minimum | Light and airy |
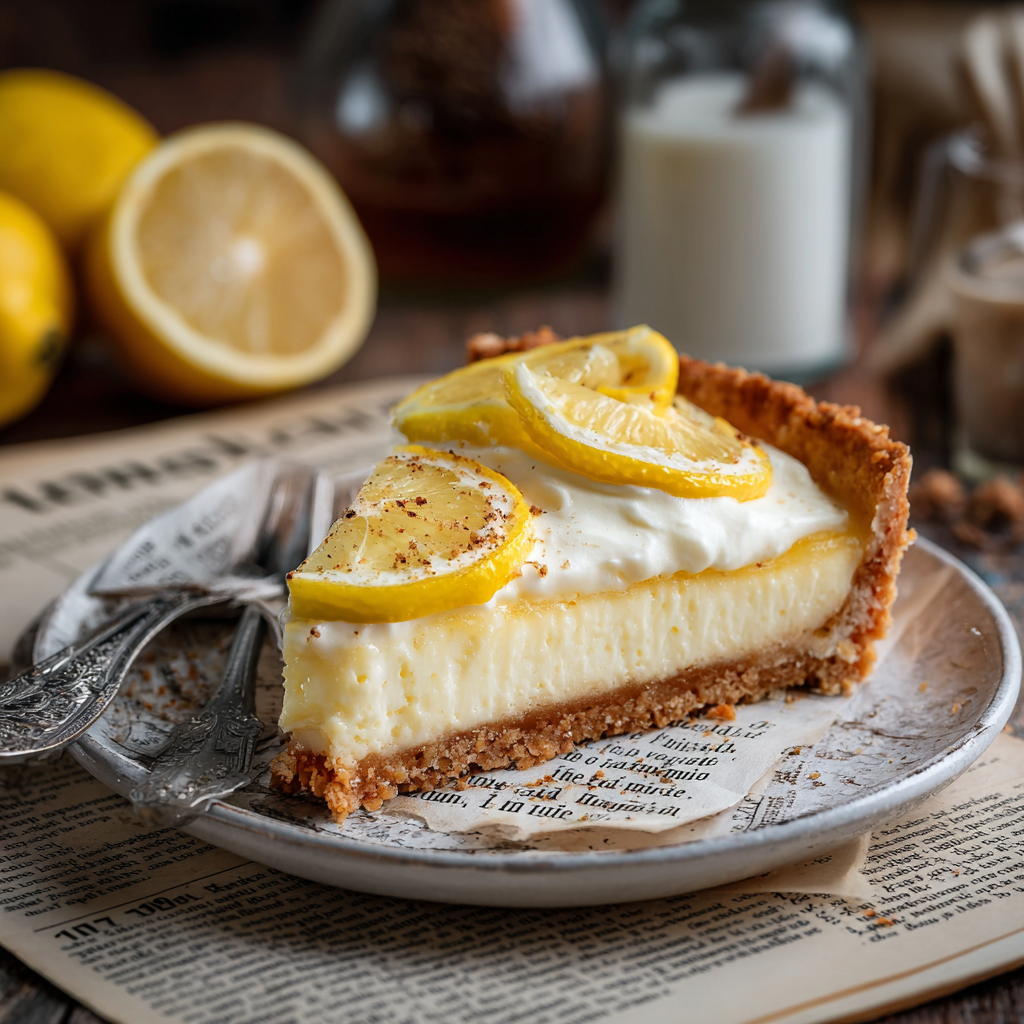
| Baked Custard | Pour into hot shell, bake until set | 2+ hours to set fully | Sliceable firmness |
Respect the chilling times specified. This isn’t optional—it’s when the components firm up properly. The no-bake version needs the shortest time, while baked versions require patience.
Clear refrigerator space before you begin. You’ll need to slide the finished product in carefully without tilting. Proper chilling ensures clean slices when serving time arrives.
Final Touches and Serving Your Tart Masterpiece
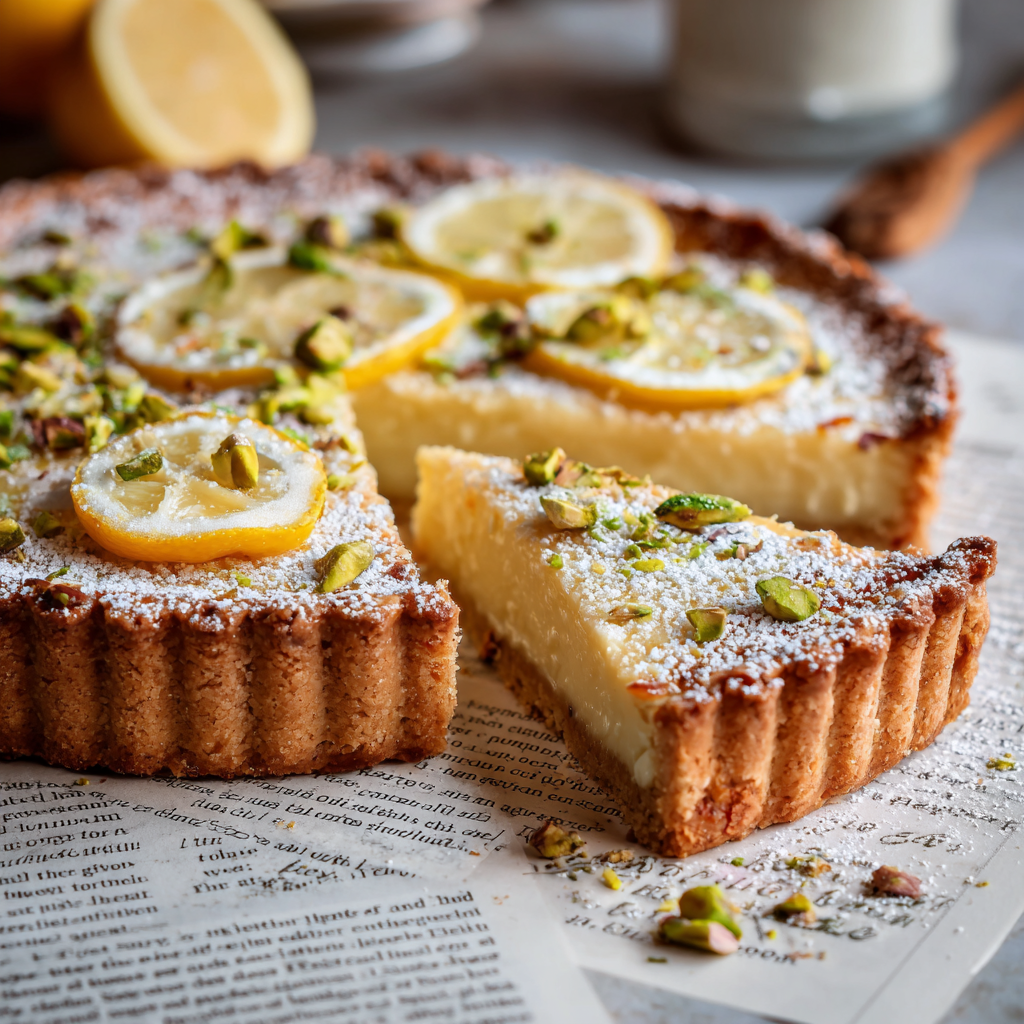
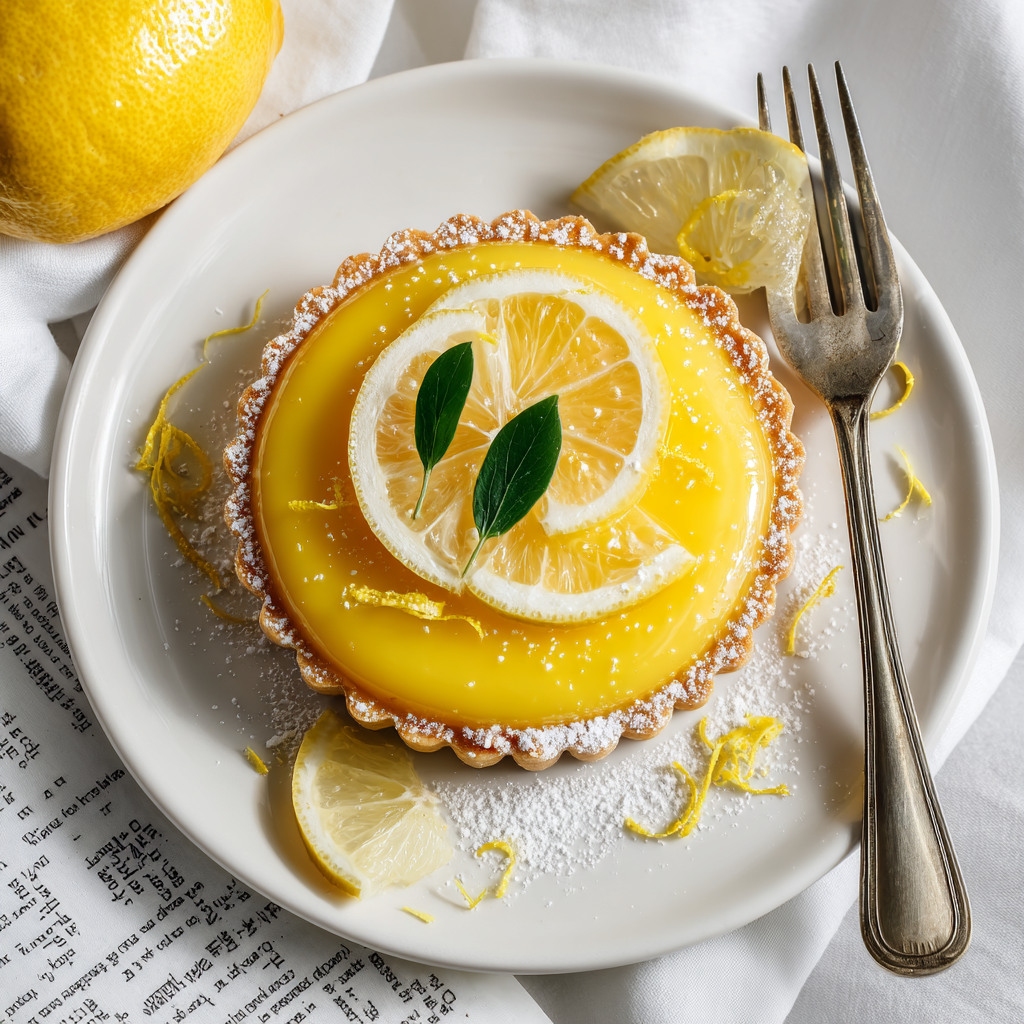
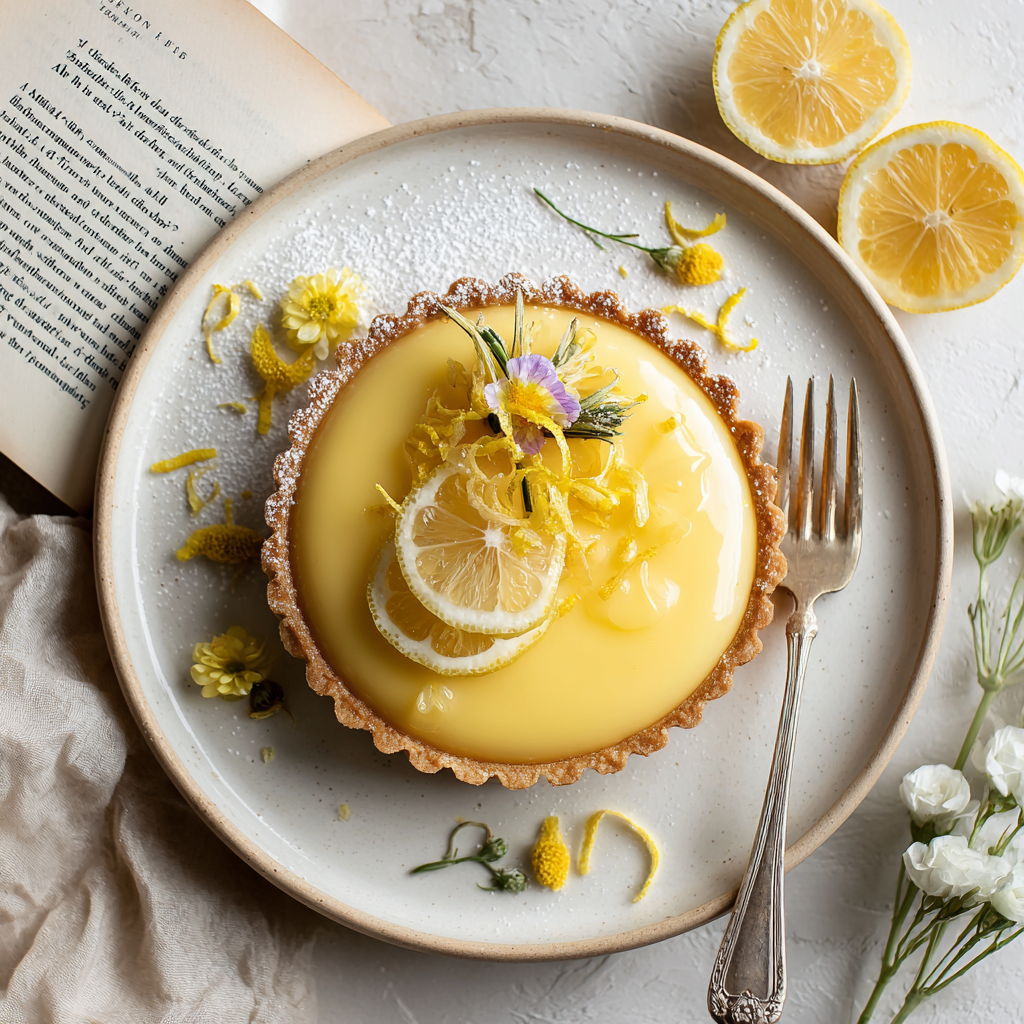
Proper storage and serving techniques ensure your dessert maintains its intended quality. A light dusting of powdered sugar right before serving creates beautiful contrast. Fresh lemon slices or chopped pistachios add visual appeal and textural interest.
For clean slices, run your knife under hot water and wipe it dry. Cut in one smooth motion rather than sawing. This preserves the delicate texture of the filling.
Keep your creation refrigerated at all times. The cheese and cream components are highly perishable. Don’t leave it at room temperature for more than a couple hours.
Leftovers keep well for 2-3 days in an airtight container. The crust may soften slightly over time. Planning ahead works beautifully—you can prepare this dessert a day in advance. For another delightful Italian dessert option, explore this limoncello tiramisu recipe that shares similar make-ahead convenience.
Lemon Mascarpone Tart
Ingredients
Method
- Preheat your oven to 350°F (175°C).
- In a mixing bowl, combine flour, sugar, and salt. Add cubed butter and mix until the dough resembles coarse sand.
- Press the dough evenly into a tart pan with a removable bottom, focusing on the edges.
- Bake for 15-18 minutes or until golden brown. Let it cool completely on a wire rack.
- In a large bowl, whip the chilled mascarpone cheese and heavy cream until smooth and fluffy.
- Gradually fold in lemon curd, lemon zest, and powdered sugar. Mix until well combined.
- Chill the filling for 10 minutes to firm it up.
- Once the tart shell has cooled completely, spread the mascarpone filling evenly into the shell using an offset spatula.
- For the mousse-style tart, reserve some filling for decorative piping.
- Chill the tart in the fridge for at least 1 hour (or 4 hours for best results).
- After chilling, decorate the tart with fresh lemon slices, chopped pistachios, and a dusting of powdered sugar.
- Slice and serve chilled for clean, firm slices.
Notes
- You can make the tart ahead of time and refrigerate it overnight for best results.
- If you prefer a graham cracker crust, substitute the pastry shell for a simple graham cracker crust for a quicker option.
- Using fresh lemon zest and curd enhances the flavor significantly compared to store-bought options.
- The tart shell must be completely cool before adding the filling to avoid sogginess.