
Jump to Recipe
I learned this stuffed focaccia bread recipe at my nonna’s elbow, where warm flour dusted our hands and olive oil steamed in the pan.
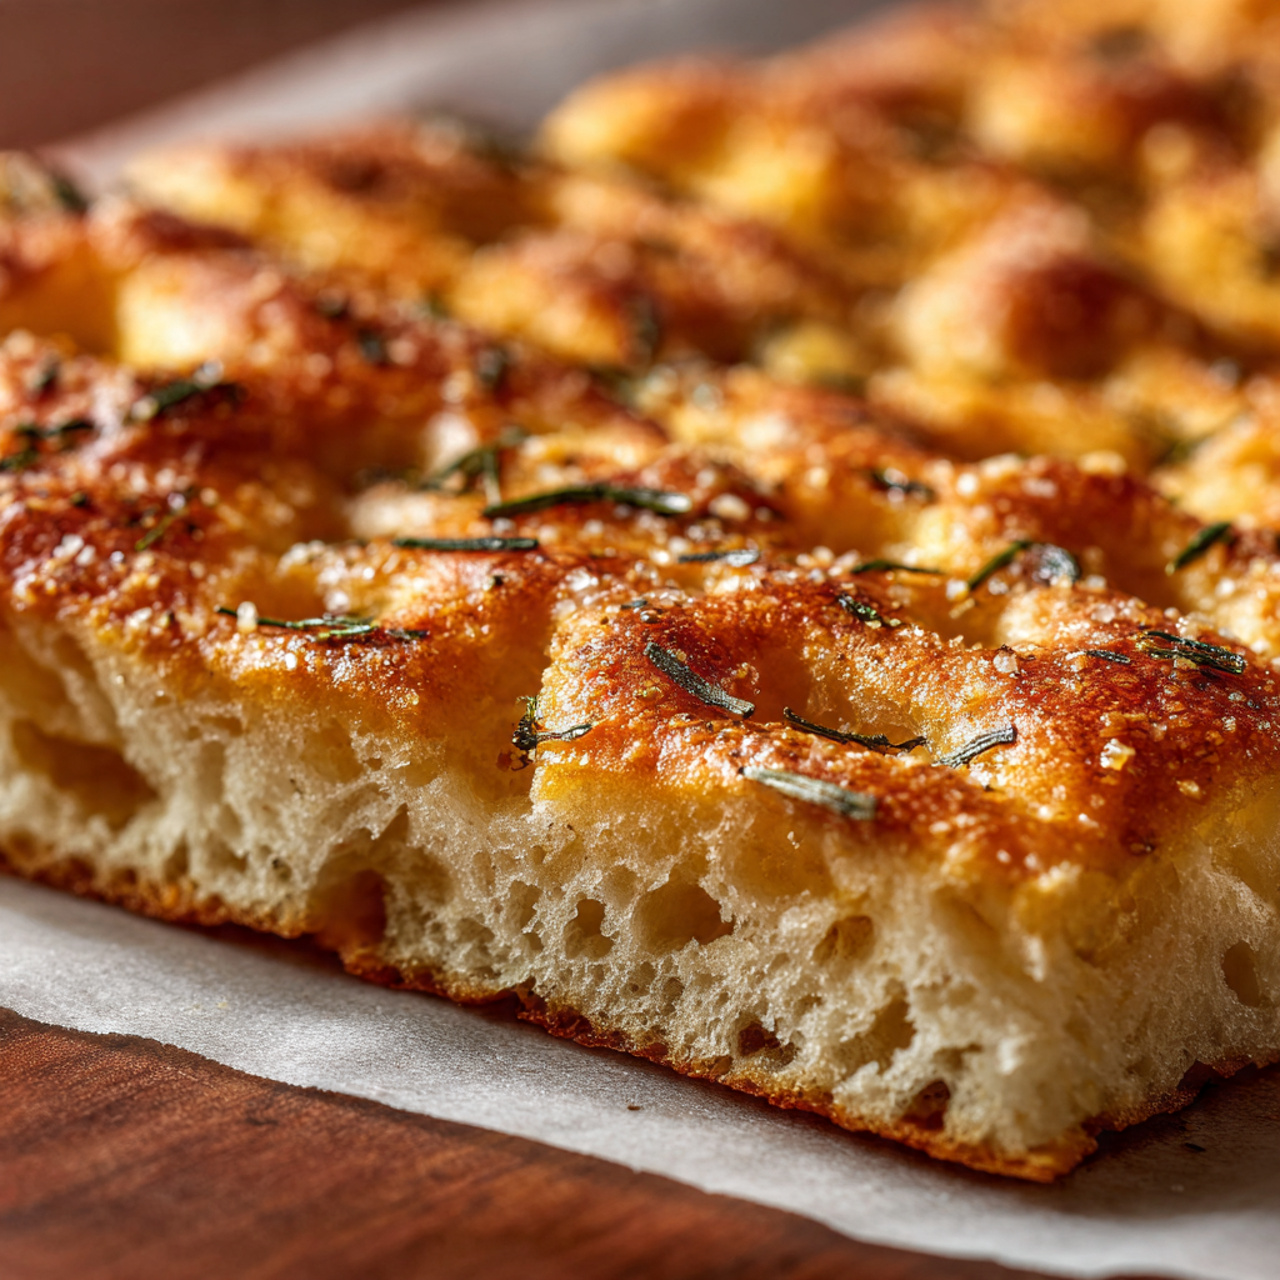
We aim for a soft, pliable dough with deep dimples, a golden top, and edges that crisp at 425°F. I mix until the dough “cleans the bowl,” then let it rise at room temperature or chill overnight for richer flavor. Cheese helps bind fillings, so slices hold together, and I always roast or drain vegetables to keep moisture in check.
Use a springform or a 9×9 pan, press dimples before baking, and brush with infused oil for extra aroma. Small technique choices—how long you rest the dough, how you seal the seam—change texture more than fancy steps. I share practical safety notes for infused oil and simple storage tips so your loaf stays fresh and the family gathers without fuss.
Key Takeaways
- Mix until the dough “cleans the bowl” for ideal hydration and texture.
- Control moisture: roast or drain fillings and use cheese as a binder.
- Bake hot at 425°F for a golden, deeply browned top and crisp edge.
- Make ahead: room rise or refrigerate up to 3 days for better flavor.
- Small pro moves—pan choice, dimpling, infused oil—boost flavor and consistency.
Why this family-loved focaccia delivers big flavor with simple steps
What turns a good loaf into a family favorite is not trickery, but the way the dough behaves in your hands. A well-hydrated dough lets gluten relax and gives the airy crumb we all crave. Mix just until the dough is smooth and it pulls clean from the bowl.
Proofing in a warm place speeds the rise; tuck the pan somewhere cozy for quick results in minutes. For depth of flavor, I refrigerate the dough overnight. Keep salt away from direct contact with yeast during the first mix so the rise stays lively and predictable.
We rely on visual and tactile cues: elastic feel, dimples that hold, and a surface that springs back slowly. Brush a generous film of olive over the top before baking and bake hot until the top is deeply browned — that contrast gives a savory aroma and gentle chew.
- Simple steps: combine, mix, rest, dimple, brush, bake.
- Use cheese as a binder for fillings to limit sogginess.
- Trust the dough’s look and feel over strict times.
| Technique | Warm Proof | Cold Ferment | Visual Cue |
|---|---|---|---|
| Time | 30–90 minutes | 8–24 hours | Doubling in volume |
| Flavor | Bright, yeasty | Deeper, tangy | Airy crumb |
| Handling | Easier short rest | Softer, stickier dough | Holds dimples well |
| Finish | Quick bake for color | Rich crust after high-heat baking | Deep brown top |
What you’ll need: pantry staples, cheese, and the right pan
A few trusted pantry items and the right pan set you up for success every time. I keep a small list by the stove so I can pull everything when company calls.

For the dough I favor bread flour for strength and a higher rise, though all-purpose flour works in a pinch. Use instant yeast and warm water to wake the yeast quickly. A splash of olive oil and sea salt brings flavor and tenderness.
- Choose lower‑moisture fillings: roasted peppers, sautéed onions, drained tomatoes, olives, marinated artichokes, pesto, or low‑moisture mozzarella.
- If using sausage, cook it through and cool so juices settle before layering.
- A stand mixer with a dough hook or a sturdy large bowl both make a smooth, elastic dough possible.
- Keep plastic wrap handy to cover rises, and brush a little oil on the pan for easy release and a crisp edge.
- Measure carefully — each cup of water matters for consistent results across batches.
Dough and filling essentials
Salt the dough with sea salt and add garlic or herbs to taste. Use cheese sparingly as a binder so fillings don’t make the crumb soggy.
| Item | Why it helps | Tip |
|---|---|---|
| Flour choice | Strength and chew | Prefer bread flour for lift; use all‑purpose if needed |
| Pan | Tall, even sides aid shaping | 9‑inch springform or 9×9 pan for neat slices |
| Tools | Consistency and ease | Large bowl or mixer, plastic wrap, measuring cups |
Mastering the dough: from mixing to a pillowy rise
I always begin by bringing flour and water into harmony, then watching the dough change under my hands. This step sets the structure for a soft, airy result and saves time later when you shape and layer.
Hydrate, mix, and beat until the dough cleans the bowl
Start by hydrating the flour evenly. Mix until the mass pulls clean from the bowl and feels springy to the touch. Flip the ball midway so the top becomes the bottom; this evens gluten development and removes streaks of dry flour.
Warm place vs cold ferment: flavor gains from an overnight rest
If your kitchen is cool, let the dough proof in a warm place until it has doubled — usually about an hour. For deeper flavor, refrigerate for hours or up to three days. The slow rest builds complexity and a gentle tang.
Pro tips: keep salt off direct yeast, fold for strength, and let the dough relax
Keep salt away from direct contact with yeast during the first mix to protect activity. A few gentle folds build strength without overworking. Rub a teaspoon of oil on your hands to manage stickiness and protect the surface.
How to know it’s ready: smooth, elastic, doubled, and easy to handle
Cover the large bowl with plastic wrap to prevent drying and let rest before shaping. After minutes in warmth or hours in the fridge, the dough should be smooth, elastic, and visibly airy.
- A fingertip press springs back slowly — the classic ready cue.
- When it pulls clean from the mixing bowl, you’ve developed enough gluten.
- Trust tactile signals over strict time, then dimple and brush with oil before baking.
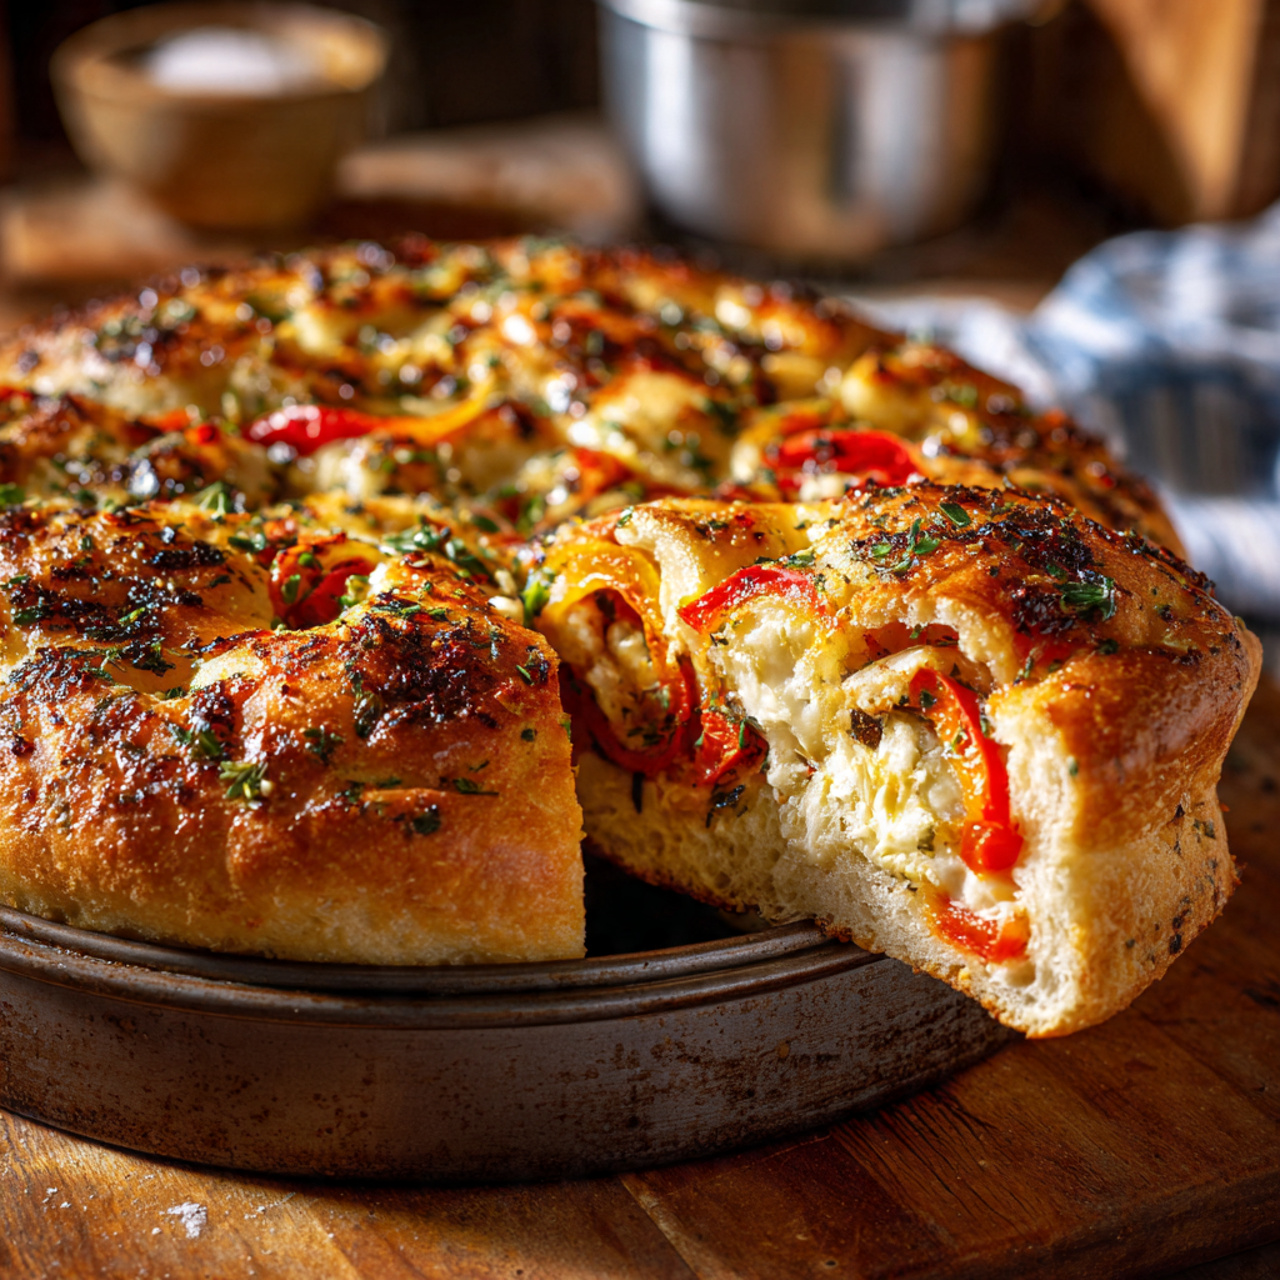
Stuffed focaccia bread recipe: fillings, shaping, and sealing
Start by getting fillings ready so each flavor is cooked, cooled, and ready to layer without releasing extra moisture. Roast peppers and onions on a sheet in a single layer until softened and caramelized. Line fillings separately so you can pull pieces as they finish.
Cook sausage with plenty of onions until the meat is done and the onions are tender-sweet. Drain or gently squeeze tomatoes to remove liquid. Stir a quick pesto or use a jarred one; keep it thick so it spreads without dripping.
Keep moisture in check
- Roast vegetables single‑layer to steam off water and brown edges.
- Let fillings cool so they don’t wilt the dough on contact.
- Pat peppers and drained tomatoes dry before placing them in the pan.
Layering, shaping, and sealing
Lightly oil the pan, then stretch one half of the dough across the bottom and up the sides for a snug base. Spread cheese first as a binder, add vegetables or meats, season with a pinch of salt and pepper, and top with more cheese.
Stretch the second half thin, drape it over the filling, and tuck the edges under the bottom layer; press firmly to seal. Dimple the top to make pockets for oil, then brush with olive oil for a burnished finish. If the dough resists, set aside for a few minutes to relax. Keep a small bowl of water to moisten edges as needed.
| Step | Why it matters | Pro tip |
|---|---|---|
| Prep fillings | Reduces moisture, boosts flavor | Line pans separately; pull when caramelized |
| Base layer | Catches juices and shapes slices | Stretch half the dough up the sides of a 9×9 or springform pan |
| Seal & dimple | Keeps filling inside and controls oven spring | Use a bowl of water to moisten edges for a tight seal |
| Finish | Color and crunch | Brush top with oil and bake until deep golden |
Time and temperature: preheat oven 425 and bake until golden brown
A blazing 425°F oven is the simple secret that turns a soft interior into a golden, crisp finish. Preheat oven fully so the pan meets a fully hot environment and the crust sets on contact.
Slide the pan onto the middle rack and plan to bake minutes in the 20–35 range. Thicker loaves or dense fillings need more minutes; thinner ones will finish sooner. Watch for a deep golden brown top and well-browned sides.
Doneness cues
Press the center gently; it should feel set and spring back slowly. The visual signs matter most: a deep golden top, browned sides, and no wet seams near the edge. If the surface darkens too fast, tent loosely with foil and continue baking until the center is done.
Reheat and serve
Brush the hot loaf with a little oil as it comes out. This adds shine and flavor and keeps the top from drying during the brief rest.
- Let cool a few minutes, then cut wedges or sandwich-style slices for serving.
- To reheat, wrap portions in foil and place in a 425°F oven for about 20 minutes.
- Smaller pieces rewarm at 375°F for ~15 minutes or 350°F for 5–10 minutes depending on size.
- Avoid microwaving; the oven restores crispness and the olive aroma better than quick heat.
Make-ahead, flavorful variations, and the version you’ll bake next
Make-ahead changes everything. Mix the dough, cover the large bowl with plastic wrap, and chill for up to two or three days. Cold dough shapes more cleanly and gains depth of flavor.
On bake day, divide in half, press the bottom layer into the pan, add drained fillings, and seal the top. If the dough resists, set aside for a few minutes to let it relax. For very moist fillings, cut small vents so steam can escape and the seal holds.
Reheat leftovers by preheating oven 425 and warming slices about 20 minutes wrapped in foil. Shorter options: 375°F for roughly 15 minutes, or 350°F for 5–10 minutes to restore a golden brown edge without drying.
Flavor ideas we love include sausage with onions and pepper, pesto with low‑moisture mozzarella, or a sweet apple‑pear and walnut version. Finish each loaf with a brush of olive oil and a pinch of sea salt — it smells like home and invites everyone to the table.
For more family baking that honors our roots, see this family torta al testo and gather a few ideas for your next version.

Stuffed Olive Focaccia Bread
Ingredients
Method
- In a large bowl or mixer, combine flour and yeast.
- Add warm water and olive oil; mix until a shaggy dough forms.
- Add salt (keep it away from direct yeast at first).
- Knead or mix until the dough pulls cleanly from the bowl and feels springy.
- Cover with plastic wrap and let rise at room temperature until doubled (1–1½ hours), or refrigerate overnight for deeper flavor (up to 3 days).
- Roast vegetables on a sheet pan at 400°F until soft and browned.
- Drain tomatoes and pat dry.
- Cook sausage and cool.
- Let all fillings cool before layering.
- Lightly oil a 9-inch springform or 9x9 pan.
- Divide dough in half. Stretch one half across the bottom and up the sides.
- Spread cheese first, then fillings, season, and add more cheese.
- Stretch second dough half thin and lay over the top.
- Tuck and seal edges; press with wet fingers to close seams.
- Dimple the top with fingertips.
- Brush with 2 tablespoons olive oil and sprinkle with coarse salt.
- Preheat oven to 425°F (220°C).
- Bake for 20–35 minutes, until the top is deep golden brown and the center feels set.
- If it browns too fast, cover loosely with foil.
- Brush with more olive oil right after baking for shine and flavor.
- Let cool 10 minutes before slicing.
- Serve warm or at room temperature.
Notes
- For flavor depth: Cold-ferment the dough overnight or up to 3 days.
- For best texture: Bake at high heat (425°F) and brush with olive oil before and after baking.
- Storage: Wrap tightly and refrigerate up to 3 days; reheat in a 350°F oven until crisp.
- Avoid sogginess: Always drain or roast veggies and use cheese as a binder.
- Best pan: 9-inch springform or 9x9 pan for easy release and clean edges.