
Jump to Recipe
I still remember the first time the kitchen filled with warm, herb-scented steam as this parmesan rosemary loaf baked in a hot Dutch oven.
We use an overnight, no-knead method that rewards patience: a wet dough at about 80% hydration, an 18–24 hour room-temperature rise, and a hand-grated cheese plus finely minced herbs folded gently into the mix so flavor blooms while the dough bubbles.
Measure by weight—flour, water, yeast and Diamond Crystal Kosher Salt—to keep the dough predictable, and plan for a 450°F preheated pot: 30 minutes covered, then 10–15 minutes uncovered until the interior hits 200–210°F.
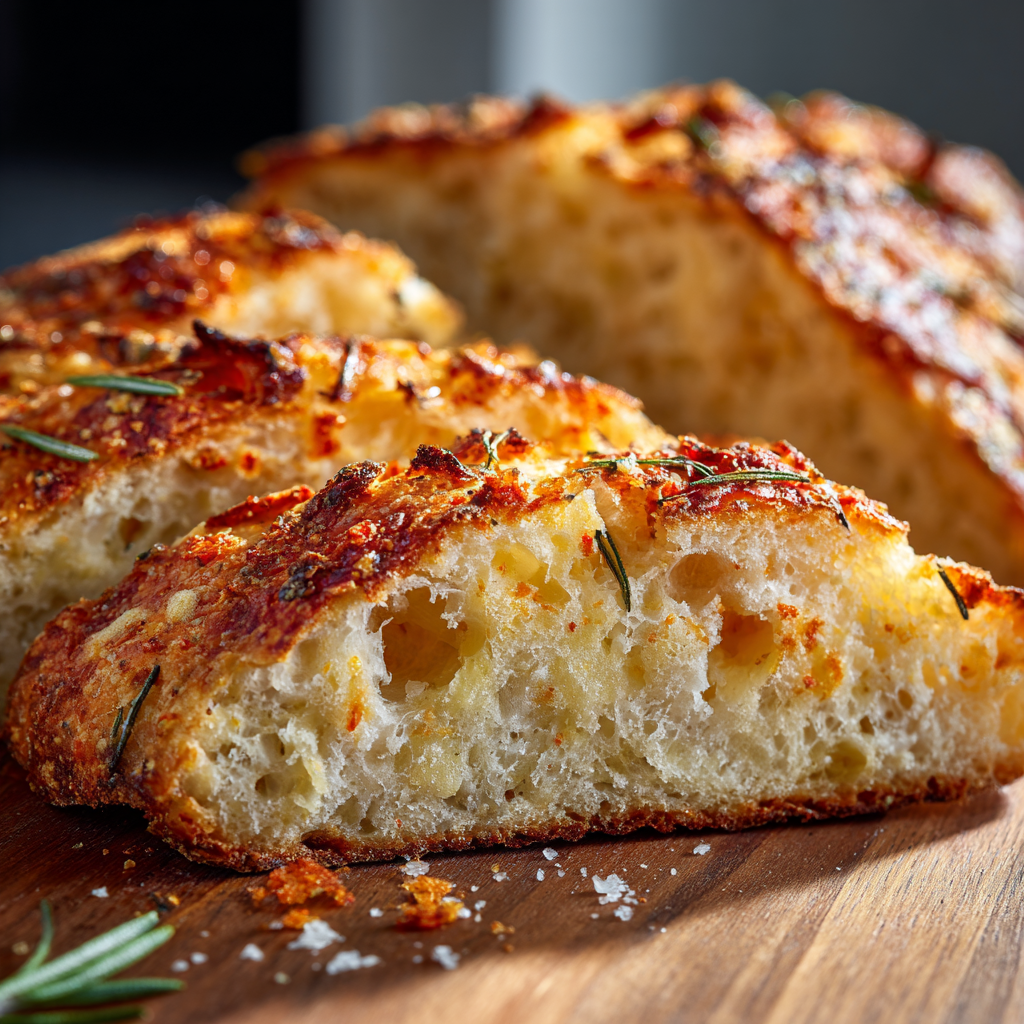
This loaf is forgiving; messy, sticky dough is a good sign and your familiar bowl and a spoon are all you need to make bread that pulls apart with an open crumb and a crackly crust.
Key Takeaways
- Overnight, no-knead method gives big flavor with minimal hands-on time.
- Weigh ingredients and use Diamond Crystal Kosher Salt by weight for consistent results.
- 450°F in a covered Dutch oven creates steam for a tall, crackly crust.
- Room rise of 18–24 hours, 80% hydration, and hand-grated cheese plus fresh herbs develop aroma.
- Internal temperature of 200–210°F signals doneness for this loaf.
Why this rosemary parmesan loaf wins every time
Time, not force, distributes savory bits and lets the crumb stay open while flavors bloom. A long, room-temperature rise lets essential oils from the herb and the salty aged cheese move through the dough slowly. That gentle diffusion seasons the crumb without weighing it down.
Flavor-first: how herb oil and aged cheese infuse the crumb
We hand-grate the cheese so it melts into strands instead of clumping. The small pieces dissolve during fermentation and baking, seasoning each pocket of crumb.
The herb’s oils release over hours, threading herbaceous notes without creating bitter pockets. A modest add-in rate — about 4–5% of total dough weight — keeps the interior airy and the flavor bold.
No-knead ease with artisan results
No-knead dough depends on time for gluten formation. As the dough rests, networks form and trap gas, giving lift without hands-on work. This is why a covered bake that traps steam is vital: it supports expansion before the crust sets and deepens oven spring.
- Slow rise = even flavor and open texture.
- Hand-grated cheese melts, seasoning rather than clumping.
- Low add-in percentage preserves structure and gives bold taste.
| Add-in % (by weight) | Texture Impact | Handling Notes |
|---|---|---|
| ~2% | Very open crumb, subtle flavor | Easy folding; minimal effect on rise |
| ~4.4% | Balanced airy interior with pronounced savory notes | Recommended for this loaf; preserves oven spring |
| ~7–8% | Tighter crumb, stronger flavor | Can weigh dough; reduce hydration slightly |
Want more on technique and pairings? See our deep dive on Italian herbs and cheese in the linked guide: Italian herbs and cheese.
Ingredients that matter: flour, yeast, water, fresh rosemary, and parmesan
Great loaves start with simple, honest ingredients you can trust and store correctly. Small choices — which flour, how you keep yeast, and whether herbs are fresh — shape texture and flavor more than fancy techniques.
All-purpose vs. bread flour and how protein affects texture
Choose bread flour when you want extra chew and a stronger structure. Strong all-purpose flour, like King Arthur AP, sits close to bread flour in protein and gives a tender but resilient crumb.
Instant vs. active dry yeast and storage for reliability
Both instant (rapid rise) and active dry yeast work for our no-knead method. Store unopened yeast in a cool pantry, and keep opened packs in the fridge or freezer to preserve potency.
Fresh vs. dried rosemary and the right ratios
Use fresh rosemary for bright, herbaceous notes. If you swap dried, use half the amount and give it a quick chop so the bits disperse evenly through the dough.
Why hand-grated parmesan beats the pre-grated shaker
Hand-grated parmesan cheese melts cleanly and avoids anti-caking additives that can dry the dough. It gives silkier pockets of flavor and better texture.
- Weigh salt—Diamond Crystal Kosher Salt measures differently; weigh to prevent oversalting.
- Use cool water to slow fermentation for more flavor and easier handling.
- Weigh ingredients to avoid 30–50 gram swings per cup that affect hydration.
- Leftover whey from cheesemaking adds a gentle tang if you have it.
| Ingredient | Tip | Practical swap |
|---|---|---|
| Flour | Bread flour for chew; King Arthur AP for reliable lift and tenderness | Use hatched AP for softer crumb |
| Yeast | Instant or active dry both work; refrigerate opened packs | Freeze portions for long storage |
| Herb | Fresh gives best aroma; dried = half amount, chop finely | Crush dried briefly to release oils |
| Cheese | Hand-grate for melt and texture; avoid powdered shakers | Fine shreds disperse evenly |
Gear check: Dutch oven, parchment paper, scale, and simple tools
Before the dough ever hits the oven, the gear you choose sets the stage for oven spring and crust. A few reliable items make the process calmer and the results repeatable.
Why a preheated pot creates bakery-level crust
I recommend a sturdy dutch oven because its mass and tight lid concentrate steam for a strong rise and a crackly crust. A 5.5-quart pot is ideal, though a 4-quart or larger works well for most loaves.
Preheat the pot and lid at 450°F so the dough meets an immediate heat jump. That trapped steam lets the surface stretch before the crust sets and gives a taller loaf with a lovely color.
Helpful extras and how they simplify each step
- Scale — the one tool that guarantees consistency loaf after loaf.
- Parchment paper or a parchment sheet — crumple then flatten it so the sling hugs curves without denting the dough as you lift.
- Dough whisk — it cuts through wet dough quickly and stops dry pockets from forming.
- Bowl scraper and bench scraper — the bowl scraper releases sticky dough cleanly; the bench scraper shapes without tearing.
- Lame (razor) — a shallow, confident angle gives neat scores and controlled expansion.
These tools keep the work simple and the focus on the dough. With a hot pot, a tidy sling, and a few shaping helpers, home baking feels calmer and more like a small bakery.
parmesan rosemary bread recipe: step-by-step, start to finish
Start by sorting the dry ingredients so the grated cheese and minced herb scatter evenly through the flour. This small step prevents clumps and makes mixing easy for a first-time baker.
Combine dry ingredients for even distribution
In a large bowl stir flour, salt, yeast, grated parmesan, and minced rosemary until uniform. Use a fork or whisk to break up any pockets so the add-ins disperse into the flour.
Add cool water and mix to a shaggy, sticky dough
Pour cool water over the dry mix and stir just until no dry streaks remain. The dough should be shaggy and sticky—resist the urge to knead. This is the texture we want for a strong rise and open crumb.
Room-temperature rise window and visual cues
Cover the bowl and leave it at room temperature for 18–20 hours. Look for a flat or slightly domed top with lots of bubbles. A gentle sink means the dough is mildly overproofed but will still bake up well.
- I start by combining dry ingredients so the grated cheese and herbs disperse evenly into the flour.
- I add cool water and stir just until no dry pockets remain; a shaggy, sticky dough is perfect.
- I cover the bowl and set it at room temperature for a long, relaxed rise that develops flavor and structure.
| Visual cue | What it means | Action |
|---|---|---|
| Bubbly, slightly domed | Ready to shape | Proceed to shape and rest |
| Flat and bubbly | Peak fermentation | Shape and bake within minutes |
| Slight sink | Mild overproofing | Still bakeable; expect a slightly softer rise |
Timing and temperature: dialing in your rise like a pro
Dialing in hours and warmth takes the guesswork out of every loaf we bake together. A clear plan makes the process calm and repeatable, whether your kitchen is cool or sunny.
18–24 hours at room temperature and simple warm/kitchen tweaks
Baseline: 18–24 hours at room temperature gives steady flavor and structure. Watch the surface for bubbles and a slightly domed top as your real cue.
In warm kitchens (70°F+), yeast speeds up. Cut the yeast to about 1 g or move the bowl into the fridge for a few hours to slow things down. Cooler rooms simply need more patience; the dough will tell you when it’s ready.
Long, cold fermentation for flexibility and deeper flavor
Cold fermentation in the refrigerator can go up to 5 days. The slow chill builds complex flavor and firms the gluten, which makes shaping easier and less sticky.
- Mix at night and bake the next evening for an easy weeknight plan.
- Or hold the dough cold until the weekend to fit a busy schedule.
- Always prioritize surface cues over the clock when in doubt.
| Method | Timing | When to use | Effect on loaf |
|---|---|---|---|
| Room rise | 18–24 hours | Normal kitchens, steady plan | Balanced flavor, good oven spring |
| Warm kitchen adjustment | Shorten or chill; reduce yeast to 1 g | 70°F+ environments | Prevents overproofing; keeps structure |
| Cold fermentation | Up to 5 days | When you need flexibility | Deeper flavor, easier shaping |
These small shifts in time and temperature help you control the rise, plan around your week, and still end up with a soulful, crackling loaf.
Shaping the loaf for height, oven spring, and an oval or round finish
A calm shaping routine keeps the bubbles we waited for and rewards you with better oven spring. Move with purpose but no force. Your hands should feel the dough give and hold its shape.
Light flouring, gentle folds, and surface tension without degassing
Lightly dust the top so your palms don’t stick, taking care not to dry the floured surface. Turn the dough onto the counter and gently stretch it into a loose square. Fold the top corners toward the center, then roll into a tidy log without pressing the interior.
Tuck the seam beneath so the top stays smooth. Use a gentle drag across the counter to build surface tension. That slight resistance is what helps the loaf rise tall in the oven.
Parchment sling setup and 30-minute bench rest
Crumple a sheet of parchment paper into a loose sling and open it under the loaf. Lift using the paper so your transfer into a hot pot is safe and confident.
Let the shaped dough rest for 30 minutes. This short bench rest relaxes the gluten and finishes proofing so the bread arrives in the oven ready to bloom.
- I show how to flour lightly so your hands don’t stick without drying the surface.
- I guide you to a loose square, then simple corner folds to start a tidy log.
- I remind you not to press down; we want to preserve the bubbles we worked so long to build.
- I teach a gentle drag on the counter to set surface tension that boosts oven spring.
- I place the loaf on a parchment sling so transfer into the hot pot is safe and smooth.
- I call for a 30-minute rest to relax the gluten and finish proofing before the bake.
Scoring for controlled expansion and a beautiful finish
Scoring is the quiet moment that steers a loaf’s final shape and keeps the oven from surprising you. Do this step with a plan so the top opens where you want it to and the loaf rises with a clean ear.
Where to place the main slash and how deep to cut
Place one confident main slash down the center or slightly off-center, depending on the oval or round shape. Cut about 1/4-inch deep to guide expansion without deflating the dough.
Hold the blade at a shallow 30–45° angle so the cut opens into an ear. Use a sharp knife or a lame for a swift, single motion. Score right before the bake so the lines stay crisp under the lid.
Designs that won’t compromise rise
Keep decorative cuts secondary. Make one dominant score and add simple, shallow accents if you wish. Avoid tight crosses or deep, competing slashes that can choke oven spring.
- One bold main score ~1/4″ deep directs the rise.
- Angle the blade 30–45° for an ear rather than a sealed cut.
- Move decisively; avoid dragging to prevent tears.
- Score immediately before baking in the hot oven for best results.
Preheat, bake, and uncover: getting that golden, crackling crust
A very hot pot and a calm hand at the oven door make the difference between a pale loaf and a crackling, golden crust. Heat, timing, and a safe transfer give you repeatable results.
Preheating the dutch oven at 450°F for maximum steam
Set the preheat oven to 450°F and place the dutch oven and lid inside for at least 30 minutes. The mass of the pot creates instant steam when the dough meets that heat.
Bake minutes covered, then uncover to deepen color
Use a parchment paper sling to lower the dough into the screaming-hot pot. Bake minutes covered for 30 to trap steam and encourage oven spring.
Then remove lid and bake minutes uncovered for 10–15 more to brown and crisp the crust. A pale top at first uncover is normal; it will brown in the final window.
- I preheat the dutch oven to 450°F so the dough hits instant steam and climbs tall.
- I use the parchment sling to lower the loaf safely into the hot pot.
- I bake minutes with the lid on for 30, then remove lid and finish 10–15 minutes uncovered.
- Be cautious when lifting the lid—the burst of steam is very hot.
| Step | Temperature | Time |
|---|---|---|
| Preheat pot | 450°F | 30 minutes |
| Covered bake | 450°F | 30 minutes |
| Uncovered finish | 450°F | 10–15 minutes |
Follow these exact temperature and minutes, move slowly at the lid, and you’ll end up with a tall, crackled loaf and a deep, golden crust.
Doneness and cooling: internal temperature, aroma, and patience
When the oven door opens and the loaf exhales, you want more than looks to tell you it’s done. I use a few quick checks that remove guesswork and protect the crumb’s final texture.
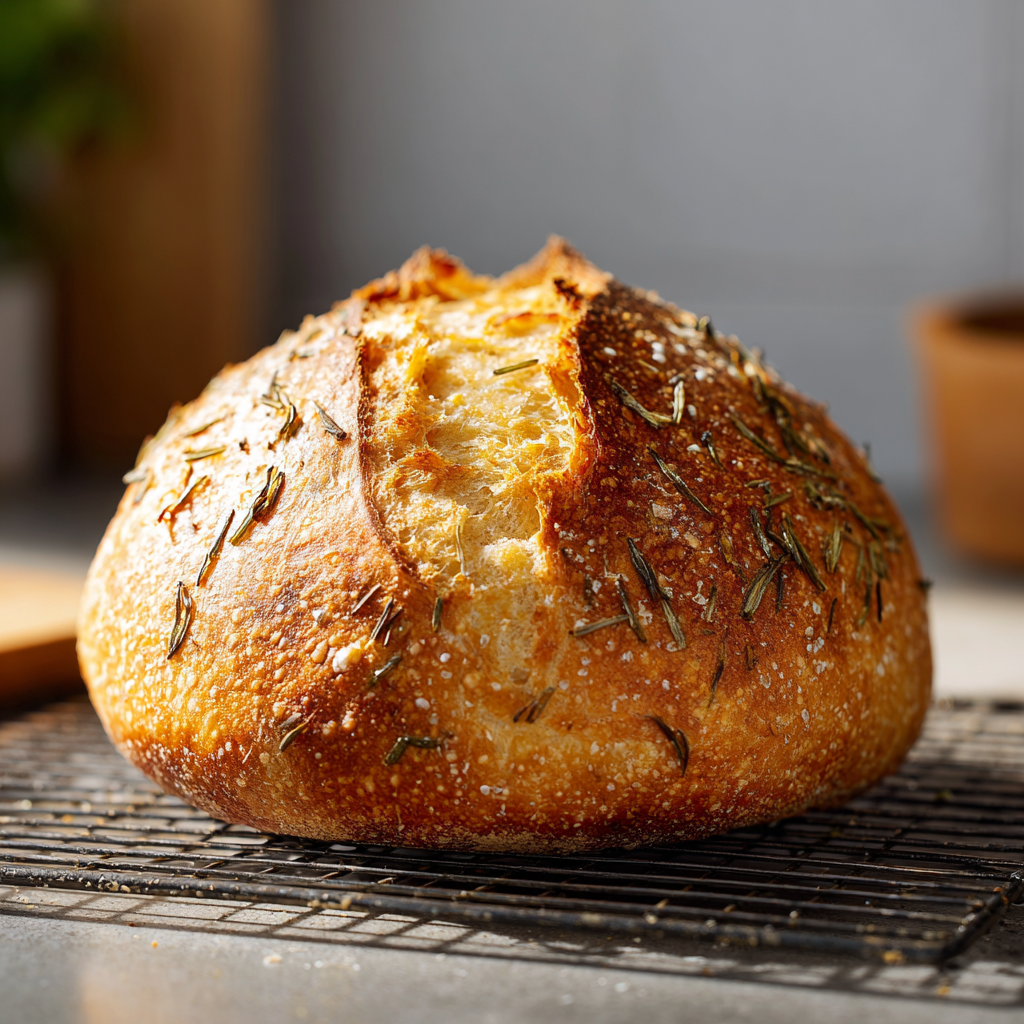
Target 200–210°F and what the crust should look and sound like
I confirm doneness with an instant-read thermometer placed in the center of the loaf. Aim for 200–210°F for a reliably baked interior.
Visually, the crust should be a deep golden tone and, as it cools, it should sing with tiny crackles. That audible crackle is a good sign the exterior set correctly in the hot oven.
Why slicing too soon makes the crumb gummy
Slicing hot traps steam inside. That steam keeps starches gelatinized and makes the crumb gummy rather than open and tender.
Transfer the loaf immediately to a wire rack so air can circulate under and around it. The bottom stays crisp and condensation won’t soften the crust.
- I confirm doneness with a thermometer at 200–210°F for reliable results.
- Look for a dark golden, crackling crust and listen for tiny pops as it cools.
- Wait patiently—give the crumb time to set so the texture finishes cleanly.
| Check | What to expect | Action |
|---|---|---|
| Thermometer | 200–210°F center | Remove from oven |
| Sound & look | Deep golden, audible crackle | Cool on rack |
| Time after bake | 10–30 minutes for setting | Slice gently when cool |
Smart storage, freezing, and reviving your loaf
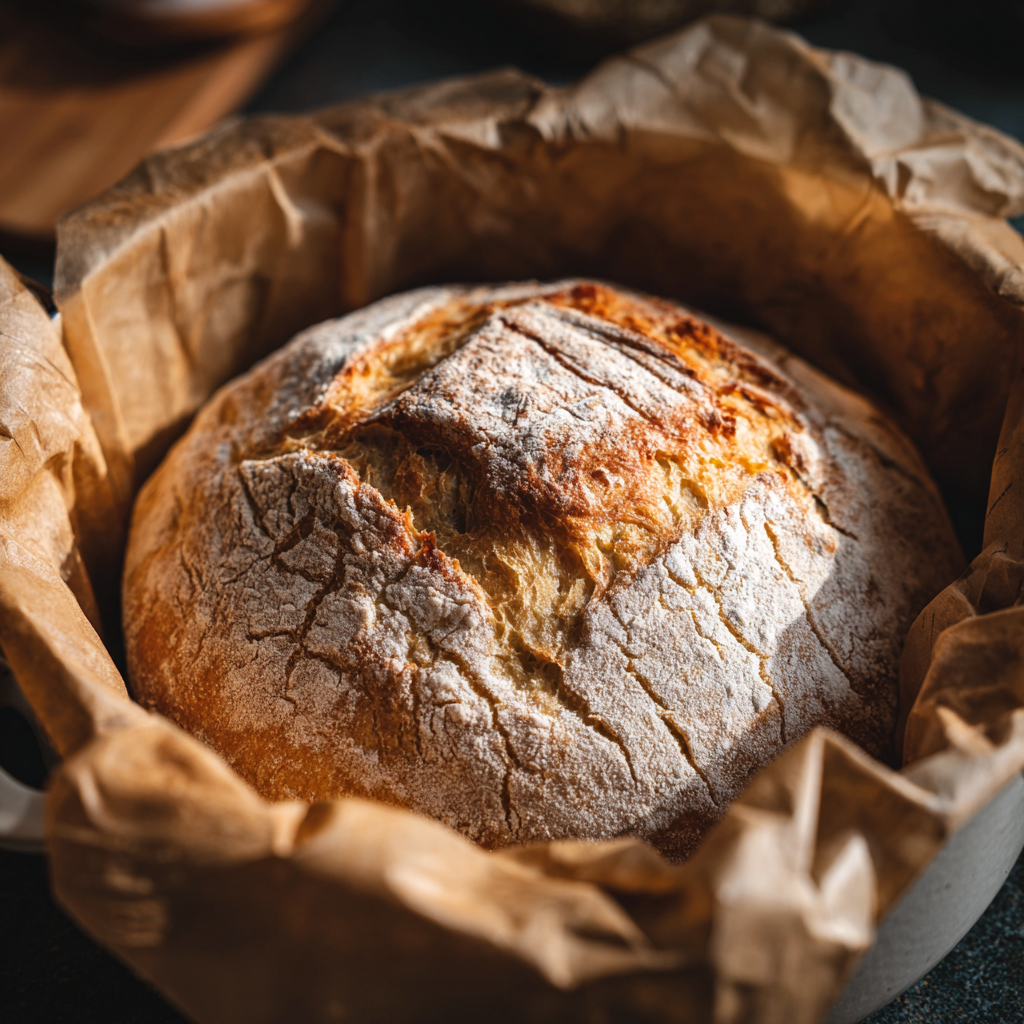
A crisp crust starts with where and how you store the loaf after it cools. I let it rest on a rack until fully cool, then choose a breathable wrap for short-term storage. That keeps the interior soft without killing the crust.
Room-temperature storage that protects the crust
Store at room temperature in a cloth bag, paper bag, or a vented bread box for up to 48 hours. Avoid airtight bags if you want crunch; they soften the crust, though they keep the inside tender.
Slice-and-freeze method and toasting from frozen
Slice the whole loaf, lay slices flat on parchment, flash-freeze for an hour, then stack in a labeled bag. Toast slices straight from frozen in a toaster or under the broiler for a quick, fresh taste.
How to bring a stale loaf back to life
To revive day-old loaf, sprinkle the surface lightly with water and bake in a preheated oven at 400°F for 5–8 minutes. This resets the crust and lifts the crumb without drying it out.
- I store at room temperature in breathable wrap to protect crust and crumb.
- Airtight containers soften crust—use them only if you prefer tender crust.
- Sliced and frozen on parchment saves time; toast from frozen for best results.
- Revive by moistening briefly and heating in a hot oven for several minutes.
| Method | Best for | How long | Effect on crust |
|---|---|---|---|
| Cloth or paper bag | Daily use | Up to 48 hours | Keeps crust crisp |
| Vented bread box | Counter storage | 2–3 days | Balanced crust and crumb |
| Airtight bag | Soft sandwiches | 2–4 days | Crust softens |
| Slice and freeze | Long-term use | Months | Toast restores crunch |
Variations and swaps: cheeses, herbs, and mix-ins that work
A single change — a different cheese or a bold mix-in — can shift this loaf from simple to celebratory.
I want you to feel free to experiment while protecting dough structure. Keep add-ins modest so the crumb stays open and the oven gives good spring.
Cheese swaps that play nicely
- Asiago or Pecorino Romano — use about 3–4% of dough weight for a sharp lift in flavor.
- Gouda — try 3% shredded for a milder, slightly smoky note that melts into pockets.
- When you make rosemary parmesan choices, reduce other salty add-ins to balance salt.
Savory mix-ins and measured amounts
- Roasted garlic: 1–2 cloves, mashed, folded in at mix time.
- Pitted olives or sun-dried tomatoes: 30–50 g total (about 3–5% of dough weight).
- Caramelized onions: 40–60 g; drain excess moisture to avoid soggy crumb.
Topping and shaping options
Brush the loaf lightly and sprinkle everything bagel seasoning before baking for a toasty breakfast crust.
Shape into a longer loaf for sandwich slices. Fold add-ins during the initial mix to disperse them evenly without overworking the dough.
| Add-in | Suggested % by weight | Effect on loaf |
|---|---|---|
| Asiago / Pecorino | 3–4% | Sharper, savory pockets; preserves rise |
| Gouda | 2.5–3% | Milder, melty ribbons; tender crumb |
| Olives / Sun-dried | 3–5% | Bright, briny notes; slightly denser crumb |
| Roasted garlic / Onions | 2–4% | Sweet depth; drain to protect oven spring |
Troubleshooting flatter loaves, gummy crumbs, and pale crusts
If your loaf looks shy in the oven—low and dense instead of tall and proud—there are calm, exact fixes we can try. I want you to be able to diagnose and correct common faults without stress.
Overproofing signs and shaping fixes for more lift
A slightly sunken top or very loose surface usually means overproofing. Gently reshape with firmer surface tension and a tighter seam to recover lift.
Shorten room rise next time or move the dough to the fridge when bubbles peak. Small, confident folds keep interior gas and give a better rise during baking.
Heat management, covered time, and pot size
A too-large dutch oven lets the loaf spread. Choose a pot that supports the sides so the dough climbs vertically. Preheat the pot thoroughly at baking temperature.
Bake covered for 30 minutes, then remove lid and bake uncovered for 10–15 minutes to deepen color. Adjust those minutes if your crust stays pale.
Measuring by weight to keep hydration right
Weigh flour, water, and salt to avoid hydration swings that cause gummy crumbs. If your kitchen runs warm, cut yeast slightly and watch temperature cues rather than the clock.
- Decode surface cues before you change technique.
- Use the right pot size and preheat fully.
- Weigh ingredients to stabilize hydration and avoid gummy crumb.
| Problem | Likely cause | Quick fix |
|---|---|---|
| Flat loaf | Overproofing or too-large dutch oven | Tighten shaping; use smaller pot |
| Gummy crumb | Too much water or underbaked center | Weigh flour/water; extend covered bake |
| Pale crust | Short uncovered time or low pot heat | Preheat longer; remove lid for final minutes |
Serving ideas that make this loaf the star of the table
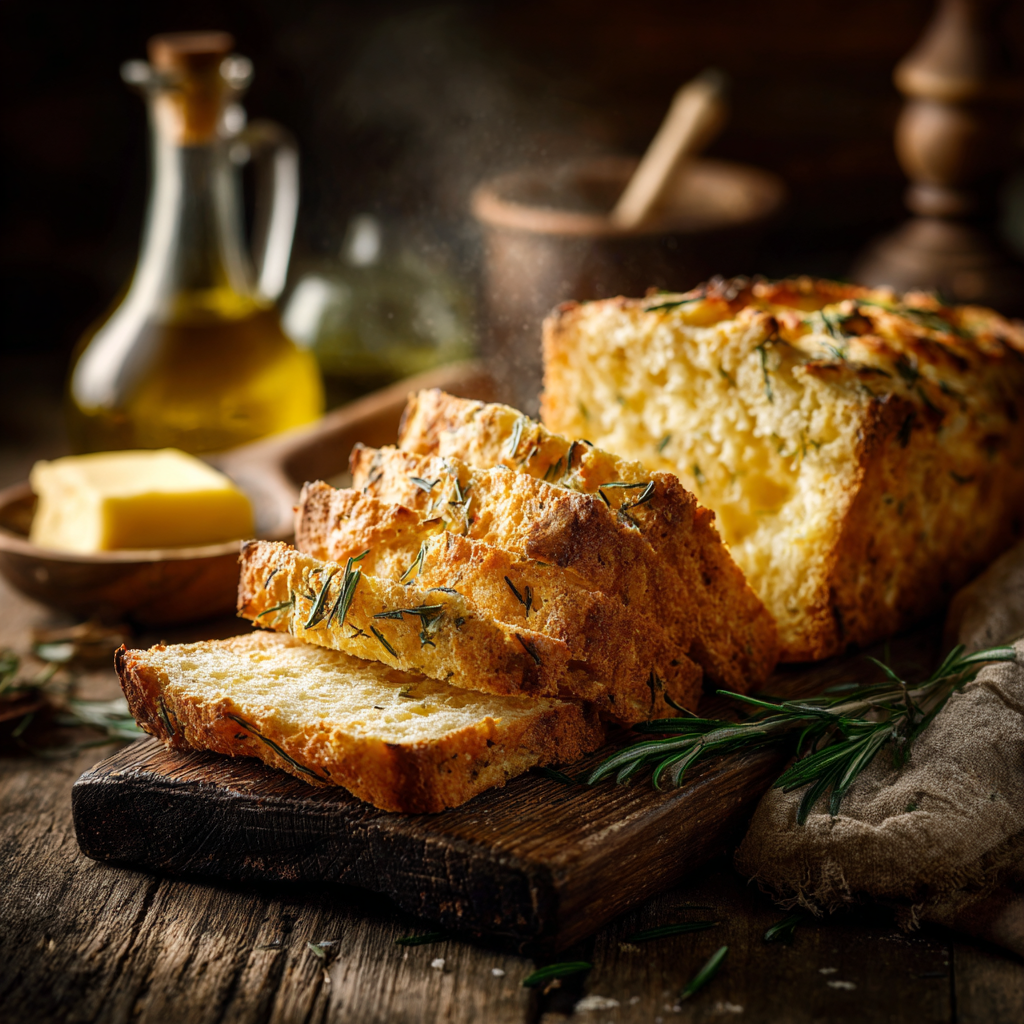
There’s a small, steady joy in passing thick slices around the table while steam curls up. A warm parmesan bread loaf invites simple, honest pairings that taste like home.
With butter, soups, and stews
Serve thick slices with salted butter or a peppery olive oil for an easy starter. The crust holds up when dunked into chicken soup, chili, or a slow lamb stew.
Toast, croutons, and grilled cheese
Freeze slices and toast from frozen for fast breakfasts. Cube and toast into golden croutons that carry cheese and rosemary into salads.
For grilled cheese, stack slices with a melting cheese and press until the top browns and the middle is gooey.
Pairings for weeknights and special gatherings
- Quick pasta nights: serve torn pieces alongside a simple tomato sauce.
- Antipasti boards: pair with olives, salami, and herbed olive oil.
- Holiday idea: warm slices with herb butter or as crostini bases for toppings.
| Use | Best match | Why it works | Serving tip |
|---|---|---|---|
| Dunking | Chicken soup, chili | Crust holds texture | Serve warm, cut thick |
| Toasting | Breakfast toast | Toasts from frozen well | Finish under broiler for color |
| Grilled cheese | Mild melting cheese | Crust crisps, interior melts | Butter outsides for extra crunch |
| Crostini / croutons | Salads, canapés | Flavorful, holds toppings | Brush with oil and toast until golden |
Bake it your way, with confidence and a little rosemary-scented joy
Let this loaf be the kind of baking that fits your week and brings family to the table. This no-knead bread is beginner-friendly and truly hands-off.
Remember the key numbers: preheat to 450°F, bake 30 minutes covered, then 10–15 minutes uncovered. Pull the loaf at 200–210°F inside and let it cool before slicing.
Trust the dough’s look and feel more than the clock. Try a small change next time — a different cheese or shape — and make it yours.
For more on herbs and cheese that pair well, see our guide on Italian herbs and cheese. We bake, share, and enjoy — together.
Parmesan Rosemary No-Knead Bread (Dutch Oven Loaf)
Ingredients
Method
- In a large bowl, mix flour, salt, yeast, grated parmesan, and minced rosemary. Stir well so the cheese and herbs spread evenly through the flour.
- Pour in cool water and stir with a spoon or dough whisk until no dry flour remains. The dough will look sticky and shaggy — that’s perfect. Don’t knead.
- Cover the bowl and let it rest at room temperature for 18–24 hours. The dough is ready when it’s bubbly and slightly domed on top.
- Lightly flour your counter. Turn out the dough and fold it into a loose ball or oval without pressing out air. Tuck the seam underneath and drag gently to tighten the surface.
- Place the shaped dough on a piece of parchment paper. Let it rest for 30 minutes while the oven preheats.
- Place your Dutch oven with its lid inside the oven and preheat to 450°F (230°C) for at least 30 minutes.
- When ready, lift the dough using the parchment and lower it carefully into the hot pot. Score the top about ¼ inch deep with a sharp knife or lame.
- Cover and bake for 30 minutes.
- Remove the lid and bake 10–15 minutes more until the crust is deep golden brown and the internal temperature reaches 200–210°F.
- Transfer the loaf to a wire rack and cool completely (at least 30–60 minutes). Listen for the crackling crust as it cools — that’s a good sign!
Notes
- Sticky dough is a good sign — don’t add extra flour.
- Hand-grated cheese melts evenly; skip pre-grated or powdered versions.
- Diamond Crystal Kosher Salt weighs less than table salt — if using table salt, reduce by about 25%.
- Let the loaf cool fully before slicing to avoid a gummy interior.
- For longer flavor development, refrigerate dough up to 5 days before baking.
- Store leftover loaf in a paper bag for 1–2 days or slice and freeze for up to 3 months.