
Jump to Recipe
I learned this pici pasta recipe from tuscany standing at my kitchen counter, hands dusted with flour and a warm bowl of olive oil beside me. The dough is humble—flour, water, oil, salt—and it responds to touch: soft, slightly tacky, and ready after a patient 1–2 hour rest.
I’ll walk you through a friendly, step-by-step rhythm: weigh roughly a 2:1 flour-to-water start, knead until smooth, rest, then roll strands just under pencil thickness on an unfloured wooden board so they grip and stretch. Fresh strands cook in 2–4 minutes in well-salted water; dried versions can need up to 19 minutes.
Small, sensory cues help: the dough should feel springy, not sticky; semolina keeps strands separate for storage; refrigerate up to 24 hours or freeze flat and boil from frozen. This is a forgiving, tactile tuscan pasta you can make for a quick weeknight or a slow, rewarding weekend.
Key Takeaways
- Start with a roughly 2:1 flour-to-water ratio for workable dough.
- Let dough rest 1–2 hours to relax gluten for easy shaping.
- Roll strands slightly thinner than a pencil; fresh cooks in 2–4 minutes.
- Use an unfloured wooden board and semolina for storage to prevent sticking.
- Refrigerate up to 24 hours or freeze single-layer and cook from frozen.
The Tuscan pasta I make at home right now: what pici is and why it’s special
There’s a quiet joy in turning four humble ingredients into thick, chewy lengths that cradle sauce so well.
From Siena to your kitchen: thick, hand‑rolled spaghetti with Etruscan roots
This rustic strand, often called pici, traces back to Siena and older Etruscan tables. Frescoes show long, thick cords that look very much like what we roll today.
The traditional mix is simple: flour, water, olive oil, and salt. That modest list of ingredients keeps the focus on texture and flavor.
Texture matters: chewy strands that love sauce and reward slow, mindful cooking
Hand-rolled strands are thicker than machine-cut spaghetti and intentionally irregular in length. That irregular shape and the slightly rough surface help sauce cling to each bite.
Work at room temperature; a tacky dough rolls into smoother, continuous strands. Thickness—just under a pencil—affects bite and cooking time, so you can tune chew with a little practice.
- Rustic origin, modern comfort.
- Minimal ingredients, maximum texture.
- Rough surface = better sauce pickup.
Ingredients and tools that set you up for success
Good results start with calm prep: the right flour, measured water, and a clean work surface. Choose flour with purpose and you control chew and tenderness. 00 flour yields a soft, silky dough while a 50/50 mix with semola rimacinata gives more structure and bite.
If you only have high-protein all-purpose flour, it works well. Expect a slightly chewier finish and a minute or two extra in the pot. I use a 2:1 flour-to-water ratio by weight as my baseline and then adjust by feel so the dough is tacky, not sticky.
Small details that make a big difference
A drizzle of extra-virgin olive oil adds suppleness without weighing the dough down. Salt matters for flavor. Use room temperature water to hydrate evenly.
Gear check
- A large mixing bowl for the initial combine and short knead.
- A rolling pin and an unfloured wooden surface to help strands elongate.
- A sharp knife or bench scraper for clean edges and two large baking sheets lined with parchment.
- Semolina to dust trays and prevent sticking, plus a kitchen towel to cover dough and shaped strands.
Pici pasta recipe from Tuscany: what to expect and why it works
Understanding why each step matters helps you shape strands that cook evenly and hold sauce.
After you mix flour, salt, water, and olive oil, knead 5–8 minutes until the dough feels smooth and pleasantly tacky. That short knead builds gluten so the strand holds together without tearing during shaping.
Rest the dough 1–2 hours at room temperature. The rest calms the gluten and reduces spring-back, so sheets roll thinner and strip edges stay clean. Temperature matters—room warmth makes the dough cooperative.
Roll the sheet to about 1/8 inch and cut 1/4 inch strips. Hand-roll each strip to just under pencil thickness. This hand-rolled shape creates a subtly ridged surface that clings sauce far better than smooth, machine-made spaghetti.
- Expect fresh strands to cook in 2–4 minutes—taste early to avoid overcooking.
- Dried versions require much more time and steady simmering to reach al dente.
- Watch the dough feel: soft, cohesive, and tacky means you’ve stopped kneading at the right moment.
By following these mechanics you avoid tearing, flat spots, and loss of the chewy bite that makes this pasta so satisfying.
Step-by-step: mix, knead, rest, roll, and shape like a Tuscan
I begin in a large mixing bowl, whisking salt into the flour, then forming a well. Pour in water and a drizzle of olive oil and use a fork to draw the dry into the wet until the center thickens into a paste.
Switch to your hands and bring the shaggy mass together. Knead the dough 5–8 minutes until smooth and tacky. If it sticks, add flour sparingly. If it feels tight, mist your hands with water.
Wrap the dough and let it rest at room temperature for 1–2 hours. Resting relaxes the gluten and makes rolling effortless.
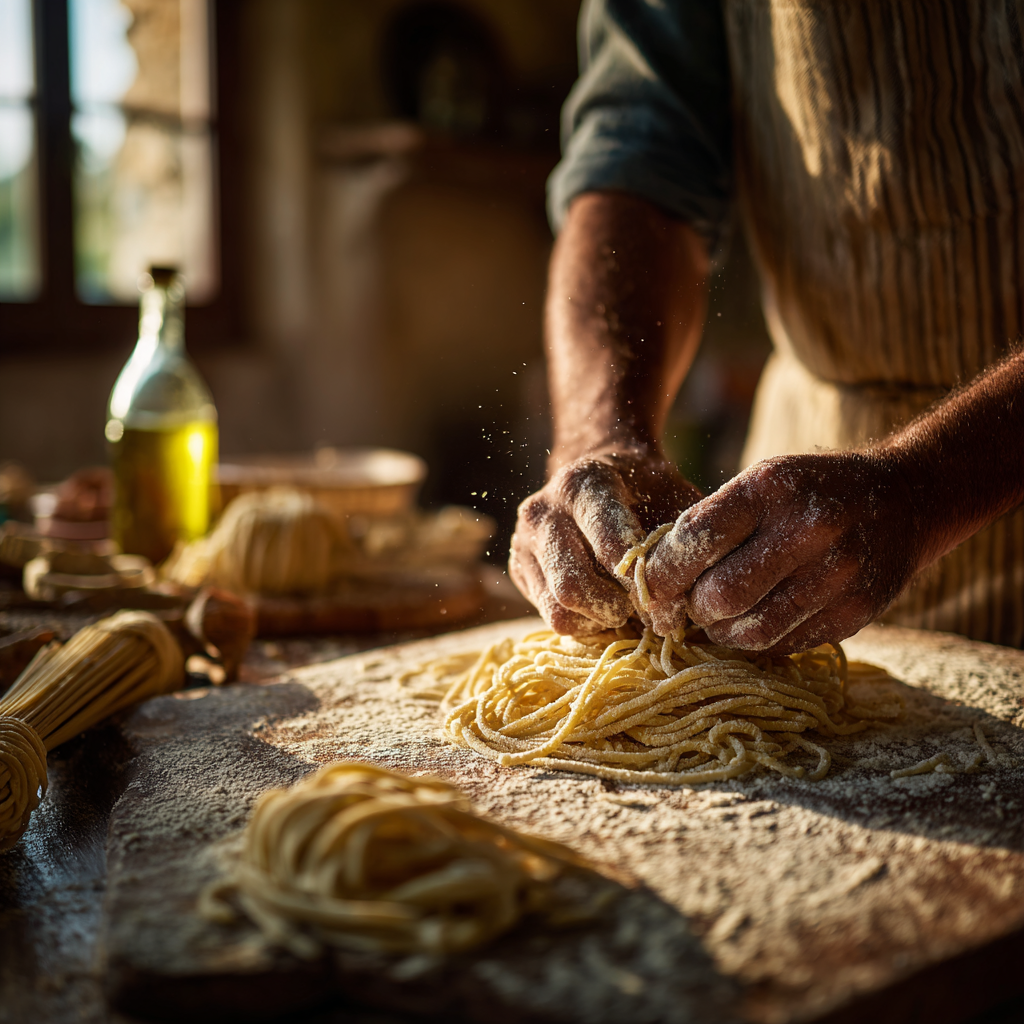
Roll the sheet to about 1/8 inch and cut dough into 1/4 inch strips. Shape each strip on an unfloured wooden surface, rolling outward with both hands so the strand lengthens evenly.
Aim for just under pencil thickness and taper the ends between your palms. Work in batches, cover unused dough, and stack shaped strands on a semolina-dusted tray while you finish.
Quick guide
| Step | What to do | Time |
|---|---|---|
| Mix | Whisk flour and salt, add water and olive oil in a bowl | 5 minutes |
| Knead | By hand until smooth and tacky; adjust with flour or mist | 5–8 minutes |
| Rest & Shape | Rest 1–2 hours, roll to 1/8 inch, cut into strips, hand-roll | 1–2 hours + active shaping |
Cooking pici like a pro: boil, time, and sauce
When it’s time to cook the strands, I focus on steady heat and simple cues that remove guesswork. Bring large pot to high heat and salt the water generously so the food picks up seasoning while it cooks.
Bring a large pot to a rolling boil
Use plenty of water so the temperature recovers quickly when you add the dough. Once the water reaches a rolling boil, add the strands and stir immediately to keep them separate and off the surface.
Cook time cues and tasting
Fresh pici usually needs 2–4 minutes; begin tasting at 2 minutes for al dente. Dried versions are denser and can take about 19 minutes—taste every few minutes until the center feels just tender.
- Keep heat high but controlled to avoid spillover.
- Reserve a ladle of starchy water before draining; it helps sauce cling to the rough surface.
- Toss and finish the dish in the pan so the sauce and strands marry without rinsing.
| Stage | Water | Action | Typical time |
|---|---|---|---|
| Boil | Heavily salted water | Add strands, stir to separate | Immediate |
| Fresh cooking | Rolling boil, steady temperature | Taste at 2 minutes for al dente | 2–4 minutes |
| Dried cooking | Active boil, patience | Taste periodically until center is supple | ~19 minutes (varies) |
Tuscan sauces and pairings that cling perfectly to pici
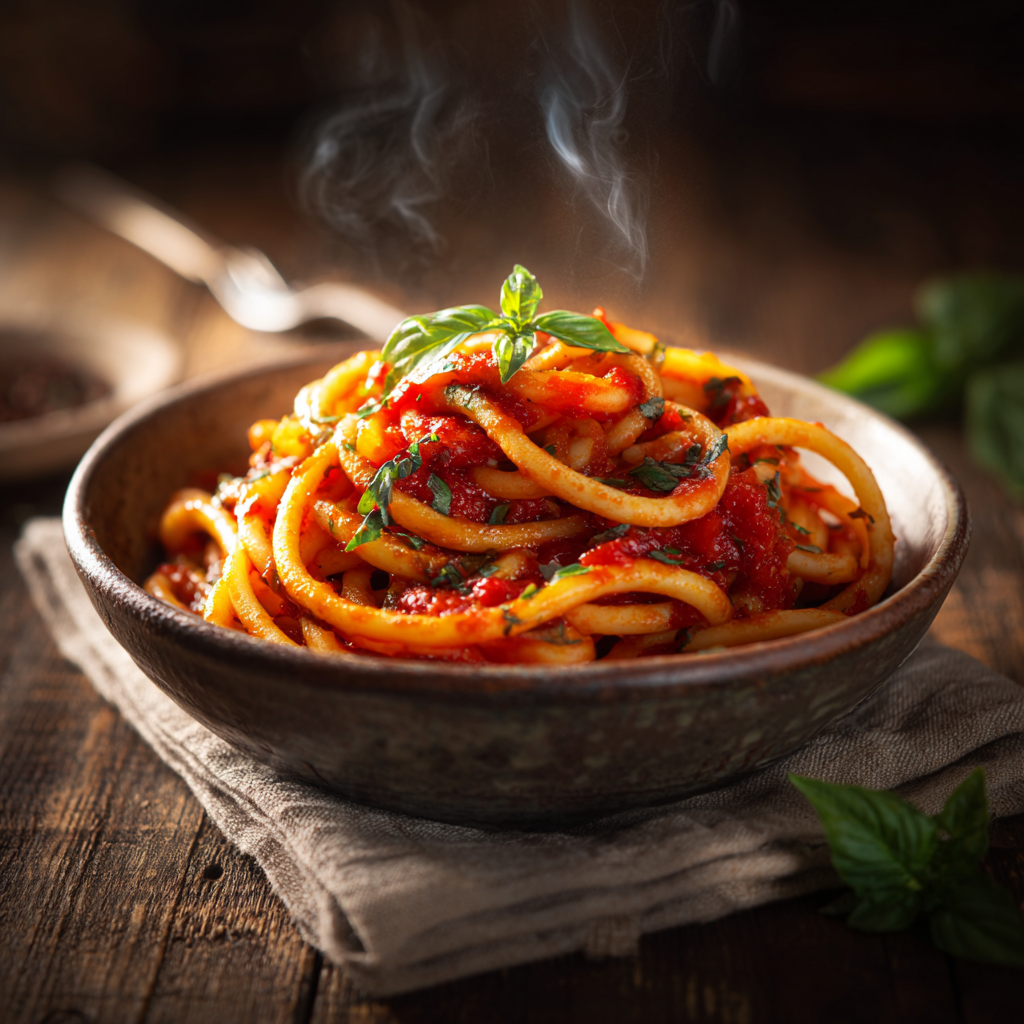
Warm garlic, ripe tomatoes, and a good drizzle of oil are the simplest way to make these strands sing at the table. The hand-rolled surface grabs sauce, so choose pairings that reward chew and texture.
Pici all’aglione: garlicky tomato brilliance
Gently bloom sliced garlic in olive oil until soft. Add crushed tomatoes and simmer until glossy and slightly reduced. Toss the hot strands with the sauce and a splash of starchy water so it clings without becoming heavy.
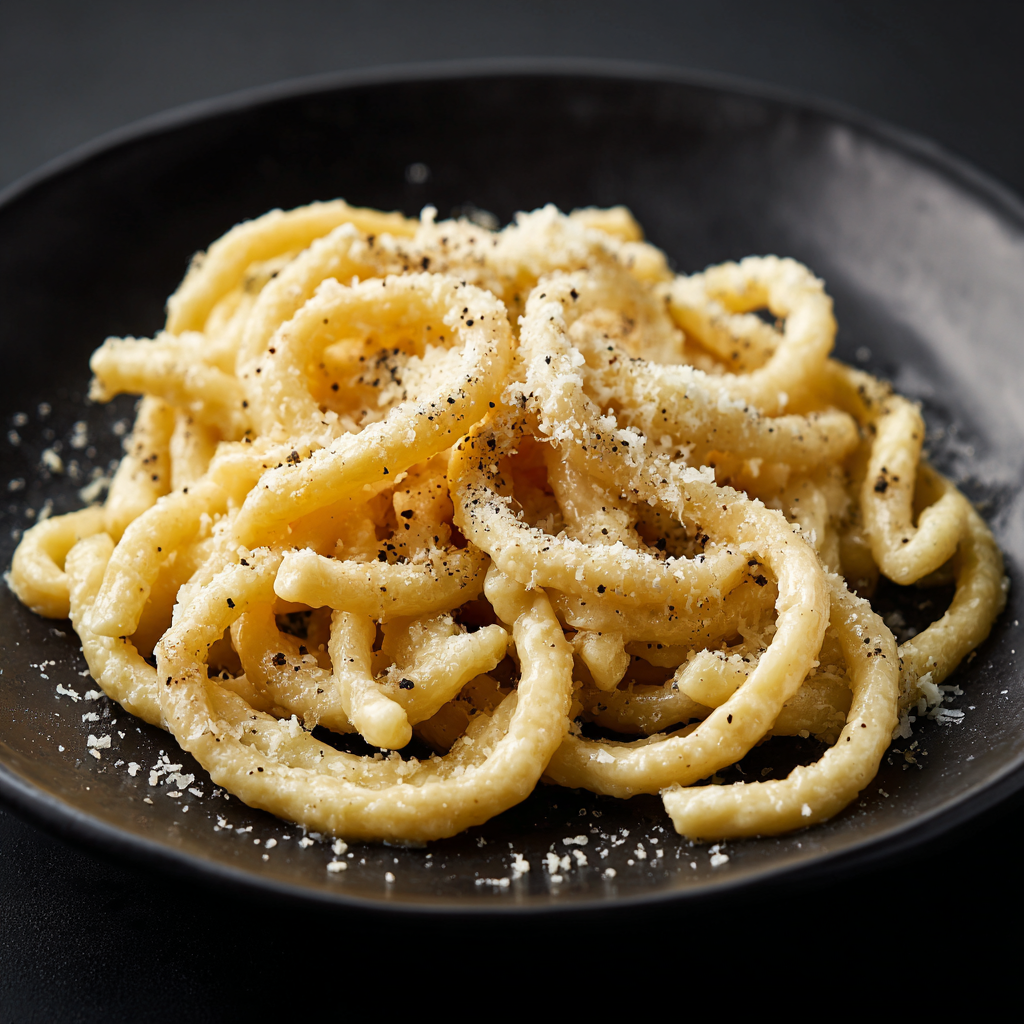
Cacio e pepe and pecorino-forward options
Pecorino and black pepper love that textured surface. Emulsify finely grated cheese with reserved water off heat. Fold in the hot noodles slowly to make a silky coating that won’t seize or become too fatty.
Hearty ragùs: lamb or wild boar for a rustic feast
Long-simmered ragùs—lamb or wild boar—sink into every groove. The robust fat and collagen from the meat balance the chew. Finish with a spritz of acid and a drizzle of good olive to refresh the palate.
Bright alternatives: lemon pesto, puttanesca, and classic pomodoro
Lemon pesto and puttanesca bring brightness and bite. Olive oil emulsions, capers, and citrus cling beautifully to the rough strands. For a classic pomodoro, reduce to a light nappe and toss vigorously with starchy water for sheen.
- Bloom garlic in oil for all’aglione; finish with starchy water.
- Emulsify cheese and water off heat for cacio e pepe to avoid clumping.
- Use a light thread of olive oil instead of heavy butter to balance fat and aroma.
| Sauce Type | Why it Works | Finish Tip |
|---|---|---|
| All’aglione | Garlic and tomato cling to rough strands | Starchy water + toss to bind |
| Cacio e pepe | Pecorino forms creamy emulsion on texture | Fold off heat to prevent graininess |
| Ragù (lamb/wild boar) | Richness seeps into grooves | Splash of vinegar and olive oil to brighten |
Make-ahead, storing, and freezing without clumping
I treat storage as part of shaping. With the right steps you keep the texture and avoid sticky messes.
After you shape each strip, arrange strands in a single layer on parchment-lined trays. Dust those trays generously with semolina so the dough won’t glue to the surface.
Cover the trays with a kitchen towel and let them rest up to 2 hours at room temperature. This short rest keeps the dough supple and protects the marks from crisping.
- For the fridge: transfer single layers to shallow containers, dust again with semolina, and seal. Store up to 24 hours.
- For the freezer: freeze trays flat until solid, then pack into airtight bags for up to one month.
- When cooking, bring large pot to a rolling boil in salted water and add frozen strands straight in—no thawing. Expect an extra minute or so; taste for doneness rather than relying on time alone.
| Storage | How | Keep for |
|---|---|---|
| Counter rest | Semolina tray, covered with kitchen towel | Up to 2 hours |
| Refrigerator | Single layer, shallow container, light semolina dusting | Up to 24 hours |
| Freezer | Freeze single layer, then bag airtight | Up to 1 month |
Troubleshooting and chef tips from hands-on experience
When the strands refuse to shape, I slow down and check the board. Small adjustments at this step save time and stress later.
Strands won’t roll? Try this
Make sure your board is wooden and unfloured. The light grip helps you roll dough into long, round spaghetti-like strands without adding excess flour.
Dough too sticky or too dry?
If the dough trends sticky, dust flour sparingly and knead briefly in the bowl. If it feels tight or crumbly, wet your hands or mist the dough with a few drops of water and rest a few extra minutes at room temperature.
Uneven lengths and thickness
Embrace the rustic look. Taste thinner strands a minute earlier and remove them first. Use a sharp scraper to cut dough into cleaner strips so they roll into smoother shapes.
- Keep mixing simple; rework dry pockets in the bowl for 30 seconds instead of piling on flour.
- For all-purpose flour doughs, roll with lighter pressure and longer strokes to avoid flattening.
- Dust finished strands lightly with semolina to prevent fusing, not to toughen the surface.
| Problem | Quick fix | Correction time |
|---|---|---|
| Strands resist rolling | Use an unfloured wooden surface and steady strokes | Immediate |
| Dough sticky | Add small pinches of flour and knead in the bowl | 1–2 minutes |
| Dough dry or tight | Rub water into hands, knead briefly, rest | 5–10 minutes |
| Jagged cuts | Sharpen knife or use a bench scraper to cut dough cleanly | Immediate |
Conclusion
Finish with a quiet confidence: simple dough, patient hands, and a warm pot will do the work.
You now have a clear step to follow: mix, knead, rest, roll to about 1/8 inch, cut into 1/4 inch strips, then shape long strands. Make sure the wooden surface is unfloured so the strip rolls smoothly.
Dust strands lightly with semolina, cover with a kitchen towel, and freeze single layers if you plan ahead. Bring a large pot to a rolling boil, salt well, and taste after a few minutes—fresh cooking is quick and rewarding.
A thread of olive oil helps elasticity, but the true craft is in your hands. Pick a favorite pasta sauce and let this tuscan pasta shine at the table. Try the make recipe soon and trust the process.
Traditional Tuscan Pici Pasta (Hand-Rolled Pasta from Siena)
Ingredients
Method
- In a large mixing bowl, combine the flour and salt. Make a well in the center, pour in the water and olive oil, and mix with a fork until it starts to come together.
- Use your hands to knead for about 5–8 minutes until the dough feels smooth, soft, and tacky (not sticky). Add a pinch of flour only if needed.
- Wrap the dough and let it rest at room temperature for 1–2 hours. This helps the gluten relax so rolling becomes easy.
- Roll the rested dough into a sheet about ⅛ inch thick. Cut it into ¼-inch wide strips using a sharp knife or bench scraper.
- On an unfloured wooden surface, roll each strip between your palms into long strands just thinner than a pencil. Cover finished pici with a kitchen towel and dust lightly with semolina.
- Bring a large pot of salted water to a rolling boil. Add the fresh pici and cook for 2–4 minutes, tasting for al dente. (If frozen, cook from frozen for about 5 minutes.)
- Toss the hot pasta directly with your favorite sauce — like pici all’aglione, cacio e pepe, or a Tuscan ragù — along with a splash of starchy pasta water to help it cling perfectly.
Notes
- The dough should feel soft and tacky, not sticky. Adjust with small amounts of flour or water as needed.
- Use an unfloured wooden board for rolling — the light grip helps form round strands.
- Fresh pici cooks fast! Start tasting after 2 minutes.
- You can refrigerate shaped strands up to 24 hours or freeze for up to 1 month.
- The beauty of pici lies in its uneven, rustic shape — perfection isn’t the goal.