
Jump to Recipe
I grew up watching my nonna coax deep, nutty flavor from a humble head of cauliflower, and this italian roasted cauliflower recipe is the exact method I still use at home.
I preheat a baking sheet so the florets hit hot metal and start caramelizing right away, then roast at 425°F for 25–30 minutes until tender with crisp, browned edges. Drying the cauliflower well prevents steam and soggy bites, and a final sprinkle of grated Parmigiano-Reggiano, a squeeze of lemon, and a scatter of parsley lifts the whole dish.
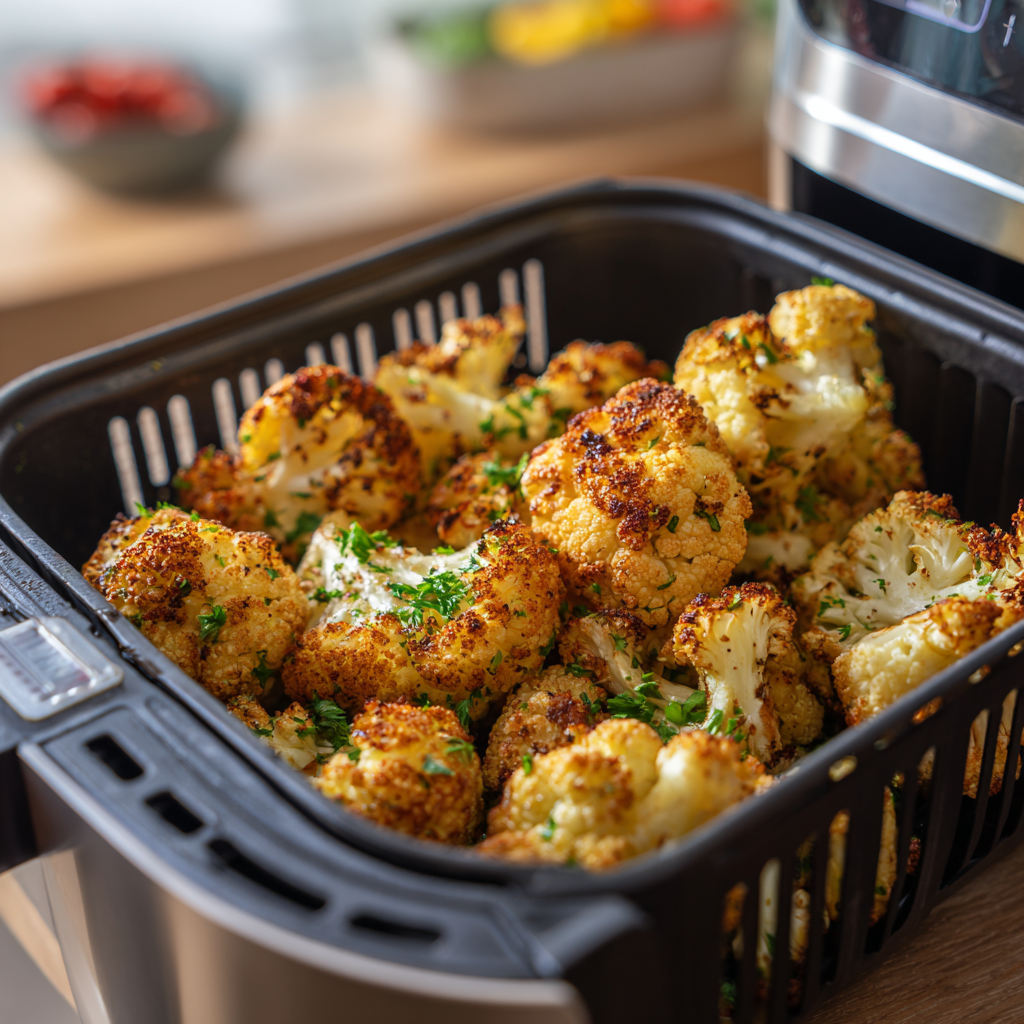
If you’re short on time, the air fryer at 400°F for 10–15 minutes—shake once—gives excellent texture. I’ll show which ingredients matter, how much olive oil to use for proper browning, and timing cues so this recipe becomes a reliable weeknight favorite and a dish worth serving at dinner parties.
Key Takeaways
- Use a hot baking sheet and high heat (425°F) for best browning and texture.
- Dry florets thoroughly to avoid steam and soggy results.
- Add cheese in the last minutes, then finish with lemon and parsley for balance.
- Air fryer option: 400°F for 10–15 minutes, shake once for even crisping.
- Space florets on the pan and use the right amount of olive oil for caramelization.
Why this roasted cauliflower belongs in your Italian rotation
This method turns a simple vegetable into a dependable, savory side that fits any weeknight or special dinner. High heat concentrates sweetness and builds those crisp, caramelized edges we all chase.
Good extra-virgin olive oil does more than add richness. It helps the surface brown evenly and carries garlic and herbs into every floret. A quick squeeze of lemon and a scatter of parsley brighten the final plate.
- It’s effortless and flexible — the kind of side we make on repeat because it complements protein like baked chicken breast or pork chops.
- Flavor layers from garlic, Italian seasoning, and a last-minute shower of cheese add savory depth without fuss.
- Nutritionally it’s thoughtful: a source of fiber and vitamin support that helps make plates feel complete without heaviness.
- Serve alongside pasta, toss into a grain bowl, or offer with pesto for dipping; the dish fits many menus.
We rely on pantry staples and simple baking technique so you spend less time at the stove and more time enjoying the table.
Italian roasted cauliflower recipe
Preheat the oven to 425 degrees and slide a baking sheet in to heat while you prep. That hot surface jump-starts browning so florets get deep color without long baking.
Cut one large head into even florets or one-inch pieces. One head yields about 7–8 cups, enough for four generous servings.
What you’ll make: a golden, garlicky side with crisp edges
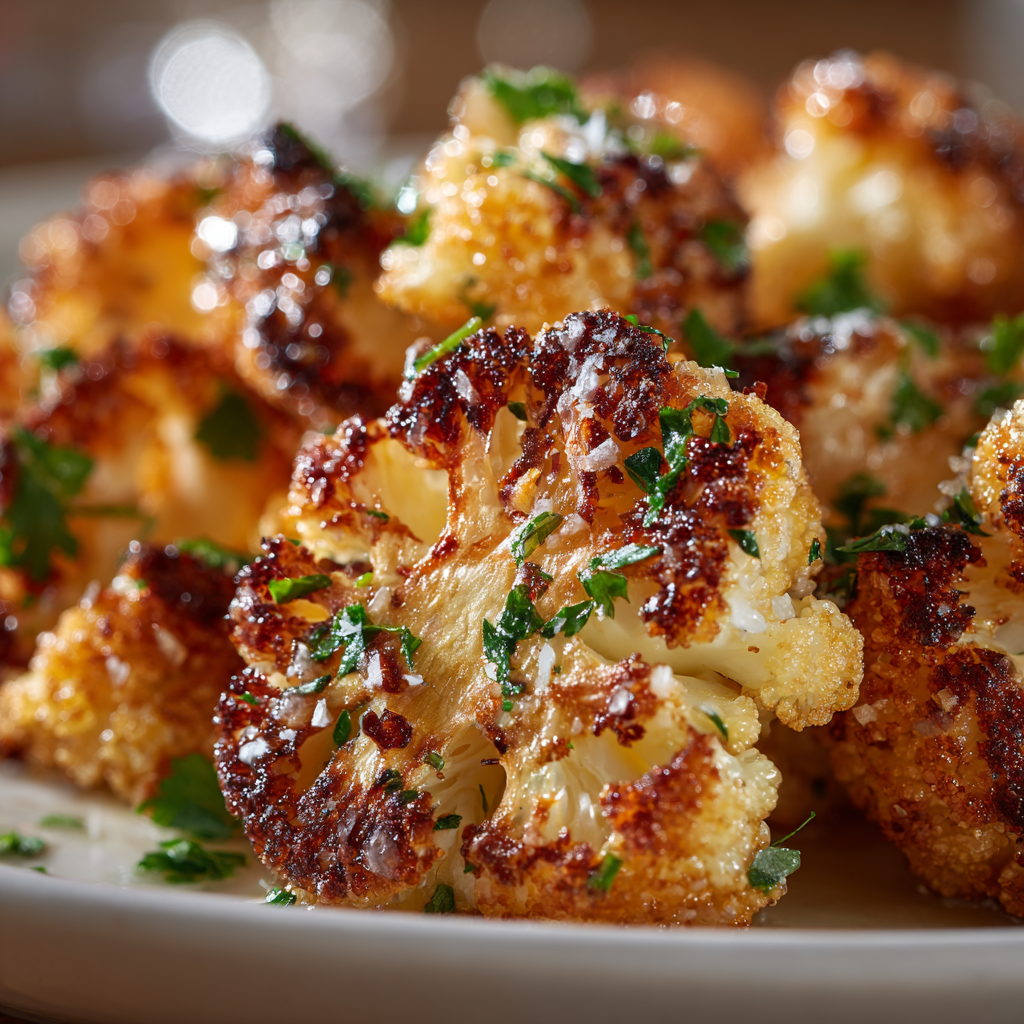
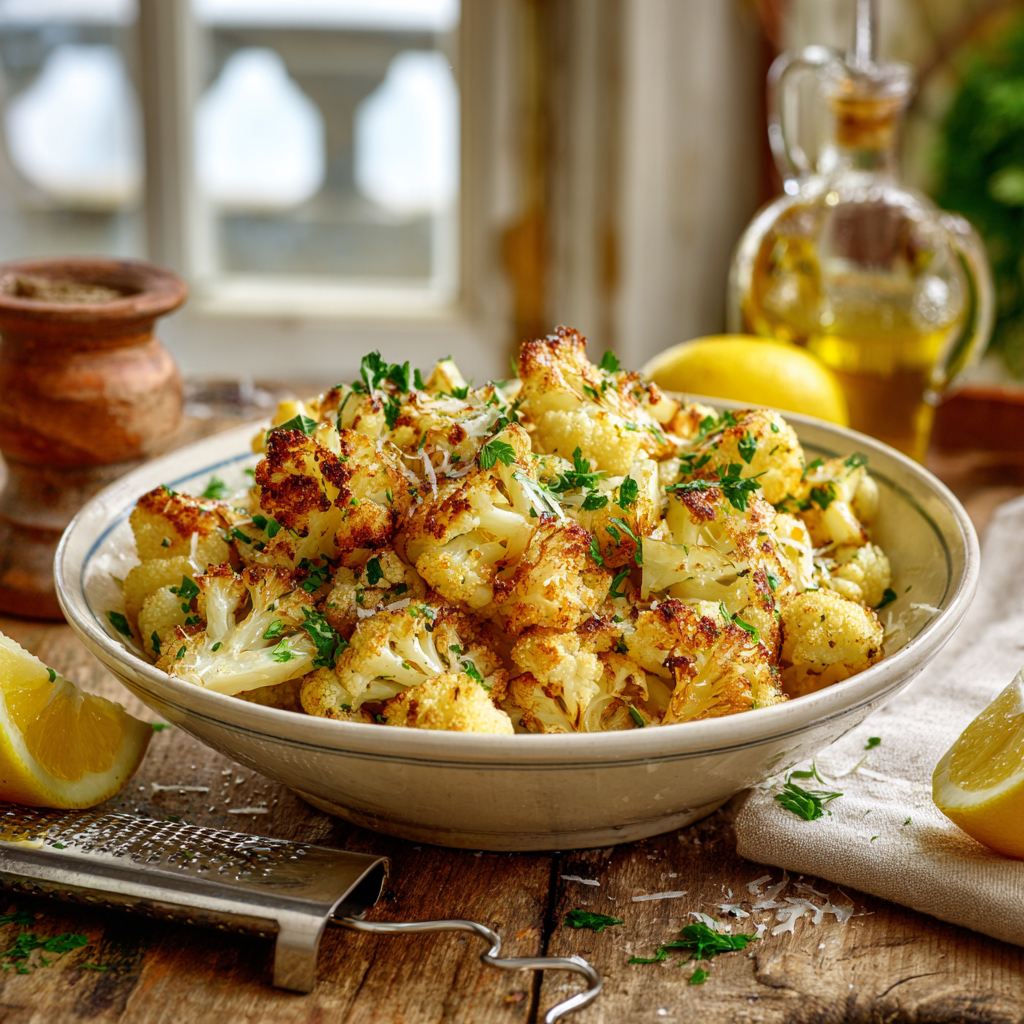
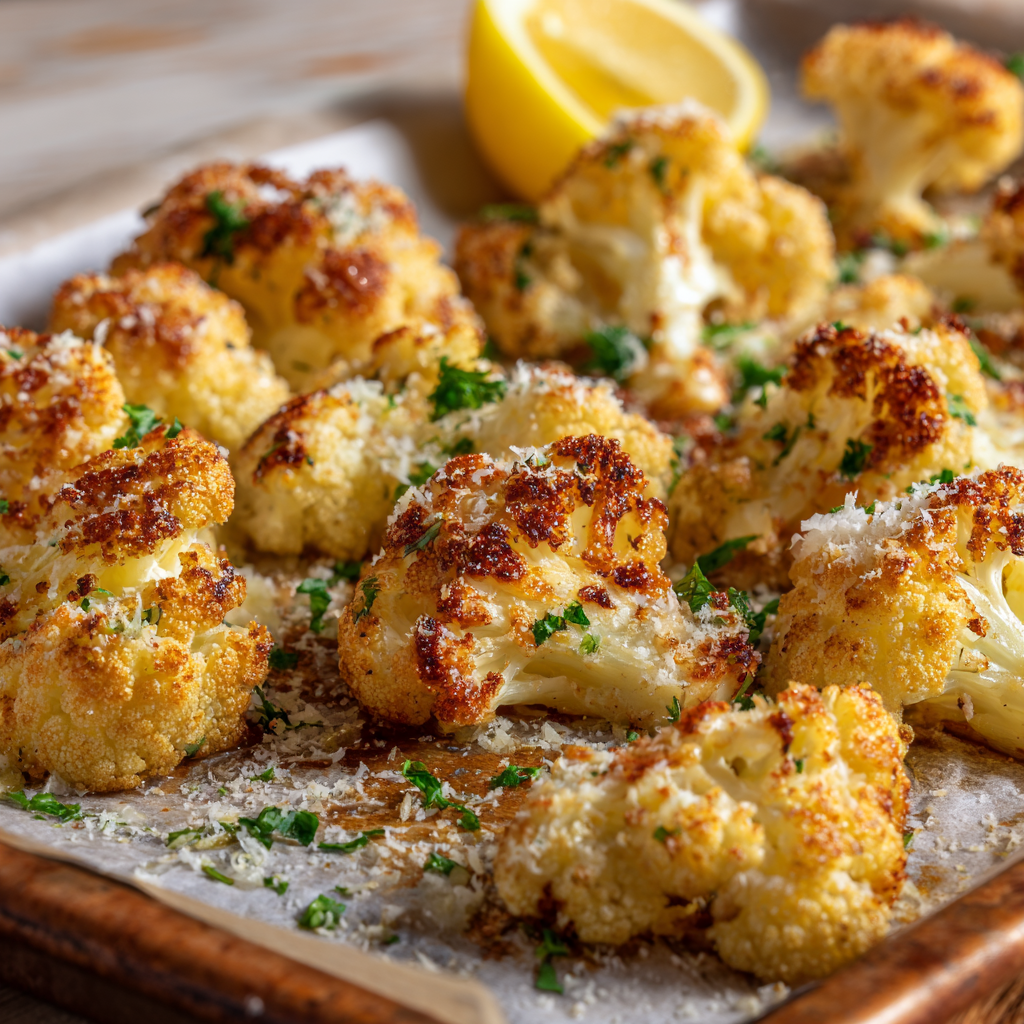
You’ll get a pan of bronzed florets that are crisp at the edges and tender inside. Finish with grated Parmigiano-Reggiano, a squeeze of lemon, and chopped parsley for balance.
Timing and temperature: 425 degrees Fahrenheit for that perfect roast
Roast at 425 degrees for 25–30 minutes, turning once if needed for even color. For an air fryer, use 400°F and cook 10–15 minutes, shaking once mid-cycle.
Yield and skill level: weeknight-easy, dinner-party worthy
- Serves: 4 generous portions from one head.
- Skill: beginner-friendly; timing is reliable so you can coordinate mains.
- Texture goal: browned edges, tender centers, and garlic-forward flavor.
| Step | Temperature | Time |
|---|---|---|
| Preheat baking sheet | 425 degrees (oven) | 5 minutes while you prep |
| Roast florets on hot sheet | 425 degrees (oven) | 25–30 minutes until browned |
| Air fryer option | 400°F | 10–15 minutes, shake once |
| Finish | Room temp | Grate cheese and squeeze lemon before serving |
Ingredients that deliver bold, clean flavor
Gathering the right ingredients makes the difference between a flat side and one that sings. Start with a single large head that trims to about 7–8 cups of florets. Even cuts mean even color and texture on the baking sheet.
Olive oil
Use extra-virgin olive oil to lightly gloss each piece. The oil encourages browning and adds a round, fruity note while keeping edges from drying out.
Minced garlic and herbs
A spoonful of minced garlic plus oregano and thyme creates the savory backbone. These flavors seep into the florets and roast cleanly without overpowering the vegetable.
Seasonings
Salt and pepper are essential. A pinch of sweet or smoked paprika gives warm color. If you want heat, add a few red pepper flakes; they wake the pan without masking natural sweetness.
Finishers and cheese
Bright finishers matter. A squeeze of lemon juice and a scatter of chopped parsley add lift and color. In the last minutes grate Parmigiano-Reggiano, Pecorino, or Asiago for a crisp, savory crown. For dairy-free, nutritional yeast brings nutty, umami depth.
- Choose a firm, heavy head.
- Coat pieces evenly with oil for best caramelization.
- Keep cuts uniform so every floret cooks the same.
Step-by-step: how to roast cauliflower on a baking sheet in the oven
Start with heat on your side — a preheated sheet sends florets into caramelization the moment they land. I always heat the oven to 425 degrees and slide a lined baking sheet in to get truly hot.
Trim the head: remove leaves, cut out the core, and split into even pieces. Uniform florets cook at the same rate, so size matters.
Dry and toss
Pat the florets completely dry. Excess water causes steam and stops browning.
Toss pieces with olive oil, minced garlic, salt, pepper, paprika, and any other seasonings so each bite has flavor.
Single layer on the hot sheet
Spread florets in one layer with flat sides down on the preheated sheet. Direct contact gives the best color and crisp edges.
Roast timing
Place the sheet in the oven and roast 25–30 minutes without turning. Look for deeply browned edges and a fork-tender center.
Finish and serve
Sprinkle grated cheese in the last five minutes so it melts and crisps. Squeeze a little lemon juice and scatter chopped parsley before serving.
Air fryer option
If you use an air fryer, cook at 400°F for 10–15 minutes and shake the basket once for even browning.
| Action | Temperature | Time | Why it matters |
|---|---|---|---|
| Preheat baking sheet | 425 degrees (oven) | 5 minutes | Hot surface jump-starts caramelization and prevents steaming. |
| Roast on sheet | 425 degrees (oven) | 25–30 minutes | Long, high heat creates crisp, browned edges and tender centers. |
| Add cheese | Room temp / in oven | Last 5 minutes | Melts and crisps without burning when added late. |
| Air fryer option | 400°F | 10–15 minutes | Faster crisping; shake once for even color. |
Pro tips for crispy, evenly browned florets every time
A few small steps at the start make the difference between soft florets and ones with deep, crisp color. These are the practical tricks I use when I want dependable results for a weeknight or a dinner with friends.
Start dry and keep pieces uniform
Pat each piece completely dry. Even a little surface moisture creates steam and stops the sear.
Cut similar sizes so the small pieces don’t overcook while the larger ones finish.
Space, oil, and heat
Don’t overcrowd the pan. Give each piece room in a single layer so hot air can circulate.
Use just enough oil to coat — it helps carry seasoning and encourages caramelization. I favor quality olive oil for flavor and browning.
Preheat, parchment, and a quick finish
Slide a hot baking sheet into the oven before you add the florets so they hit a sizzling surface.
Line the sheet with parchment for extra-crisp edges and easy cleanup. For deeper bronze, finish with a short broil but watch closely.
- Season early so salt penetrates, and add cheese at the end to avoid burning.
- If the pan looks dry midway, drizzle a touch more oil to keep edges frying, not steaming.
- Trust visual cues: deep golden tips and tender centers are your goal.
| Action | Why it matters | Quick tip |
|---|---|---|
| Preheat baking sheet | Instant sizzle speeds browning | Heat 5 minutes at the right temperature |
| Single layer on sheet | Prevents steaming and soft edges | Allow 1/2–1 inch between pieces |
| Broil to finish | Boosts color and concentrated flavor | Broil 1–2 minutes, watch closely |
Follow these points and you’ll end up with evenly browned, flavorful florets every time. My go-to is to roast cauliflower until the tips are deeply golden and the centers stay tender — it takes practice, but these steps make success routine.
Italian-inspired flavor variations to match your menu
A handful of pantry items can steer this side toward bright, spicy, or herb-forward directions with little fuss. I like to think in finishing cues: when to add cheese, when to squeeze lemon, and when to toss on a crunch so texture stays lively.
Classic trattoria: Season with salt, pepper, garlic, a splash of olive oil, and finish with lemon and parsley for a fresh lift.
Cheesy finish: Add Parmigiano-Reggiano, Pecorino, or Asiago in the last minutes so the cheese melts and crisps without burning.
Spicy kick: Sprinkle red pepper flakes or a pinch of cayenne. For smoky warmth, use smoked paprika. Taste as you go so heat complements the vegetable.
- Herb-forward: Use an Italian seasoning blend with oregano and thyme for layered green notes.
- Pesto on the side: Serve basil pesto or pesto rosso for dipping—its herbaceous character brightens each bite.
- Crunch factor: Scatter toasted breadcrumbs or crushed nuts before roasting for a crisp finish.
If you’re pairing with a bright salad, keep the pan simple so the greens can shine. Use just enough oil to help spices bloom, then finish with lemon to balance richness. Mix and match these ideas to suit your main course and mood.
Serving ideas that make this side dish a weeknight hero
A tray of caramelized florets lifts even the simplest protein into a comforting meal. I like to keep things practical and tasty, so the pan often becomes the star of a quick dinner.
Here are easy ways I serve it so dinner comes together without stress.
- Pair with baked chicken breast or pork chops for an easy, balanced plate.
- Slide it onto a baking sheet with chicken thighs for a one-pan meal that finishes together.
- Toss warm florets into pasta with a spoon of pesto and a squeeze of lemon juice for a cozy bowl.
- Add to a lemony arugula salad and shave cheese over the top for a bright lunch.
- Fold into rice bowls with herbs and a drizzle of good olive oil for a fast weeknight win.
| Pairing | Why it works | Quick tip | Timing |
|---|---|---|---|
| Baked chicken breast | Balanced protein and veg for a simple dinner | Season chicken simply so flavors match | Cook together on separate half of sheet; 25–30 minutes |
| Sheet pan chicken thighs | One-pan convenience; shared cooking time | Place florets around thighs to catch juices | Roast 25–30 minutes at 425°F |
| Pasta or salad | Transforms leftovers into a new dish | Toss with pesto, lemon, or olive oil | Rewarm 3–5 minutes or toss warm into bowls |
Nutrition-minded notes and smart swaps
With a few mindful swaps you can keep the flavor you love while lightening the plate. I want this to feel practical and kind to your goals.
Why this veg works for health
Cauliflower brings fiber and antioxidants to the table. It also supplies key vitamin C and vitamin K without many calories.
That concentrated nutrition makes a humble side feel nourishing and filling.
Lighter options and simple swaps
A light coat of extra-virgin olive oil gives heart-healthy fat and helps browning during baking. Use less oil if you prefer and add a splash of low-sodium broth halfway through to keep pieces moist.
- Skip cheese or swap it for nutritional yeast to keep savory depth without dairy.
- Season simply with salt, pepper, and fresh herbs to control sodium and highlight natural flavors.
- Portion generously—this method concentrates taste so plates feel satisfying without heavy sauces.
| Focus | Benefit | Smart swap |
|---|---|---|
| Fiber & vitamins | Supports fullness and immune health | Keep portions generous |
| Fat for flavor | Healthy fats aid absorption of nutrients | Use extra-virgin olive oil sparingly |
| Dairy-free | Savory without added fat | Sprinkle nutritional yeast |
| Lower-fat baking | Retains texture with less oil | Add broth mid-bake; finish with citrus |
Storage, reheating, and make-ahead without losing crunch
Leftovers deserve love—here’s how to keep edges crisp and flavors bright when you store and reheat. Cool the pan briefly, then move pieces into an airtight container. Stored this way, they keep for up to four days in the fridge.
To re-crisp, spread the pieces in a single layer on a baking sheet and reheat in a 350°F oven for several minutes until the edges revive. The air fryer is faster: a few minutes at 400°F restores color and snap without overcooking.
- Cool completely before storing to avoid soggy steam buildup.
- Reheat from chilled on a dry sheet; avoid the microwave, which steams and softens texture.
- If you freeze, keep for up to three months but expect softer centers after thawing.
- Hold back cheese when you know you’ll reheat; add it fresh so the finish crisps.
- A squeeze of lemon juice or a spoonful of pesto refreshes the flavor before serving.
- Keep a cup aside for lunch bowls—toss into pasta, top pizza, or eat cold as a snack.
| Storage | Temperature / Method | Notes |
|---|---|---|
| Refrigerate | Airtight container, 4 days | Cool fully first to prevent steam; best when reheated on a sheet. |
| Reheat (oven) | 350°F on a baking sheet | Several minutes until edges crisp; use one layer for even heat. |
| Reheat (air fryer) | 400°F, a few minutes | Fast crisping; check after 2–4 minutes to avoid drying. |
| Freeze | Up to 3 months, frozen | Texture softens after thawing; best used in cooked dishes like pasta or pizza. |
Bring it to the table: simple, authentic, and ready to enjoy
Serve the pan while it’s still sizzling — the contrast of crisp edges and tender centers is irresistible. Add grated cheese in the last minutes, squeeze on lemon juice, and scatter parsley so each bite sparkles.
Use a preheated baking sheet and roast at 425°F for the best temperature and browning. Season simply with salt, pepper, garlic, and a good drizzle of olive oil. If you want extra color, give the pan a quick broil and watch closely.
Finish with a small touch of heat from red pepper flakes if you like. Set the sheet beside a bright salad or your favorite mains and serve straight from the hot pan. This italian roasted cauliflower method respects time and delivers the results you can trust. Buon appetito — let’s eat while the edges are still crisp.
Italian Roasted Cauliflower
Ingredients
Method
- Set the oven to 425°F (220°C) and place a baking sheet inside to heat while you prep the cauliflower.
- Remove leaves and core, then cut into even 1–1½ inch florets for even cooking.
- Pat the florets completely dry with a clean towel to remove moisture. This prevents steaming and helps crisp the edges.
- In a large bowl, toss cauliflower with olive oil, garlic, salt, pepper, paprika, oregano, and thyme until coated evenly.
- Carefully remove the hot baking sheet, line with parchment if you like, and spread florets in a single layer with space between each piece.
- Roast at 425°F for 25–30 minutes, turning once halfway through, until golden brown and tender inside.
- In the last 5 minutes, sprinkle grated Parmigiano-Reggiano over the florets so it melts and crisps slightly.
- Remove from oven. Drizzle with lemon juice, and scatter fresh parsley on top before serving.
- Preheat air fryer to 400°F (200°C).
- Cook for 10–15 minutes, shaking the basket halfway through for even browning.
- Finish with lemon juice, parsley, and cheese as above.
Notes
- Drying the florets is key — moisture prevents caramelization.
- Don’t overcrowd the pan. Each piece needs space to crisp up.
- Use a hot baking sheet to get that deep, golden color right away.
- Finish fresh: Lemon and parsley should always be added just before serving.
- Storage: Keeps 4 days in the fridge. Reheat at 350°F until edges re-crisp.
- For extra crunch: Add toasted breadcrumbs in the last few minutes of roasting.