
Jump to Recipe
I remember the first time a pan of braised poultry filled my kitchen with citrus, garlic, and warm wine; it felt like a small celebration on a weeknight. The scent of seared skin and softened onion always makes people gather, reach for bread, and talk a little longer at the table.
At home I use a single 12-inch oven-safe skillet to build flavor: a quick, golden sear to render fat, then soft aromatics before a gentle braise. I like either a lemon-and-white-wine route or a tomato-and-red-wine path, both giving bright, layered taste that speaks of Sicily.
Small techniques change everything: a light dry-brine for deeper seasoning, pitting the olives so the bite stays pleasant, and keeping a snug lid on the pan to trap steam. Timing is honest and achievable on busy evenings, and leftovers reheat with a splash of broth or wine to revive the sauce.
Serve this rustic dish with torn crusty bread, simple pasta, or roasted potatoes and a green side that can soak up the sauce. These are the kinds of meals I make when I want comfort, ease, and a little warmth to share.
Key Takeaways
- Use a 12-inch oven-safe skillet for even cooking and easy cleanup.
- Sear first to render fat and build deep, savory flavor.
- Choose lemon and white wine or tomato and red wine to steer the sauce.
- Dry-brine briefly and always pit the olives for best texture.
- Reheat gently with broth or wine to keep the meat moist.
Why this Italian chicken dish works on a busy weeknight
Weeknight cooking should be calm: a quick sear, a splash of wine, then let heat do the rest. I use a single skillet so flavor builds fast and cleanup is minimal.
Start by heating a thin layer of oil and sear the chicken for about 4–5 minutes per side to get deep color and fond. Remove the meat, then sauté garlic and onions until soft; those aromatics make the sauce taste slow-simmered in far less time.
Deglaze the pan with wine, add braising liquids and any add-ins, then cover and finish in the oven or on the stove. A 30–40 minute covered braise yields reliably tender thighs while you set the table or toss a green salad.
- Predictable timing: sear in minutes, then a hands-off braise.
- One pan equals fewer pots and a rich pan sauce for bread or pasta.
- Flexible: swap vegetables, herbs, or a different bottle of wine to suit the week.
Ingredient spotlight for bold, Mediterranean flavor
Start by imagining contrasts: buttery fruit, salty snap, bright acid, and warm aromatics. Pick the elements that will steer the sauce—then buy well. The right choices make a weeknight pan sing.

Choosing the right olives
Castelvetrano brings a buttery, green freshness. Cerignola feels big and meaty. Picholine gives a clean briny edge. Gaeta or Kalamata adds a salty, assertive snap. If you prefer a grassy note, use green olives.
Always pit them—buy pitted or remove pits gently to avoid a hard surprise in every bite.
Wine decisions
For lemon-forward cooking I reach for a crisp white wine like Pinot Grigio or Sauvignon Blanc. It lifts the sauce without masking delicate herbs. For tomato-based braises, a medium-bodied red—Chianti, Merlot, or Barolo—adds warmth and structure that helps tomatoes become a silky base.
Aromatics and acidity
Red onion softens into sweetness while garlic (one or two cloves) builds savory depth. Capers give bright, briny pops. Whole lemon slices simmer down to mellow citrus; crushed tomatoes or a spoon of tomato paste add body and gentle sweetness.
Best poultry choices for braising
I prefer bone-in, skin-on pieces for braising. The skin renders fat into the pan and the bone keeps meat juicy. Boneless pieces work when time is short, but they yield less rendered richness.
- Balance matters: the olive you choose shifts the whole dish.
- Match wine to acidity—white for lemon, red for tomatoes.
- Build layers: onion, garlic, herbs, then acid and brine.
| Ingredient | Characteristic | Best Use | Effect on Sauce |
|---|---|---|---|
| Castelvetrano | Buttery, mild | Lemon braise | Adds creamy, bright note |
| Cerignola | Meaty, large | Hearty tomato braise | Gives chew and substance |
| Picholine | Briny, clean | Capers & pan sauce | Punctuates with salt and lift |
| Gaeta / Kalamata | Salty, assertive | Rustic sauces | Adds punch and savory contrast |
Essential tools and prep for a smooth cook
A well-chosen pan turns good cooking into something joyful and nearly effortless. I favor a heavy, deep 12-inch skillet or a 3-quart enameled Dutch oven that is oven-safe to 450°F. That size lets the meat sit in a single layer so it browns evenly and braises steadily.
Preheat the pan over heat medium, then add a slick of olive oil so food won’t stick and you get a golden crust. If the surface looks crowded, sear in two batches and rest the first on a plate while you build the sauce.
- Choose cookware with oven-safe handles and a snug-fitting lid to trap steam.
- Keep a wooden spoon for deglazing and a measuring cup handy for a quick cup of wine or broth.
- Pat pieces dry with paper towels and set a simple mise en place to speed the process.
| Tool | Why it matters | Ideal trait |
|---|---|---|
| 12″ skillet | Even browning | Heavy, oven-safe |
| 3-qt Dutch oven | Steady braise | Tight lid, enamel |
| Wooden spoon | Safe deglazing | Long, sturdy |
Step-by-step: sear, build the sauce, and braise to tender
A few focused steps—sear, build, and braise—turn simple ingredients into something soulful. I keep each move deliberate so timing and texture stay predictable. Follow the order and the pan will reward you.
Golden sear to lock in flavor
Pat the pieces dry and heat a 12-inch skillet until hot. Add a little oil and sear skin-side down for about 4–5 minutes until deeply golden and the fat has rendered. Flip and sear the other side for a few minutes to build fond.
Deglaze and layer the sauce
Remove the meat briefly, then soften onions over heat medium in the rendered fat. Stir in garlic until fragrant, then deglaze with wine, scraping up browned bits—this is the backbone of your sauce.
Braise until falling-apart tender
Stir in olives, capers, lemon slices or tomato paste and crushed tomatoes depending on your route. Nestle the pieces back so they sit partially in the sauce, season with a touch of salt pepper, and cover.
- Braise on the stove or transfer to the oven for about 35–40 minutes until tender.
- If the sauce tightens, splash a little broth or water to keep it silky.
- Tuck in hearty greens like kale for 4–5 minutes at the end for color and balance.
Taste and finish with a squeeze of lemon or an extra pinch of salt before you serve. Spoon the sauce over the top so every plate gets sauce, fruit of the vine, and softened aromatics.
| Action | Time | Why |
|---|---|---|
| Sear | 4–5 minutes per side | Renders fat and builds flavor |
| Sauté aromatics & deglaze | 3–4 minutes | Creates a rich base for the sauce |
| Braise | 35–40 minutes | Turns meat tender and melds flavors |
Pro tips from the Italian kitchen
I keep a few kitchen rules that turn hurried cooking into a confident, flavorful meal every time. These are small, actionable moves I repeat on every run of this dish.
Dry brine for deeper seasoning
Salt the poultry up to 24 hours ahead and leave it uncovered in the fridge. This dry-brine seasons through and dries the skin so it browns more evenly.
Patience while browning and pit your olives
Leave the meat undisturbed as it develops color; that rendered fat becomes the base that carries garlic and onions. Always pit the olives—buy pitted or remove pits gently so every bite is pleasant and safe.
Covered versus uncovered braise, ideal temps and timing
For a juicier finish, keep the lid on during most of the braise; a covered pan traps steam and protects texture. If you want a tighter, reduced sauce, remove the lid near the end to concentrate flavors.
- Aim for an oven zone of 300–375°F; lower heat over longer time yields silkier results, while 375°F shortens the clock.
- If you extend the braise, drop the heat so the meat stays tender, not stringy.
- Near the end, skim excess surface fat so the sauce tastes clean and bright.
- Keep the pan roomy; crowding prevents good browning and weakens the sauce’s depth.
- Taste at the top of the finish and adjust seasoning—salt and acid can make the final plate sing.
| Method | When to use | Effect |
|---|---|---|
| Covered braise | Most of cook time | Moist meat, gentle melding of flavors |
| Uncovered finish | Last 10–20 minutes | Thicker sauce, more concentrated taste |
| Lower oven heat | Longer cooks | Silky texture, less risk of drying |
These tips sit at the intersection of ease and technique. Use them and your pan will reward you—these recipes become reliable, everyday favorites.
chicken thighs with olives italian recipe: two delicious paths
Two clear directions bring very different moods to the pan: a bright, lemon-forward skillet or a deep, tomato-braised classic. Both start the same way—good browning in a little oil—then diverge into distinct sauces and pairings.
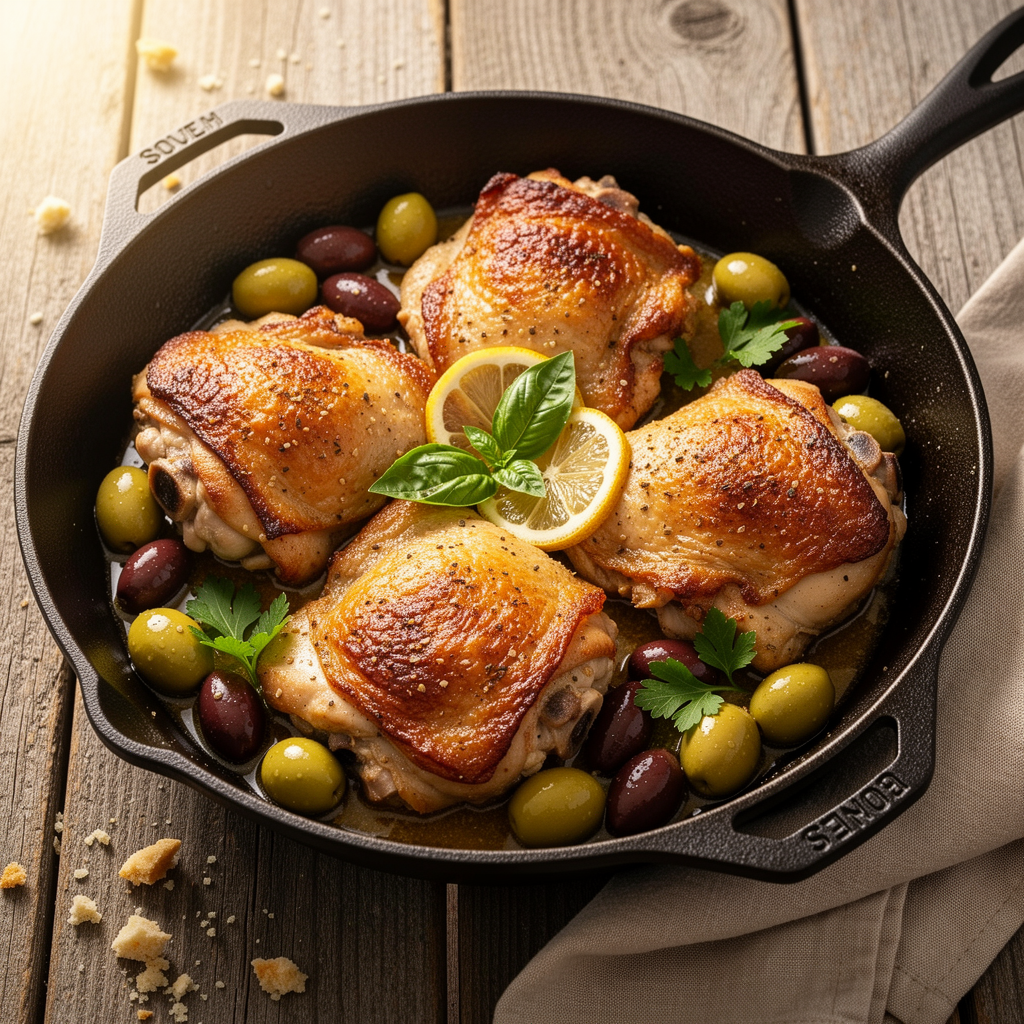
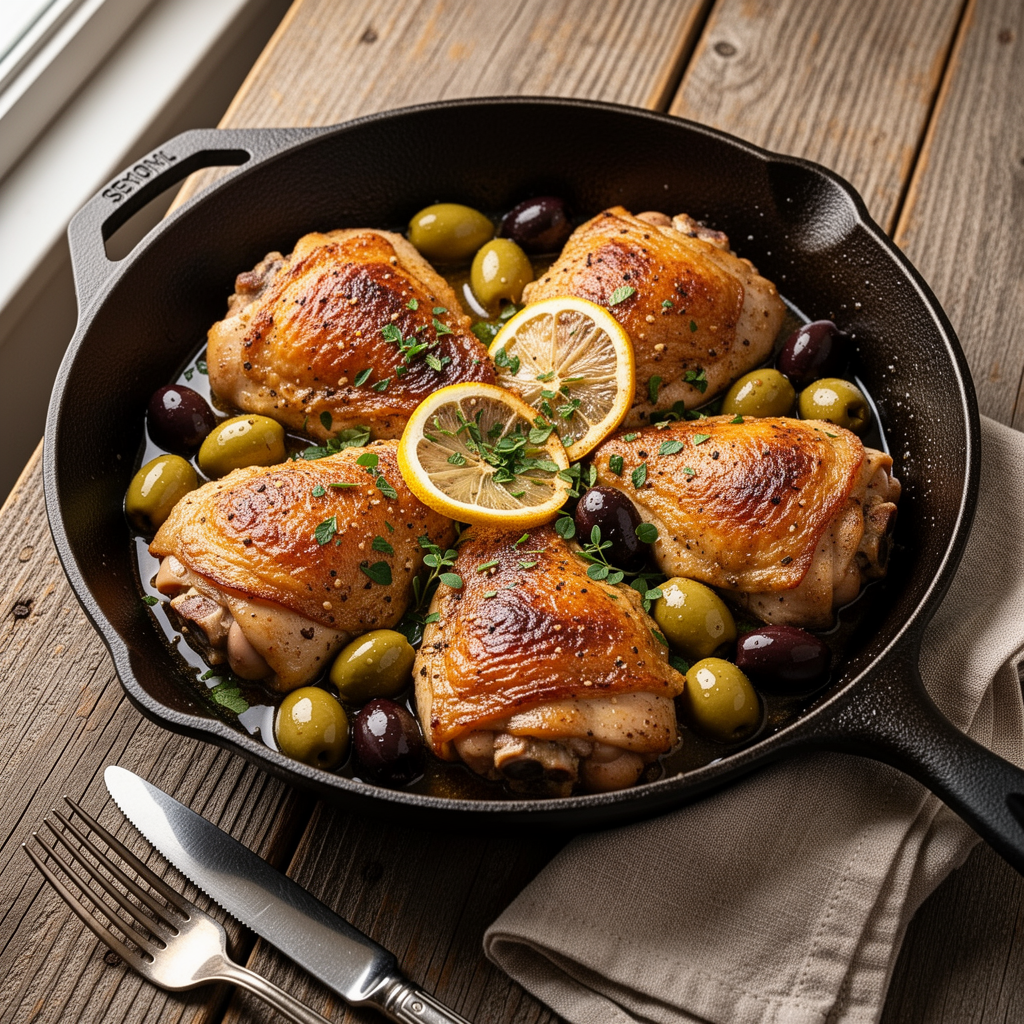
Lemony Sicilian skillet
I soften red onion and garlic in the skillet, bloom oregano, then add capers, lemon slices, and a splash of white wine. Cover and cook until the pieces are tender and the citrus has mellowed into a sunlit sauce.
This version pairs beautifully with creamy polenta or a crisp green side. Finish with a pinch of pepper to lift the flavours.
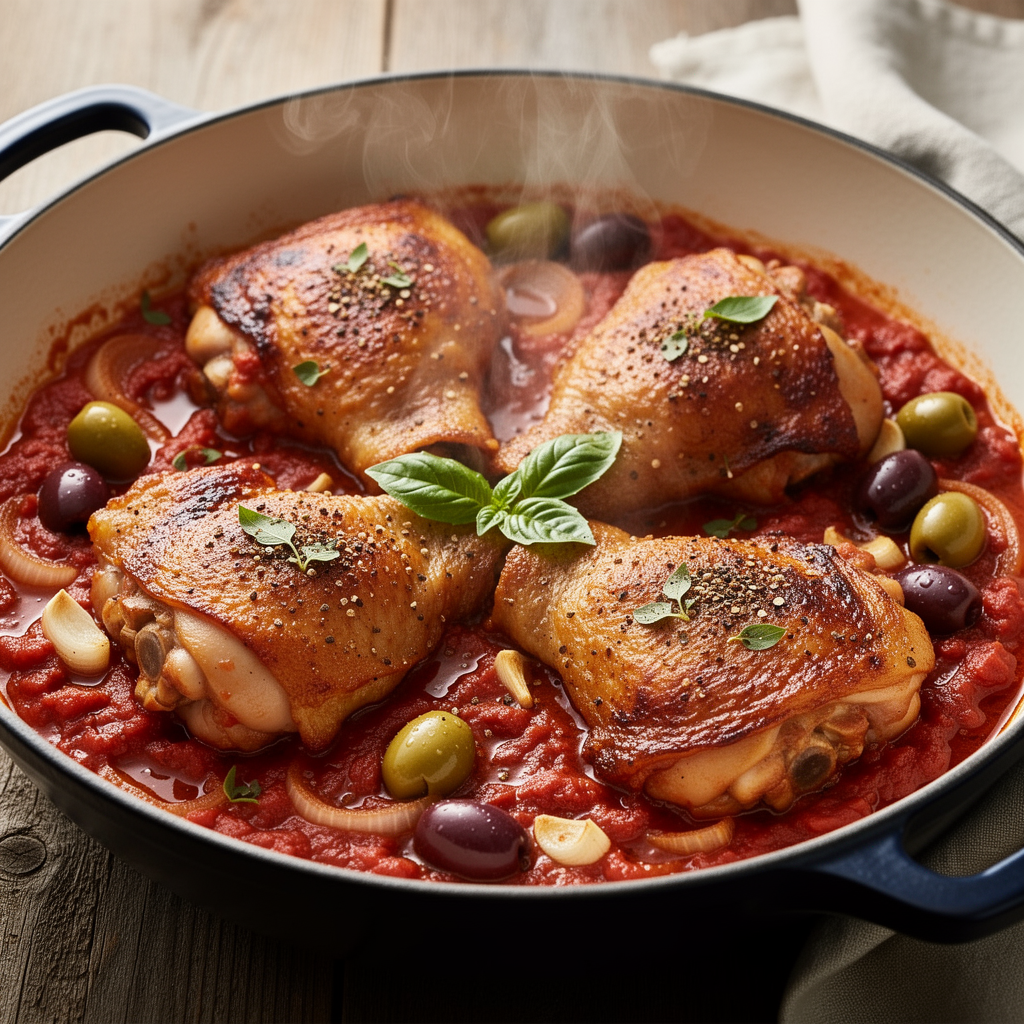
Rustic tomato-braised version
For a heartier route, stir in tomato paste and crushed tomatoes, then a splash of red wine and a handful of briny olives. I prefer to transfer the pan to the oven at 375°F for about 30 minutes, then let it rest 10–20 minutes so the juices settle.
The sauce should be thick and clingy, rich enough for bread or pasta on the side.
- Both paths begin with the same sear so the oil carries deep, caramel notes.
- Choose buttery olives for lemon, saltier ones for tomatoes.
- Finish with pepper and a short rest for juicier results.
| Feature | Lemony Skillet | Tomato-Braised |
|---|---|---|
| Main aromatics | Red onion, garlic, oregano, lemon | Tomato paste, crushed tomatoes, red onion |
| Liquids | White wine, juice from lemon | Red wine, tomatoes |
| Finish | Capers, bright tang, light sauce | Briny olives, deep red sauce, oven rest |
Smart substitutions and flavor upgrades
I recommend a few small swaps that keep the dish familiar while adding a fresh note. These choices are practical, pantry-friendly, and meant to preserve balance in the sauce and texture.
Meyer lemon, crushed red pepper, sun-dried tomatoes, and mushrooms
I reach for Meyer lemon when I want gentler citrus that softens quickly and gives a floral, round finish. A pinch of crushed red pepper adds friendly heat that cuts through richness without stealing the show.
Sun-dried tomatoes concentrate tomato brightness; paired with mushrooms sautéed in a touch of olive oil, they add deep umami and a meaty bite. If the sauce needs body, stir in a spoonful of tomato paste to thicken without long reduction.
Greens swap: kale, chard, spinach, or radicchio
If kale isn’t your style, try chard for silky leaves, spinach for quick tenderness, or radicchio for a hint of pleasant bitterness. Toss greens into the pan near the end so they wilt but keep color and snap.
- You can add chicken back to the pan when reheating—toss in a handful of green olives or strips of sun-dried tomato to wake the sauce.
- Garlic can be sliced for a pronounced bite or smashed so it dissolves into the sauce.
- A final swirl of oil smooths sharp edges; a splash of wine brightens leftovers while reheating.
| Swap | Why it works | When to use |
|---|---|---|
| Meyer lemon | Softer citrus, floral finish | For lighter, lemon-forward sauces |
| Sun-dried tomato + mushrooms | Boosts umami and texture | When you want depth without long simmering |
| Chard / spinach / radicchio | Varied texture and bitterness | Swap kale or add for color and balance |
What to serve with Italian chicken and olives
A warm pan at the table makes serving feel like an invitation, and the right sides turn a meal into a memory. I keep pairings simple so the sauce and braise stay central.
Start with a basket of crusty bread and set the pan in the middle. Guests can tear and mop up every drop; it’s unfussy and joyful.
- Toss a plain pasta in a little cooking water and good olive oil, then spoon the poultry and sauce over the noodles so they drink in the juices.
- Mashed potatoes give a creamy base, while roasted potatoes add crisp edges that contrast the tender meat.
- Hearty grains like farro or sorghum add chew and nuttiness; I warm a cup per person so they’re ready to catch the sauce.
- A peppery arugula or simple green salad with lemon vinaigrette refreshes the palate between bites.
- If you opened a bottle of wine for the pan, pour the same bottle at the table; it ties the meal together.
Keep cheese light—an easy grate of pecorino over pasta enhances, but don’t overwhelm the main flavors. For casual nights, serve straight from the skillet so the dish stays hot and family-style feels cozy.
| Side | Why it works | Serving note |
|---|---|---|
| Crusty bread | Soaks up sauce | Serve in a basket, tear at table |
| Pasta | Noodles absorb juices | Reserve pasta water, finish with oil |
| Potatoes | Creamy or crispy contrast | Mashed or roasted, warm before plating |
| Hearty grains | Add chew and nutty depth | One cup per person, warmed |
Make-ahead, storing, reheating, and freezing
Make-ahead braises are a gift: flavors deepen overnight and the sauce becomes silkier. I often finish the pan a day ahead so the aromatics settle and the cooking is easier on dinner night.
Fridge timing and quick reheats
Refrigerate leftovers in an airtight container for up to 3-4 days. Keep plenty of sauce around the pieces so they stay moist and protected over time.
To reheat, warm gently on the stovetop over medium-low for a few minutes, covered. Add a splash of broth or a little white wine to loosen the sauce and revive aroma. If you warm a single plate, cover and use short bursts, checking often to avoid overcooking.
Freezer tips and thawing
Cool completely before freezing. Pack in a freezer bag with enough sauce to surround the meat, flatten the bag for faster thawing, and label with date and contents.
Thaw overnight in the fridge, then rewarm slowly. If tomatoes taste muted, brighten them with a squeeze of lemon or a small spoon of tomato paste while reheating. Keep a lid on so the sauce returns glossy and the meat stays juicy.
| Action | Approx. time | Tip |
|---|---|---|
| Fridge storage | 3–4 days | Store covered, extra sauce protects texture |
| Stovetop reheat | Few minutes | Medium-low heat, add broth or white wine |
| Oven reheat | Until just hot | Cover to prevent sauce separation |
| Freeze | About 1 month | Cool fully, bag with sauce, thaw overnight |
Nutritional notes and dietary tweaks
Small adjustments during cooking can shift a rich braise into a lighter, brighter meal. I aim for balance: keep the flavor, trim the excess.
Bone-in pieces stay juicier through braising, and much of the surface fat renders into the pan. If you want a leaner finish, skim the top before serving and reserve a spoonful of sauce for richness.
If you watch salt, rely on capers, olives, and tomatoes for savory depth, then add a careful sprinkle of salt and pepper at the end. A modest drizzle of olive oil can round edges; omit it for a leaner plate.
- Portion sauce at about a half cup per serving to satisfy without overdoing sodium.
- Boneless pieces are convenient—shorten the braise slightly so they remain tender and not stringy.
- Add extra greens to the pot or plate for fiber and balance; they bulk the meal without extra starch.
- Tomatoes add body and subtle sweetness, so you rarely need sugar to adjust acidity.
| Concern | Practical tweak | Why it helps |
|---|---|---|
| Excess fat | Skim after resting | Lightens the sauce and reduces calories |
| Sodium | Use capers/olives sparingly; finish with salt | Preserves savory punch while controlling salt |
| Texture | Shorter braise for boneless | Prevents dryness and stringiness |
Reheat gently on medium-low, adding a splash of broth or wine to refresh texture. Taste as you go—small, sensible adjustments to ingredients ensure the best result for your table. If you want another classic take, see my notes on pollo alla cacciatora for inspiration: pollo alla cacciatora.
Bring it to the table: simple, rustic, and company-worthy
Bring the skillet hot to the table and let the room inhale the sauce. I love the small ceremony of setting the pan down and watching people reach for bread.
Right before serving I tuck the pieces back into a gentle bubble, finish with a swirl of olive oil, and add a quick twist of pepper and a whisper of salt. Heap the meat onto a warm plate for guests who prefer that, spooning over tomatoes, softened aromatics, and a few green olives for brightness.
Offer an easy side—bread for dipping, a bowl of pasta, or roasted potatoes—so every drop of sauce finds a home. Keep the pan covered between helpings; brief trips to a low oven will hold heat without overcooking.
Set out a small cup of extra sauce and a jar of olives at the table. This dish is meant to be shared—family-style, relaxed, and enjoyed slowly. Trust the time you gave the sear and braise, then sit down and listen to the compliments.
Italian Chicken Thighs with Olives
Ingredients
Method
- Lemon version: add lemon slices and oregano.
- Tomato version: stir in tomato paste, then crushed tomatoes.
Notes
- Bone-in, skin-on thighs give the best flavor and moisture.
- Always pit olives so every bite stays smooth and safe.
- Keep the lid on for most of the braise to protect texture.
- Reheat gently with a splash of broth or wine.
- Flavors deepen after one day in the fridge.
- Serve straight from the skillet for a rustic table feel.