

Jump to Recipe
There’s a quiet comfort in a dessert that sets with a gentle wobble, a simple pleasure from the Italian kitchen. It feels both special and completely everyday.
That’s the spirit of panna cotta, which translates to “cooked cream.” This version honors that tradition while embracing modern needs. We achieve the signature silky texture without any dairy.
By using a plant-based liquid like almond milk, we create a delicate, custard-like treat. It’s lighter yet just as satisfying. This approach makes the dessert accessible to more people.
I want to show you how straightforward this can be. With just a few ingredients and a little patience, you can master this elegant dish. It’s perfect for a quiet evening or a gathering with friends.
This guide will walk you through each step. You’ll learn how to select your components and balance flavors for a perfect result. Let’s create something beautiful together.
Key Takeaways
- Panna cotta is a traditional Italian dessert known for its smooth, delicate texture.
- This version is a plant-based adaptation that stays true to the original’s character.
- The method uses simple, everyday ingredients for an approachable cooking experience.
- You can achieve a professional-quality result in your own kitchen with clear guidance.
- The final dish is light, elegant, and suitable for various dietary preferences.
- Understanding a few key techniques ensures success every time you make it.
Exploring the Origins and Modern Twist on Panna Cotta
The story of this delicate dessert begins in Italy’s Piedmont region, where culinary traditions run deep. This area gifted us a creation that balances richness with refreshing lightness.
It emerged as the perfect finish to hearty regional meals. The cool, smooth texture provided contrast to robust main courses.
Traditional Italian Roots vs. Contemporary Adaptations
Classic preparations relied on specific ingredients to achieve their signature character. Heavy cream provided the luxurious mouthfeel. Whole milk contributed to the delicate balance.
The setting agent was traditionally gelatin. This created the gentle firmness that defines the dessert’s wobble.
| Aspect | Traditional Version | Modern Adaptation |
|---|---|---|
| Base Ingredient | Heavy cream and dairy milk | Plant-based alternatives |
| Setting Agent | Animal-based gelatin | Agar agar (seaweed-derived) |
| Flavor Profile | Rich, dairy-forward | Lighter, cleaner finish |
| Dietary Accessibility | Traditional preparation | Broadly inclusive |
Contemporary approaches successfully reinterpret the original concept. They identify plant-based ingredients that mimic dairy’s functional properties. Agar agar has been used in Asian cooking for centuries.
This seaweed-based thickener provides a clean set without animal products. The result isn’t identical to full-fat dairy versions. But it offers appealing qualities of its own.
Modern versions feel lighter on the palate. They allow delicate flavors like vanilla to shine through more clearly. This thoughtful reinterpretation respects the original while expanding accessibility.
For those exploring plant-based options, our coconut variation demonstrates how well these adaptations can work. The essence of the dessert remains intact through careful ingredient selection.
The Dairy-Free Advantage: Why Almond Milk?
Almond milk brings a particular advantage to plant-based cooking through its clean, neutral foundation. It serves as an excellent canvas for other ingredients to express themselves fully.
Nutritional Benefits and Richness Explained
This plant-based option creates a lighter final product than traditional heavy cream versions. Some people prefer this delicate quality, especially after a substantial meal.
The subtle nutty character of almond milk complements traditional flavorings without dominating them. Vanilla and almond extract work particularly well with this base.
For those seeking more richness, consider blending almond milk with full-fat coconut milk. This combination adds body while introducing coconut notes. Cashew milk offers another middle-ground option.
| Plant Milk Option | Flavor Profile | Richness Level | Best Use Case |
|---|---|---|---|
| Almond Milk | Neutral, subtle nutty | Light | Delicate, clean-flavored desserts |
| Coconut Milk | Distinct coconut | Very rich | When coconut flavor is desired |
| Cashew Milk | Creamy, mild | Medium | Balanced texture and flavor |
| Oat Milk | Earthy, slightly sweet | Medium | Heartier dessert applications |
Understanding these options helps you make informed choices. Each plant milk brings unique qualities to your finished dessert.
The texture will differ from cream-based versions but offers its own refreshing appeal. This lighter approach respects the original concept while meeting modern needs.
vegan panna cotta almond milk recipe Essentials
Gathering the right components is the first step toward creating a dessert with perfect texture and flavor. I’ve tested these measurements to ensure reliable results every time.
The quantities adjust based on your serving needs. For two portions, use the smaller amounts. For four to six servings, scale up accordingly.
| Ingredient | 2 Servings | 4-6 Servings | Key Purpose |
|---|---|---|---|
| Unsweetened Plant Milk | 1.25 cups | 3 cups | Base liquid |
| Agar Agar Powder | 1 tablespoon | 1.5 tablespoons | Setting agent |
| Granulated Sugar | 2 tablespoons | 3 tablespoons | Sweetness balance |
| Vanilla Extract | ½ teaspoon | 1 teaspoon | Flavor enhancement |
Quality matters greatly with so few ingredients. Your extract carries significant flavor responsibility in this simple preparation.
For a richer result, blend equal parts full-fat coconut milk with your base liquid. This introduces coconut notes while adding body.
Good extracts are available at stores like TJ Maxx and HomeGoods in the baking aisle. These budget-friendly options work beautifully.
Mastering the Texture: Gelatin and Agar Agar Techniques
Texture is everything when it comes to creating that signature gentle firmness. The right set gives this dessert its characteristic wobble without being rubbery or too soft.
Unflavored Gelatin Usage and Vegan Substitutes
For traditional preparations, unflavored powdered gelatin creates the perfect structure. I prefer Knox brand for consistent results. Sprinkle one teaspoon over half a cup of cold liquid.
Let it sit for five minutes until it blooms. Then heat gently for about three minutes until dissolved. Never boil the mixture once gelatin is added.
Agar agar powder serves as an excellent plant-based alternative. Derived from red algae, it provides a clean set. Use powder rather than flakes for accurate measurements.
For a firmer result, increase the agar agar to three-quarters of a teaspoon. Cornstarch or arrowroot starch offer another option. Use about one-third cup for a custard-like texture.
Tips for Achieving the Perfect Set
Ensure your agar agar powder dissolves completely in the warm liquid. Undissolved particles can create an uneven texture.
If your dessert doesn’t set properly, check your ratios first. The issue is usually measurement-related rather than technique-based.
Remember that different setting agents require distinct approaches. Gelatin needs cold blooming while agar agar dissolves in heat.
Both methods share one crucial rule: avoid boiling after adding your gelling agent. Excessive heat breaks down their setting properties.
Infusing Flavors: Balancing Almond and Vanilla Elements
The true character of this dessert emerges from its subtle flavorings. With so few components, each one carries significant weight.
Your choice between vanilla and almond sets the entire tone. It’s the difference between a classic, creamy profile and a more nutty, cohesive experience.
Choosing High-Quality Almond Extract
Quality is non-negotiable when selecting your flavorings. Imitation extracts can impart an artificial, harsh note that stands out unpleasantly.
I recommend using between half and one full teaspoon of a pure extract. This quantity provides a clear presence without overwhelming the delicate base.
For vanilla, bean paste or scraped seeds from a pod create a wonderfully aromatic result with visible flecks. If using a standard vanilla extract, ensure it is pure.
Almond extract is quite potent. A light hand, around one-eighth of a teaspoon, beautifully enhances the nutty base without dominating.
Adjusting Sweetness for a Perfect Finish
The role of sugar here is to support, not dominate. Two to three tablespoons typically creates a gentle sweetness that allows the other flavors to shine.
This balance ensures the final dish feels refreshing rather than cloying. You can also use maple syrup for a different nuance.
Feel free to experiment with other flavorings like matcha, espresso, or even cacao. Stores like TJ Maxx often have quality extracts at accessible prices, making experimentation easy.
Step-by-Step Cooking Process for a Flawless Panna Cotta
Proper heating technique separates a perfectly set dessert from one that’s either too firm or too soft. The process requires attention but follows a clear, manageable sequence.
Heat Management and Stirring Techniques
Begin by whisking your ingredients together in a small saucepan before applying any heat. This ensures the setting agent disperses evenly throughout the liquid.
Place the pan over medium heat while whisking constantly. Constant motion prevents scorching and helps the powder dissolve completely. Watch for small bubbles forming around the edges.
Once the mixture reaches a gentle simmer, continue whisking for two to three minutes. You’ll notice a slight thickening as the setting agent activates. Remove from heat and let it rest for about five minutes.
For traditional preparations using gelatin, the approach differs slightly. Sprinkle the powder over cold liquid in your pan and let it bloom for five minutes. Then apply gentle medium heat until the gelatin dissolves fully.
| Method | Initial Step | Heat Application | Key Timing |
|---|---|---|---|
| Agar Agar | Whisk with all ingredients | Medium heat until simmer | 2-3 minutes after boiling |
| Gelatin | Bloom in cold liquid | Gentle medium heat | 3 minutes to dissolve |
| Common Rule | Avoid boiling after adding agent | Constant stirring required | 5-minute cooling period |
The entire active cooking time takes only about ten minutes. This brief investment yields an elegant result that belies its simplicity. Proper heat management ensures your dessert sets with the characteristic delicate texture.
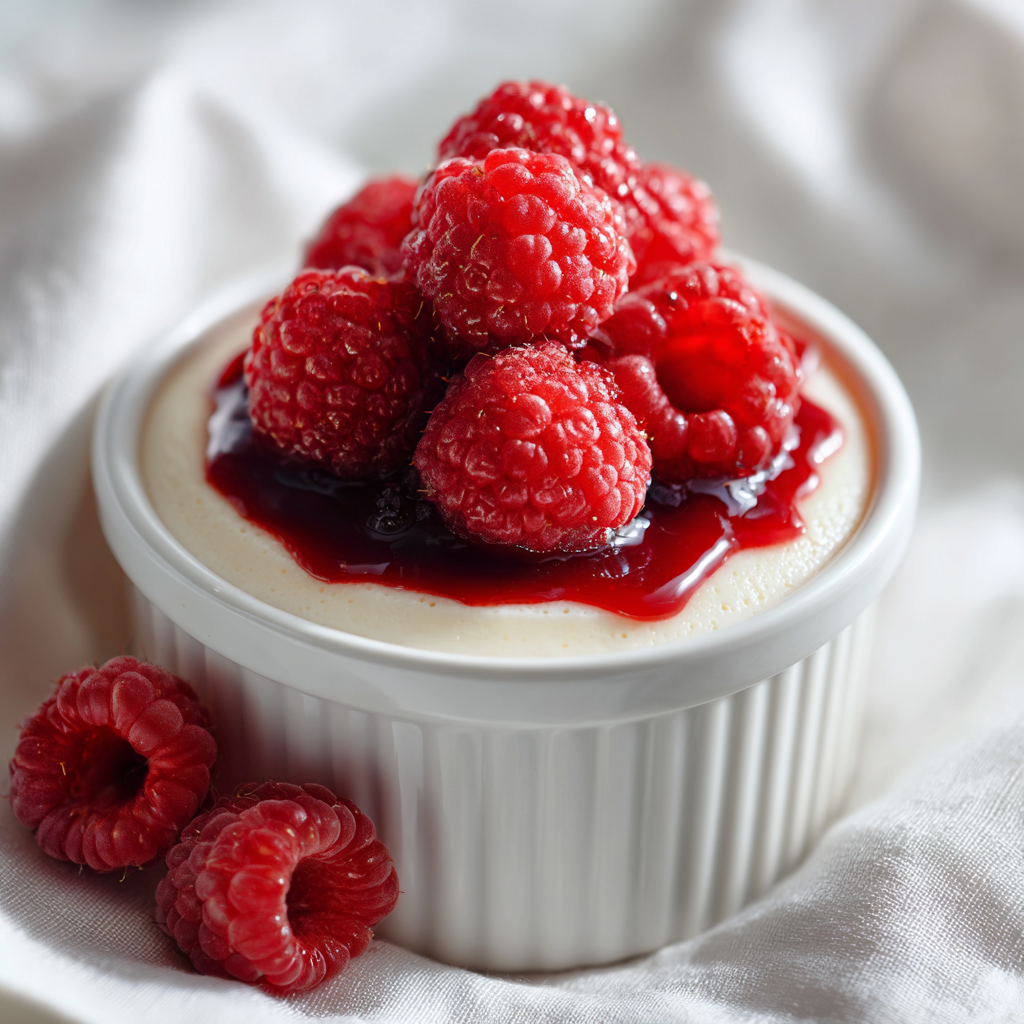
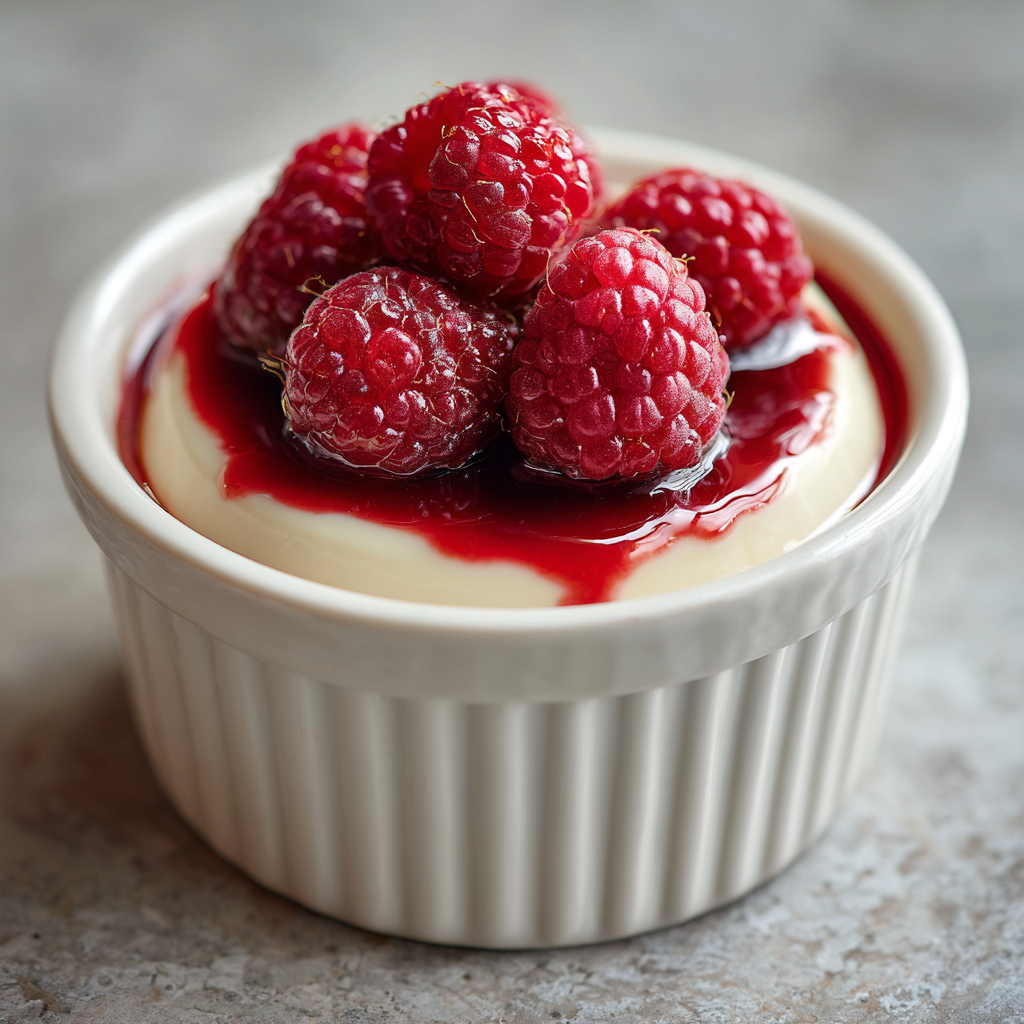
Innovative Berry Compote Toppings for Freshness
A simple fruit sauce can transform your dessert from lovely to memorable. The creamy, neutral base provides a perfect canvas for bright, tart flavors.
I find a classic raspberry coulis offers the ideal balance. It complements the delicate texture without overwhelming it.
Quick Raspberry Coulis Creation
This method is straightforward. You need about one cup of fresh or frozen raspberries.
Combine them in a small saucepan with one to two tablespoons of sugar. Add a third cup of water and a squeeze of lemon juice.
Heat the mixture over medium-high until it bubbles. This takes about ten minutes.
Reduce the heat and let it simmer for five to seven minutes. The berries will soften completely.
After cooling, blend the coulis until smooth. Strain it through a fine sieve to remove the seeds.
Chill the sauce before serving. The cold temperature creates a harmonious contrast with the dessert.
Exploring Alternative Fruit Compotes
Variety is simple to achieve. A mixed berry compote using blueberries and strawberries works wonderfully.
For a tropical twist, consider a mango puree. If you prefer indulgence, a drizzle of caramel or dark chocolate sauce is always welcome.
Fresh garnishes add final flair. Whole berries, citrus segments, or a sprinkle of roasted pistachios provide delightful texture and visual appeal on top of your creation.
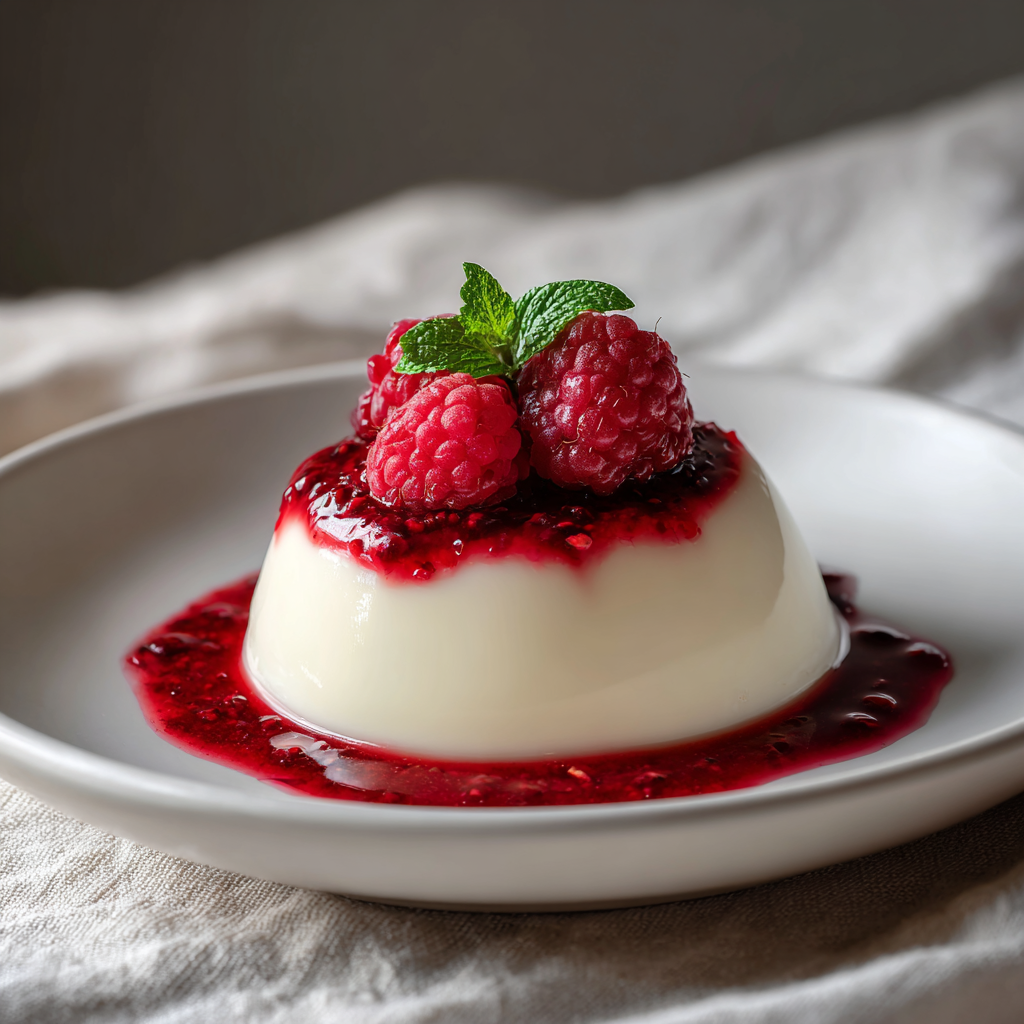
Serving with Style: Ramekins and Presentation Tips
Proper chilling and serving techniques make all the difference in achieving professional results. Your dessert needs adequate time to set completely in the refrigerator.
I recommend at least 2.5 to 4 hours for a basic set. For optimal texture and easier handling, 6 hours or overnight works best. This extended chilling allows flavors to develop fully.
Let the mixture cool at room temperature for about 30 minutes before refrigerating. This prevents condensation from forming on the surface.
Easy Demolding Techniques for a Clean Finish
You have two excellent serving options. For a casual approach, serve directly in the ramekins. This looks attractive and requires no special technique.
For the classic presentation, unmolding creates an elegant look. First, dip the bottom of your ramekin in a bowl of hot water for 5-10 seconds. This slightly warms the outer layer without melting the dessert.
Run a thin butter knife carefully around the top edge to release any seal. Place a small dessert plate on top of the ramekin. Confidently flip both together in one smooth motion.
A properly set dessert should wiggle out cleanly. Don’t worry if it doesn’t work perfectly the first time. With practice, this becomes second nature.
If unmolding doesn’t go as planned, simply scoop your creation into a serving dish. Top with sauce and fruit for a delicious result that tastes wonderful regardless of presentation.
Adapting the Recipe for Diverse Dietary Preferences
Whether driven by preference or pantry contents, you can easily modify the formula for a custom outcome. This approach treats substitutions as opportunities for personalization.
Virtually any unsweetened plant-based liquid works well here. Cashew, oat, and soy are all excellent choices. Each one brings a slightly different character to the final dish.
Substituting Ingredients for a Custom Texture
For a richer result, full-fat coconut milk or coconut cream is ideal. It creates a luxurious texture closest to traditional versions. The distinct coconut flavor becomes a prominent note.
A balanced combination uses half of one base and half of another. This adds body while keeping flavors more neutral. It’s a great way to control the final taste.
Sweetener options are also flexible. Maple syrup can replace granulated sugar for a refined sugar-free version. Use about half a cup of syrup in place of a few tablespoons of sugar.
| Ingredient to Substitute | Alternative Option | Effect on Final Dish |
|---|---|---|
| Agar Agar | 1/3 cup Cornstarch | Creates a more custard-like texture; requires longer cooking time. |
| Granulated Sugar | 1/2 cup Maple Syrup | Adds a subtle, earthy sweetness; creates a refined sugar-free version. |
| Single Plant Base | Half-and-Half Combination | Balances richness and flavor for a more nuanced profile. |
If you use cornstarch or arrowroot, the cooking time increases slightly. You must cook the mixture until it thickens properly.
Both the finished dessert and any sauce will keep well. They can be stored in the refrigerator for up to five days. This makes the dish a convenient option for planning ahead.
Feel confident experimenting with these ingredients. The framework is sturdy enough to handle various approaches while still delivering a delightful result.
Final Thoughts on Enjoying Your Vegan Panna Cotta Experience
What I love most about this dessert is how its elegance comes from such simple, straightforward preparation. In about twenty minutes of active time, you create something that feels truly special. It’s a practical choice for any home cook.
Think of this method as a flexible framework. You can easily explore different plant bases and flavorings. A drizzle of caramel or a fresh berry coulis can create a new experience each time.
Its make-ahead nature makes it perfect for entertaining. Prepare it a day before your gathering. This cool, delicate treat is especially refreshing during warmer months.
I hope you feel confident making this part of your regular rotation. Leftovers keep beautifully for days, allowing you to savor your creation gradually.
Vegan Almond Milk Panna Cotta
Ingredients
Method
Notes
- Use agar agar powder, not flakes, for accurate setting.
- Do not boil the mixture after it starts simmering — high heat weakens the set.
- Almond milk gives a lighter texture than cream; for a richer version, replace half with full-fat coconut milk.
- This dessert keeps well in the fridge for up to 3 days.
- If it sets too firm, reduce the agar slightly next time.