
Jump to Recipe
The coconut panna cotta recipe I trust yields a softly set, creamy dessert that trembles just enough to feel luxurious.
I’ll walk you through hands-on cues that save time and drama: about 10–15 minutes of active work, tested ratios for four small servings, and the gentle heat that never lets the milk boil. Use roughly 500 g coconut milk, 8 g powdered gelatin, 80 g sugar, 30 ml cold water, a splash of cream, vanilla, and a pinch of salt for a reliable set.
Make ahead—covered in the fridge for 3–4 days—then unmold by dipping ramekins halfway in hot water for 10–15 seconds and inverting. I share brand tips to keep your milk homogeneous, when to strain for silk, and topping ideas from bright fruit to toasted flakes so you can plate with confidence.
Key Takeaways
- Hands-on time is short: about 10–15 minutes before chilling.
- Reliable ratio for four servings: ~500 g milk, 8 g gelatin, 80 g sugar.
- Never let the mixture boil; heat until warm and glossy before adding gelatin.
- Chill covered 3–4 days; unmold with a quick hot-water dip.
- Strain for a silk-smooth texture and choose toppings that balance richness.
Why this creamy coconut dessert works so well
The secret to a perfect wobble is careful gelatin dosing and warming just shy of a simmer. I dose gelatin precisely so the set is tender, not rubbery. Gentle heat dissolves sugar and frees flavor without damaging the gel.
Fat matters. A blend of cream and good canned coconut milk gives a silky mouthfeel. The milk stays smooth when the brand is well emulsified; that prevents split layers and dull color after chilling.
A tiny pinch of sea salt and real vanilla deepen flavor without extra sweetness. I always strain the warm base into a clean bowl to remove bubbles and bits. That step yields a glass-like surface and a spoonable, elegant texture.
- Serve in glasses for ease or unmold on plates for drama.
- Toast flakes or add bright fruit to cut richness.
- Keep stovetop work short; chilling does the rest.
| Setting Agent | Typical Set | Chill Time | Best Use |
|---|---|---|---|
| Gelatin | Soft, wobbly | 4–6 hours | Classic unmold or glass |
| Agar | Firmer, slightly springy | 2–3 hours | Vegetarian versions; firmer slices |
| Blend (cream + milk) | Rounded, silky | 4–6 hours | Rich mouthfeel; balanced servings |
coconut panna cotta recipe: ingredients, tools, and timing at a glance
This quick at-a-glance section bundles ingredients, tools, and timing so you can prep with calm confidence. I give exact amounts for four small servings and a richer alternate if you prefer a creamier finish.
Ingredients you’ll need
- About 500 g coconut milk, 80 g sugar, pinch of salt, ½ tsp vanilla, 2 tsp powdered gelatin (≈8 g) bloomed in 2 Tbsp cold water.
- Alternate richer base: 400 ml coconut milk + 355 ml heavy cream, 100 g sugar, 2 tsp gelatin.
- Or swap gelatin for agar agar if you need a vegetarian set (adjust solids for a delicate wobble).
Simple equipment list
- Medium saucepan for warming the milk mixture.
- Heatproof bowl for blooming and mixing the gelatin.
- Fine-mesh sieve to strain before pouring for a silky surface.
- Four ½-cup (120 ml) ramekins or glasses for serving.
Yield, active minutes, and chill time
Yield: four small portions in ½-cup cups. Active stove time: 10–15 minutes from bloom to pour.
Chill: at least 5–6 hours; overnight is ideal for the best set and texture. Keep the milk mixture warm but never boiling, then strain and pour.
| Item | Amount | Notes |
|---|---|---|
| Base milk | 500 g or 400 ml + cream | Use well-emulsified cans for consistent body |
| Gelatin | 2 tsp (≈8 g) | Bloom in cold water before melting |
| Time | 10–15 minutes active; 5–6 hours chill | Plan overnight for best results |
Ingredient notes that make or break texture
Small changes to ingredients make a big difference in how this delicate dessert sets. I start by choosing cans and creams that behave well under gentle heat.
Choosing canned coconut milk: fat, emulsification, and brand differences
Pick full‑fat, well‑emulsified canned coconut milk around 15% fat. Brands that stay homogeneous prevent grey streaks and layers after chilling.
If your can separates, the final set can split into strata. I look for minimal additives and a smooth pour from the can.
Heavy cream vs. coconut cream: mouthfeel, wobble, and set
Heavy cream softens the base and adds lushness. Coconut cream boosts coconut flavor and firms the set.
Use coconut cream sparingly when you want a tender wobble; add a bit more if you need a clean unmold.
Gelatin basics and agar agar swaps
Bloom powdered gelatin in cold water until spongy, melt gently, and never boil. Overheating kills its setting power.
Agar agar sets firmer and less creamy. Start with less than you think and test—agar needs different timing and yields a springier texture.
Sweeteners and flavor balance
Granulated sugar is neutral. Honey and coconut sugar deepen color and add warm notes. Agave keeps the mix light.
Add a pinch of fine sea salt and real vanilla; these let you reduce sugar without losing flavor.
| Ingredient | Effect on texture | When to use | Quick tip |
|---|---|---|---|
| Full‑fat canned milk | Smooth, silky base | Default for classic set | Choose well‑emulsified brands (~15% fat) |
| Heavy cream | Richer, softer mouthfeel | When you want dairy richness | Balances assertive coconut notes |
| Coconut cream | Firmer, denser set | Firm unmolds or stronger flavor | Use sparingly to keep wobble |
| Gelatin vs. agar | Gelatin: tender wobble. Agar: firmer, springy. | Gelatin for classic; agar for vegan version | Bloom gelatin; reduce agar amount for tenderness |
Step-by-step: from milk mixture to perfect wobble
I like to work in clear, numbered steps so you can trust each sensory cue. Start by blooming the gelatin: sprinkle the powder evenly over cold water in a small bowl and let it sit 5–10 minutes. It should swell into a soft, opaque mass that jiggles slightly when nudged.
Warm the coconut milk, sugar, and a pinch of salt in a medium saucepan over gentle heat. Stop just before boiling — look for a whisper of steam and tiny bubbles at the pan edge. Remove from heat, stir in vanilla, and add the melted, lump-free gelatin. If needed, return to very low heat and stir until the mixture looks glossy and smooth.
- Strain the milk mixture through a fine-mesh sieve into a clean jug to catch any flecks and to remove micro-bubbles.
- Lightly brush ramekins with a neutral oil or a tiny smear of coconut oil, or choose glasses if you prefer to serve without unmolding.
- Pour slowly down the inside of each cup to avoid bubbles. Skim any surface foam for a flawless finish.
- Chill on a level shelf at least 5–6 minutes per hour of desired firmness; aim for 5–6 hours or overnight. The center should jiggle like a soft pillow when set.
| Action | Visual cue | Why it matters |
|---|---|---|
| Bloom gelatin | Spongy, opaque mass in bowl | Ensures even dissolution and a tender set |
| Heat base | Whisper of steam; tiny edge bubbles | Prevents boiling which weakens gelatin |
| Strain and pour | Glossy, bubble-free pour | Yields smooth surface and consistent texture |
| Chill | Center jiggles, edges hold | Correct chill time gives perfect wobble |
Pro tips to nail the classic panna cotta texture
Nailing a silky set comes from small, exact moves at the stovetop and a few careful finishes. I share clear, do this/not that guidance so you can finish with confidence.
Why you should never let the mixture boil
Keep the pan below a simmer. If the liquid boils, gelatin loses its strength and your dessert will either refuse to set or become tight and rubbery.
Do this: warm until steam rises and tiny bubbles form at the edge. Not that: do not bring it to a rolling boil.
How to avoid bubbles and use a fine-mesh sieve
Stir gently with a silicone spatula. Vigorous whisking traps air and creates pockmarks on the surface.
- Strain every warm mixture through a fine-mesh sieve to remove micro-bubbles and undissolved specks.
- Cool briefly before pouring to avoid condensation in the cups.
Keeping the milk mixture homogeneous to prevent splitting
Choose well-emulsified coconut milk or blend cans briefly if separated. Uneven fat and water in the pan becomes visible layers after chilling.
Fully dissolve gelatin into a translucent melt and add vanilla off heat. For agar, follow its simmer cue closely so you get the right set without overcooking.
| Setting agent | Heat cue | Result |
|---|---|---|
| Gelatin | Warm, not boiling | Tender, wobbly set |
| Agar | Brief simmer | Firmer, springier set |
| Technique | Strain & gentle stir | Glass-smooth surface |
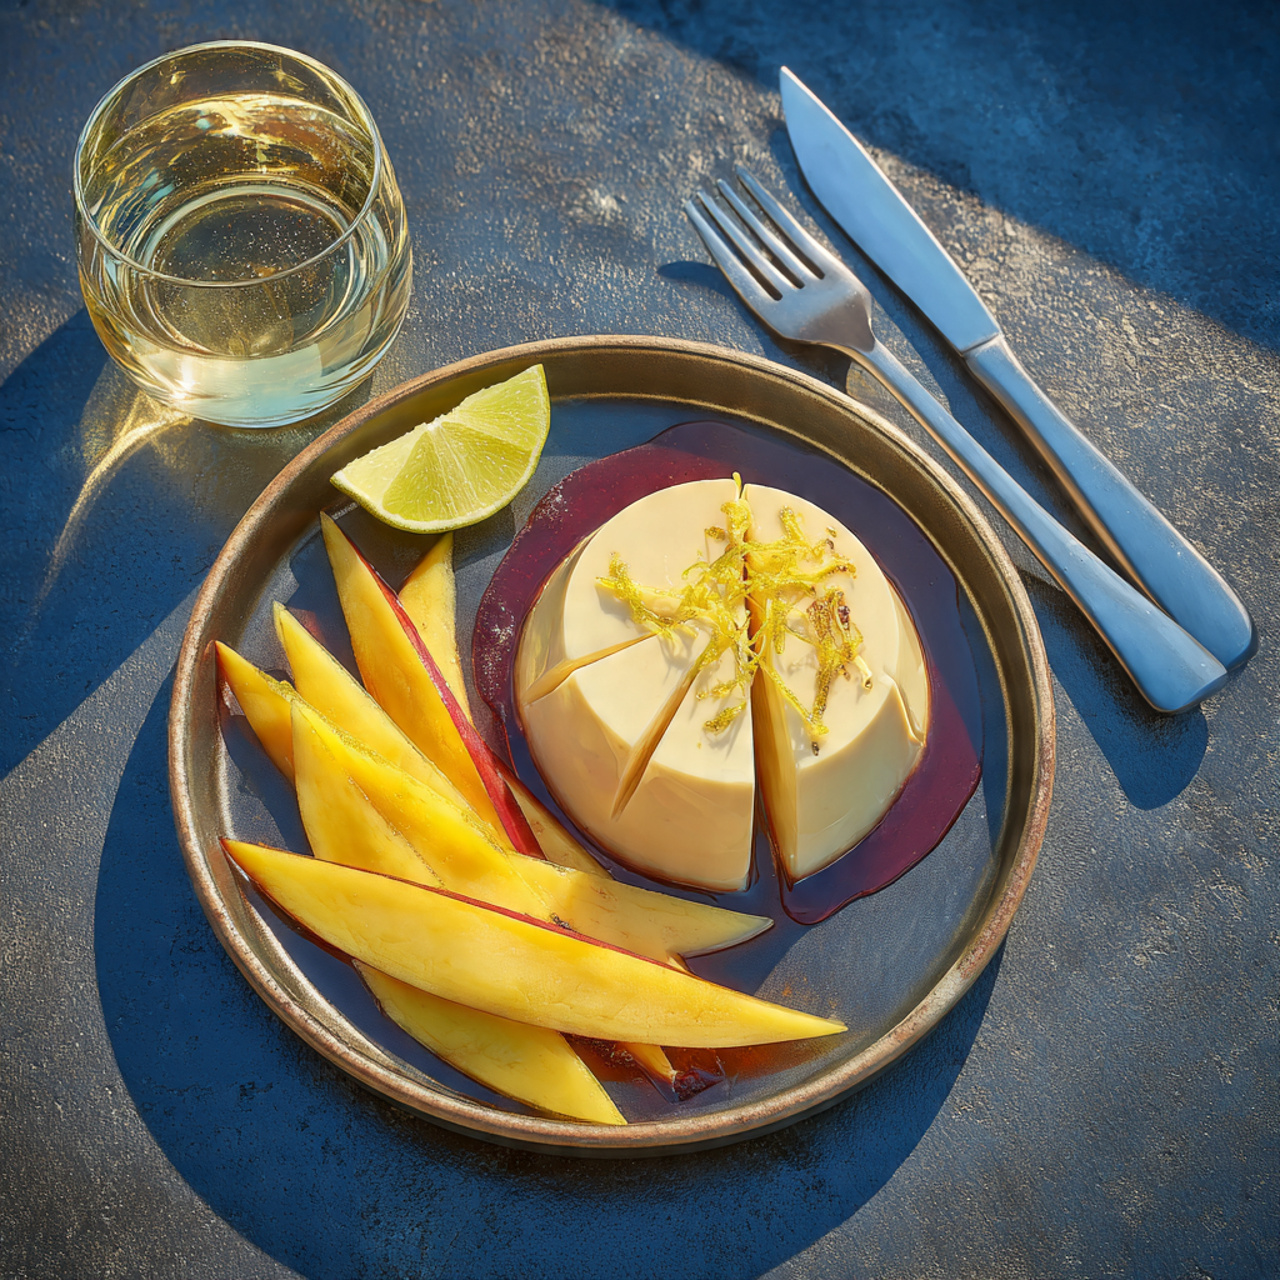
Unmolding like a pro—or serving beautifully in the glass
A clean unmold makes a small dessert feel like a fine restaurant finish. I favor calm, repeatable moves that protect the satiny surface and keep plating low stress.
Brush the inside of each ramekin with a whisper of coconut oil to cut suction. This small step keeps edges pristine and avoids sticky surprises when you flip the pan or cup.
Hot water dip, gentle loosening, and clean plate flips
When set, dip a ramekin halfway into hot water for 5–15 seconds. The warmed sides release while the center stays cool and firm.
- Press lightly around the edges to break any vacuum, then invert onto a chilled plate and give a gentle shake.
- If the mold clings, repeat a short dip rather than a long soak. Avoid softening the set.
- Use a thin, flexible knife only if needed; slip it just along the top edge to keep sides smooth.
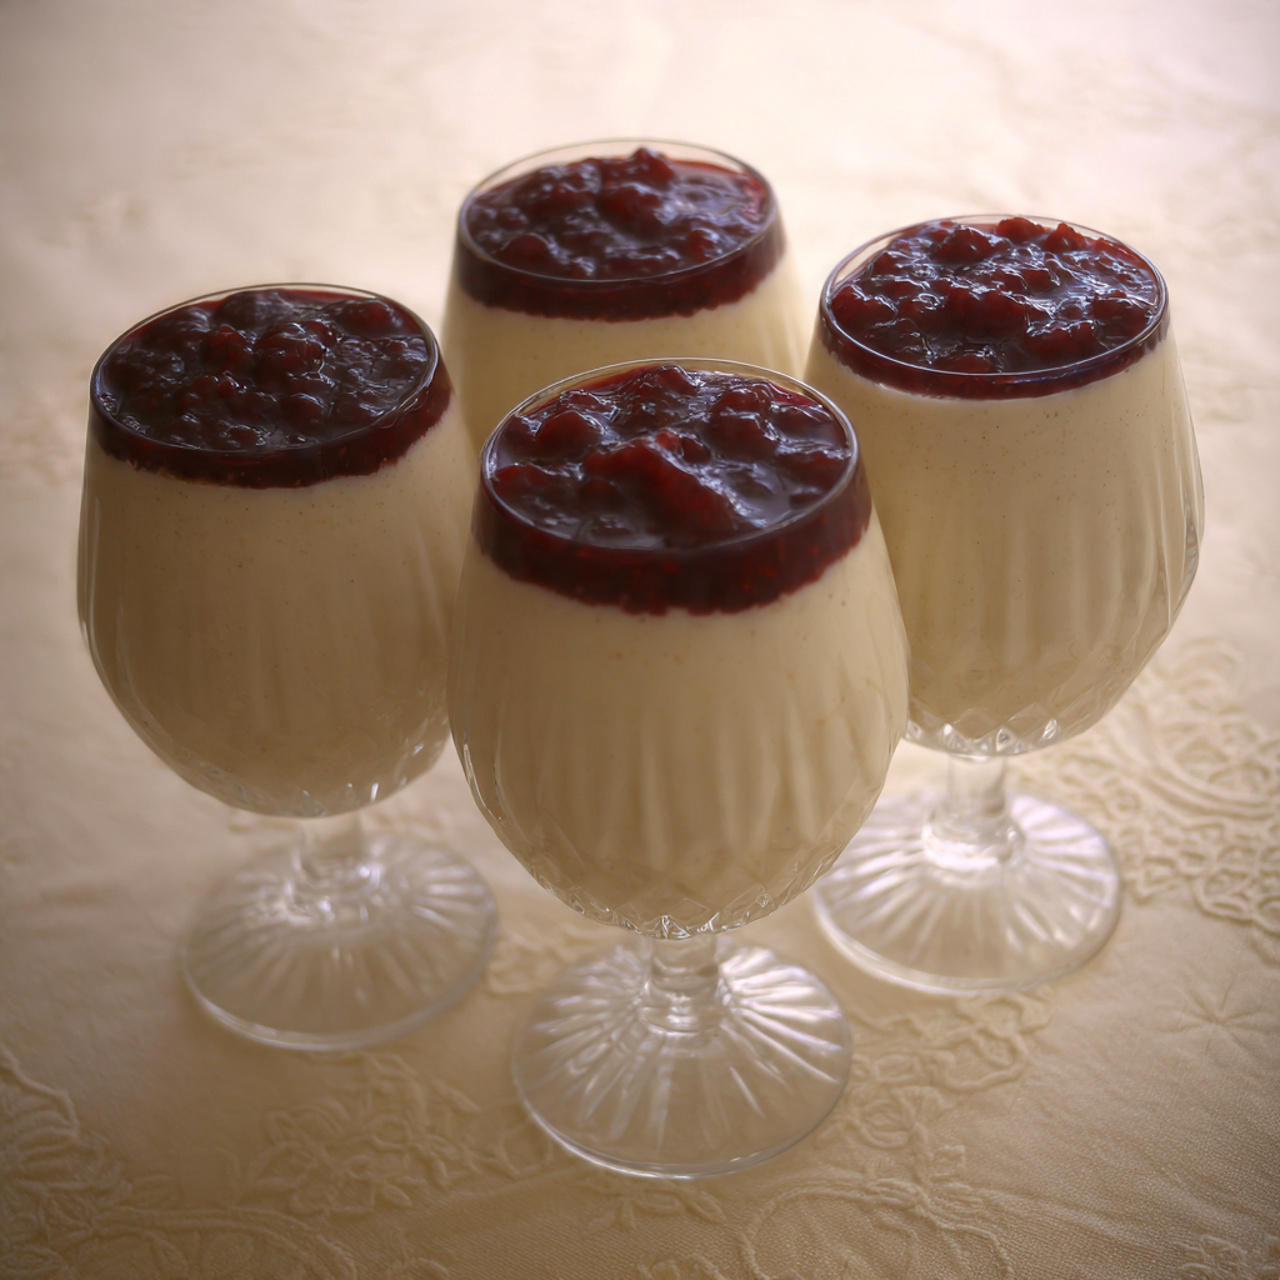
- Prefer no fuss? Serve in clear cups so guests see layers and toppings without unmolding at all.
| Method | When to use | Key step |
|---|---|---|
| Oiled ramekin + hot water dip | Classic unmold for plates | 5–15 seconds dip; invert onto chilled plate |
| Thin knife loosen | If edge clings after dip | Run knife near top only; keep sides smooth |
| Serve in cups | Outdoor or casual serving | No unmolding; show layers and toppings |
| One mold at a time | Plating for guests | Keep others cold while you finish |
Flavor ideas and toppings that elevate every serving
I love pairing vivid fruit with crunchy accents to brighten each silky base. Below are simple combos you can make at home and a few chefly touches for guests.
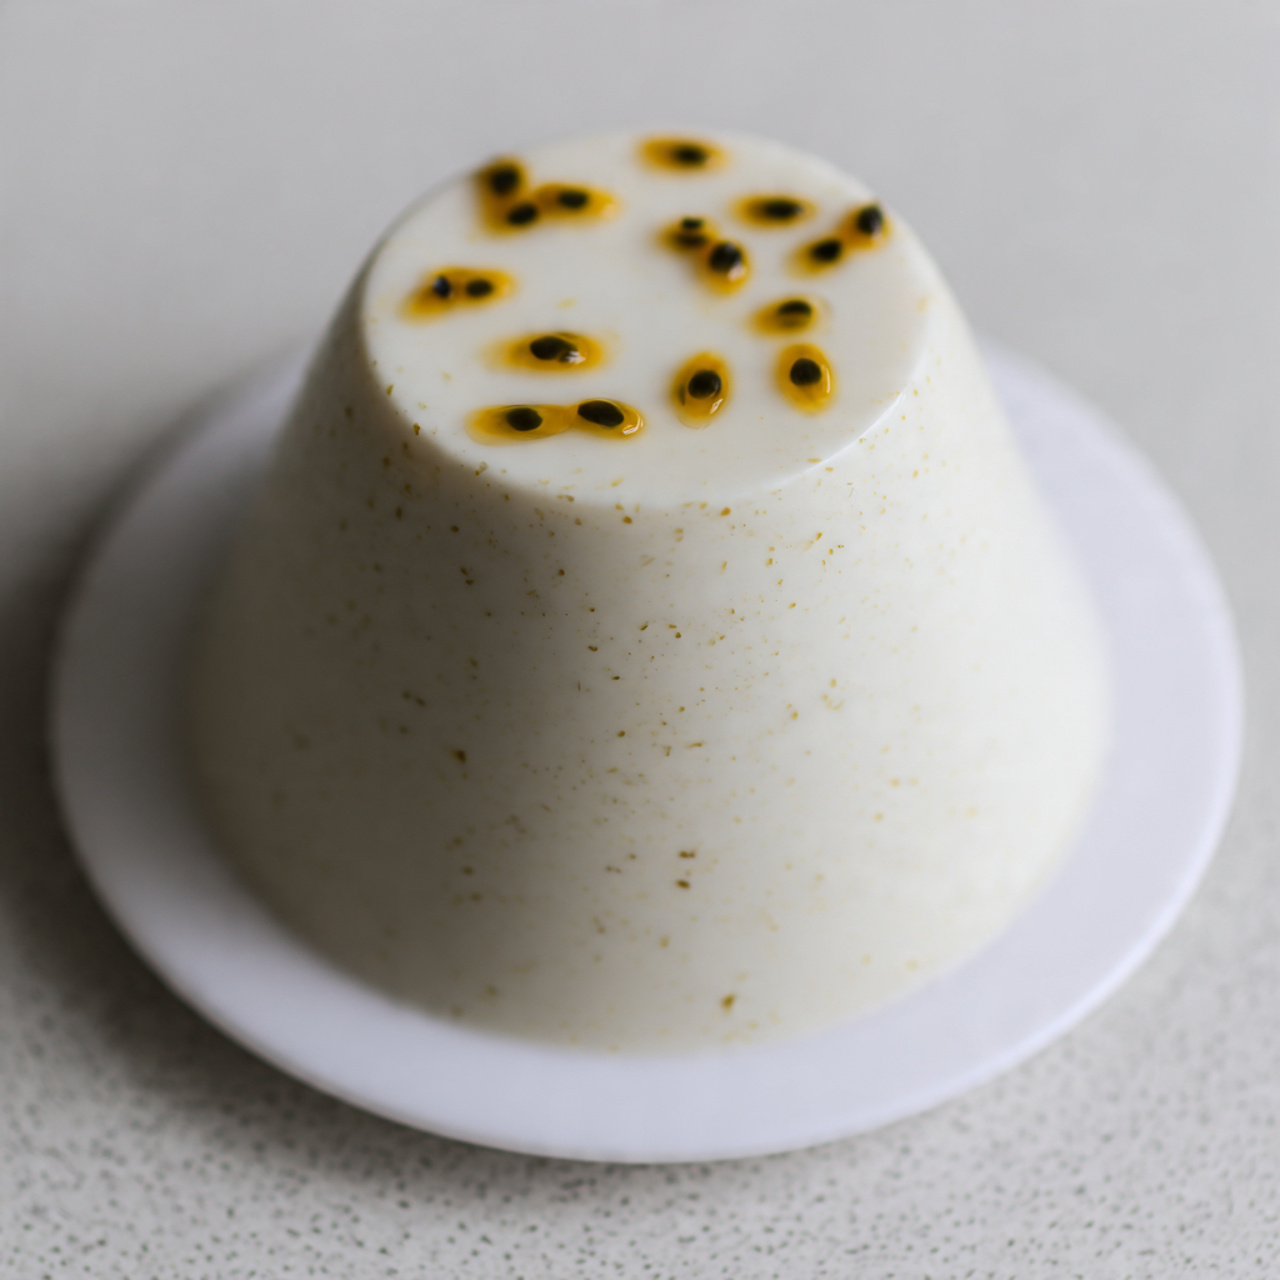
Tropical pairings
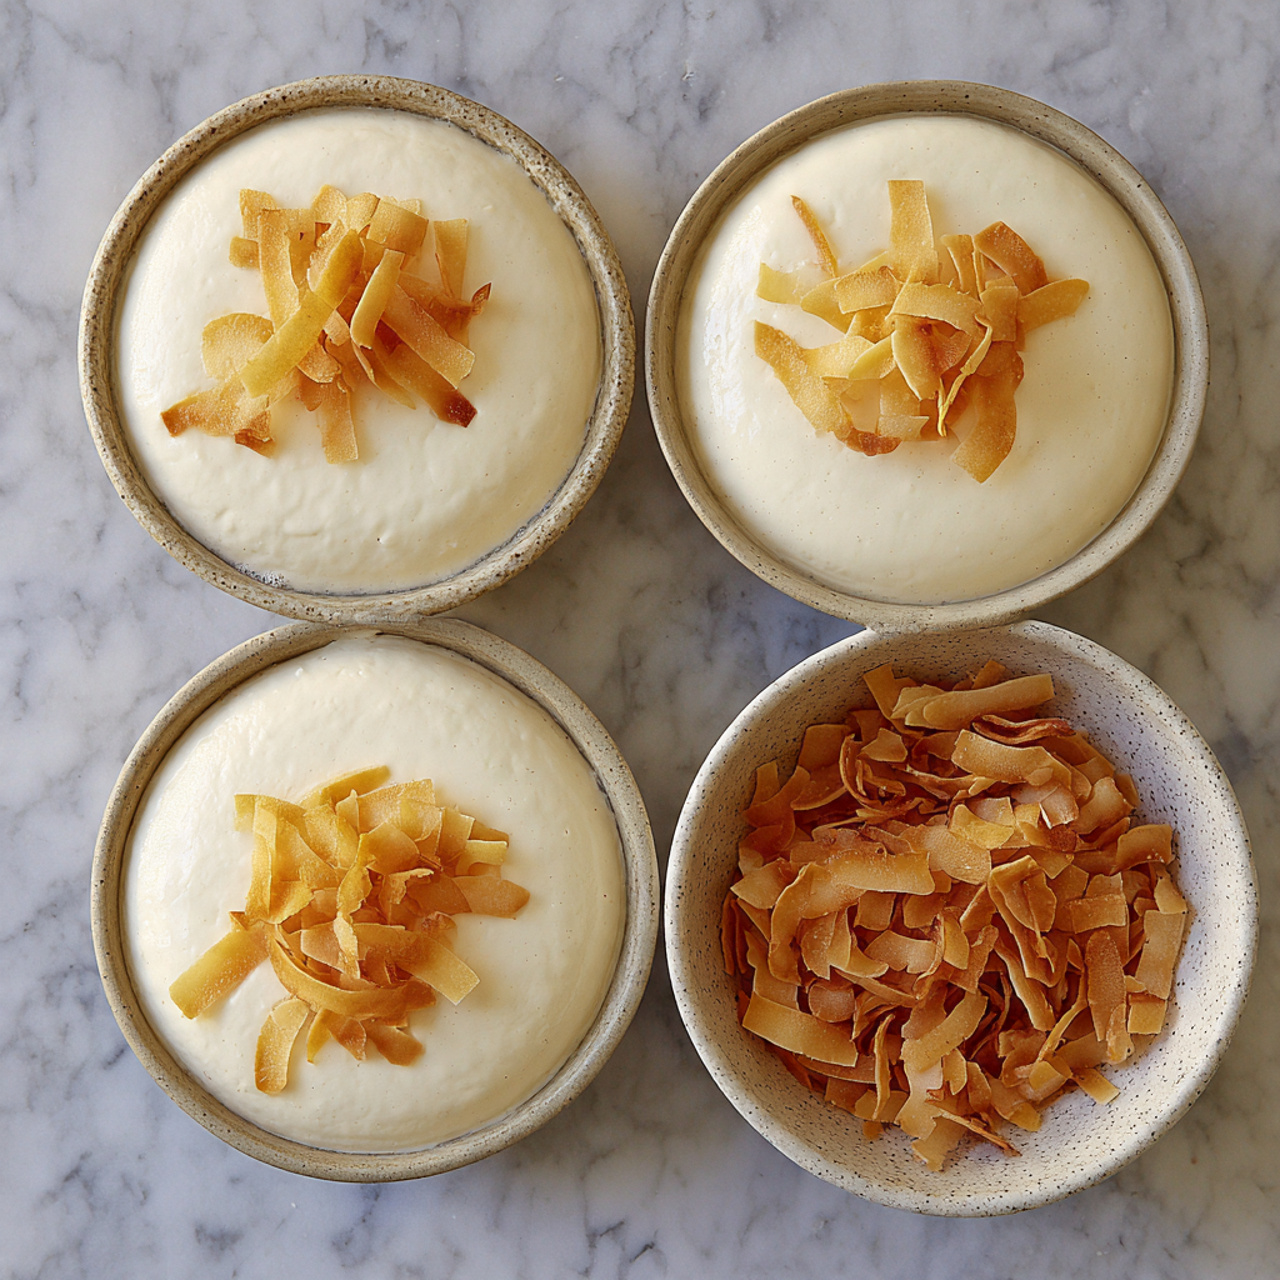
Spoon tart passion fruit pulp over the set and finish with toasted flakes for fragrance and crunch. Thinly slice ripe mango or pineapple and fan them across the top, then micro-grate lime zest to lift every bite.
Berry-forward options
Macerate strawberries with a pinch of sugar until juicy, or spoon warm raspberry compote for a sweet-tart contrast. Blueberry coulis gives a deep, glossy finish that plays well with vanilla and coconut cream notes.
Chocolate and crunch
Add shaved dark or white chocolate for richness. Sprinkle granola or an almond crumble to introduce toasty texture and a pleasant chew against the soft base.
Bright accents and infusions
Infuse the warm milk gently with citrus zest, basil leaves, or a slice of ginger or cardamom; strain before setting so the surface stays pristine. For dinner parties, layer compote in cups first, pour the base, chill, and top with flakes right before serving.
- Balance is key: pair the luscious base with bright acidity like citrus or passion fruit, or with a hint of bitter dark chocolate.
- Vegetarian option: use agar agar in the base and choose fruit-forward, dairy-free toppings.
- If you want extra coconut, finish with lightly sweetened whipped cream and a few toasted flakes for an airy touch.
| Style | Top choice | Why it works |
|---|---|---|
| Tropical | Passion fruit + toasted flakes | Tartness cuts richness; flakes add scent and crunch |
| Berry | Raspberry compote or blueberry coulis | Sweet-tart counterpoint and glossy color |
| Crunch | Almond crumble or granola | Texture contrast for a creamy spoonful |
Make-ahead, storage, and freezing notes
A calm fridge and a little patience make serving day straightforward and stress-free. Plan the time so you can chill at least 5–6 hours; overnight is best for the cleanest slice or spoon.
Fridge timeline and handling
Keep each cup covered to stop a skin and to protect aromas in the fridge. Properly stored, the set keeps 3–4 days and firms a touch after 2–3 days—still creamy but less wobbly, which helps when you unmold.
Freezing and thawing best practices
To freeze, press plastic wrap directly onto the mixture surface to block air and prevent a thick skin. Freeze only gelatin-based versions for best texture; agar agar gels can become brittle.
Thaw slowly in the fridge, never at room temperature. Slow thawing keeps the surface glossy and preserves the delicate structure so serving is simple.
- Make it the night before: 5–6 hours minimum, overnight ideal.
- Label cups with date and flavor for easy planning.
- Refresh the top with a quick wipe and add fresh fruit just before serving.
| Action | Timing | Note |
|---|---|---|
| Chill | 5–6 hours; overnight best | Firmness increases slightly after 2–3 days |
| Fridge storage | Up to 3–4 days | Keep cups covered to avoid skin |
| Freeze | Use plastic wrap on surface | Gelatin versions freeze better than agar |
Troubleshooting common panna cotta pitfalls
Troubles with set or texture almost always point to measurement, heat, or emulsification. I’ll walk you through quick checks and fixes so the dessert recovers or the next batch is foolproof.
Too firm or rubbery
Too much gelatin or too little liquid causes a tight, rubbery bite. Measure powdered gelatin by weight or level teaspoons. If you prefer a firmer unmold, add only a small extra fraction—don’t double the amount.
Separation and layered mixtures
Layering means the milk mixture wasn’t homogeneous. Pick well‑emulsified canned coconut milk and stir gently as you warm in the saucepan. Fully dissolve gelatin until it’s translucent before mixing in to avoid grainy edges and streaks.
Won’t set at all
If it won’t set, check heat handling. Boiling breaks down gelatin’s ability to gel. Keep the pan below a simmer and add the melted gelatin off heat. For agar agar, bring the mixture to a short, active simmer and follow the package timing—too much heat or too long makes a brittle gel.
- Measure solids and liquids carefully; weigh when possible.
- Melt gelatin until translucent; no cloudy bits should remain.
- Warm gently in the saucepan; avoid rolling boils.
- Strain to remove bubbles and pour slowly to protect the surface.
- If edges cling when unmolding, a quick 10–15 second hot water dip usually frees them without damage.
| Problem | Likely cause | Quick fix |
|---|---|---|
| Rubbery set | Excess gelatin or reduced liquid | Reduce gelatin slightly next batch; level measurements |
| Separation | Poor emulsification or overheating | Use homogeneous canned coconut or blend, stir gently |
| No set | Boiled gelatin or wrong agar activation | Keep pan below simmer; simmer agar briefly as directed |
| Grainy edges | Undissolved gelatin bits | Melt gelatin fully and strain before pouring |
Ready to spoon into paradise—your turn to make it
Ready to finish this simple, elegant dessert and make it your own? Plan about 10–15 minutes at the pan, then chill 5–6 hours until the center holds a soft wobble.
If you unmold, give each cup a brief hot water dip and a gentle shake. For no-fuss serving, leave them in the glass and add toppings just before you bring them to the table.
Keep a short note of your favorite milk mixture ratio so you can recreate the texture you love. Prefer a vegetarian version? Use agar agar and pour into cups for the most consistent set.
Garnish simply: passion fruit pulp, mango slices, macerated berries, or a light shower of toasted flakes. Taste the base and adjust with a half teaspoon of sugar or a drop more vanilla if needed.
Make it the day before for calm plating, store covered 3–4 days, and please let know in the comments how yours turned out. I’m cheering you on—this is a dessert that rewards gentle care with a luxurious spoonful every time.
Coconut Panna Cotta
Ingredients
Method
- Sprinkle gelatin over the cold water in a small bowl. Let it sit 5–10 minutes until soft, thick, and spongy.
- Add coconut milk, sugar, and a small pinch of salt to a saucepan. Heat gently over medium-low. Stop just before boiling—look for light steam and tiny bubbles at the edges.
- Remove the pan from heat. Add vanilla. Stir in the bloomed gelatin. If needed, place the saucepan back on very low heat to fully melt the gelatin until the mixture looks smooth and glossy.
- Pour through a fine-mesh sieve into a clean bowl or jug. This removes bubbles and keeps the texture silky.
- Lightly brush ramekins with a little neutral or coconut oil if you plan to unmold. If serving in glasses, no oil needed.
- Pour the warm mixture slowly into the ramekins or glasses. Chill for at least 5–6 hours, or overnight for the most even set.
- Dip the chilled ramekin halfway into hot water for 10–15 seconds. Loosen the edge gently and invert onto a cold plate.
- Spoon over fruit, compote, toasted flakes, or chocolate just before serving.
Notes
- Don’t let the mixture boil—boiling weakens gelatin and causes poor setting.
- Use full-fat, well-emulsified coconut milk to prevent separation. If the can looks split, give it a quick whisk.
- Straining makes a huge difference in getting a smooth, glossy top.
- Overnight chilling makes unmolding much easier.
- Serve in glasses if you want a zero-stress presentation.