
Jump to Recipe
There’s a quiet magic in the Italian kitchen, where simple, honest ingredients transform into something that feels like a celebration. It’s in the golden crust of a pastry, the rich scent of toasted nuts, and the joy of sharing something made by hand.
These elegant desserts might look like they belong in a pastry shop window, but their beauty is deceptive. The process is surprisingly straightforward when you understand the basic parts. We break everything down into clear, manageable steps.
You’ll create light, crisp shells that give way with a gentle crack. Inside, a silky, nutty filling waits to surprise you. A hint of dark chocolate and a pinch of salt balance the sweetness perfectly.
While shortcuts exist, this guide focuses on authentic flavors that honor tradition. You can complete the entire project in about two and a half hours. Most components can be prepared ahead, making them ideal for a special occasion or a satisfying weekend bake.
Key Takeaways
- This dessert appears complex but is achievable for home bakers with clear instructions.
- The process is broken down into simple components: pastry, filling, and glaze.
- The final texture combines a crisp shell with a smooth, flavorful interior.
- Authentic, quality ingredients are emphasized over shortcuts for the best flavor.
- The total time involved is reasonable, and parts can be made in advance.
- No advanced technical skills or special piping tools are strictly required.
A Flavorful Journey to Italian Elegance
The story of these delicate pastries begins with a fascinating culinary marriage between French technique and Italian soul. This combination creates something truly special that honors both traditions.
Discovering a Heritage of Sweet Indulgence
French bakers developed pâte à choux, or “cabbage paste,” centuries ago. They named it for the way the baked mounds resemble tiny cabbages with their crinkled surfaces. This same versatile dough forms the base for many European classics.
Profiteroles, eclairs, and Paris-Brest all share this foundation. What distinguishes each creation is its final shape and filling rather than the base preparation.
Italian pastry shops showcase this nut prominently, reflecting deep appreciation for ingredients grown in Sicily’s volcanic soil. Making these treats at home connects you to generations of European baking heritage.
The true elegance comes from respecting quality components rather than complex techniques. Simple ingredients handled with care yield the most satisfying results. This approach honors centuries of culinary tradition while allowing for personal touch.
Must-Have Ingredients and Essential Tools
The foundation of any great dessert lies in selecting authentic ingredients and using equipment that supports your technique. Having everything prepared before you start makes the process flow smoothly.
Key Pantry Staples for a Gourmet Touch
For the pastry shells, you’ll need full-fat milk, unsalted butter, water, all-purpose flour, eggs at room temperature, sugar, and salt. Each ingredient plays a specific role in creating hollow, crisp shells.
The star component is high-quality pistachio paste. Look for Italian brands containing only ground nuts, oil, sugar, and salt. A quarter teaspoon of almond extract enhances the nutty flavor we recognize.
For the filling, gather additional egg yolks, more milk, cornstarch for structure, butter for richness, and vanilla bean paste. Dark and white chocolate create a balanced glaze.
Equipment That Makes Piping a Breeze
You don’t need specialized tools. A medium saucepan, sturdy spatula, and wire whisk handle most tasks. For piping, use a bag with a round tip or a plastic freezer bag with the corner snipped off.
Line two large cookie sheets with parchment paper. Create a guide by tracing circles using a small cup, then flip the paper. Room temperature ingredients ensure proper texture throughout your creation.
Crafting the Choux Pastry with Confidence
Creating perfect pastry shells begins with understanding the transformation of basic ingredients under heat. The process follows a reliable ratio that guides all choux pastry: two parts liquid to one part butter, one part flour, and two parts eggs. While measurements provide direction, the final texture depends more on observation than strict numbers.
Secrets to Creating a Perfect Panade
Start by combining milk, water, butter, sugar, and salt in your saucepan. Bring the mixture to a gentle boil until the butter melts completely. This creates the emulsion that will support your pastry structure.
Add all the flour at once, stirring vigorously as it forms a thick paste called a panade. The mixture might look rough initially but will smooth with continued stirring over medium heat. Keep the pan on the heat for three to five minutes, stirring constantly.
Watch for the paste to pull away from the pan sides and leave a thin film on the bottom. This drying step removes excess moisture that would prevent proper puffing during baking. Remove the pan from the heat and let the panade cool until it stops steaming.
Now incorporate eggs one at a time, beating thoroughly after each addition. The dough should fully absorb each egg before you add the next. This gradual process builds the proper texture for piping.
Test the consistency by dipping a spoon into the finished dough and lifting it up. The mixture should form a loose “V” shape that holds briefly before falling. You might need slightly more or less than four eggs depending on your flour and kitchen conditions.
The final choux dough should be smooth, glossy, and pipeable while holding its shape. Trust the texture over any specific measurement for the best results.
Discover the Pistachio Cream Puffs Recipe
Understanding the timing and sequence of steps is the key to creating these elegant desserts successfully. The process flows naturally when you organize your work efficiently.
Layering Cream and Glaze with Expert Tips
From start to finish, this recipe takes between ninety minutes and two and a half hours. Much of this time involves hands-off baking and cooling periods.
Active preparation time is surprisingly manageable. You’ll spend about ten minutes measuring ingredients and five preparing your parchment paper guides.
| Task | Active Time | Hands-Off Time | Total Duration |
|---|---|---|---|
| Measure & Organize | 10 minutes | 0 minutes | 10 minutes |
| Prepare Parchment | 5 minutes | 0 minutes | 5 minutes |
| Make & Pipe Dough | 20 minutes | 0 minutes | 20 minutes |
| Bake Shells | 0 minutes | 20-35 minutes | 20-35 minutes |
| Final Assembly | 25 minutes | 0 minutes | 25 minutes |
Work efficiently by preparing the filling while your shells bake. This sequencing maximizes your time and ensures everything stays fresh.
When piping, use about two tablespoons of dough per mound. Space them at least two inches apart on your prepared parchment paper.
Smooth any sharp peaks with a damp finger before baking. These points can burn during the oven time.
Never open the oven door during the first twenty minutes of baking. The steam inside creates the hollow structure. Cool air causes collapse.
Properly baked shells feel firm and sound hollow when tapped. They should be golden brown, not pale yellow.
Once cooled, slice each shell horizontally about three-quarters of the way up. This creates a perfect base and lid for your filling.
Each step builds logically on the previous one. The process feels natural rather than complicated once you begin.
Transforming Pistachio Paste into Decadent Filling
The heart of these pastries lies in the careful transformation of a few simple ingredients into a rich, flavorful filling. This process builds layers of taste and texture that define the final dessert.
Achieving a Silky, Luscious Pastry Cream
Begin by heating milk with vanilla until it steams. This infuses the liquid with a warm, aromatic scent. In a separate bowl, whisk egg yolks and sugar until pale.
Whisk in cornstarch and a pinch of salt until smooth. The key step is tempering. Slowly pour the hot milk into the egg mixture while whisking constantly.
Start with a small amount to gently raise the temperature. This prevents the eggs from scrambling. Then pour in the rest of the milk.
Return the entire mixture to the saucepan over medium heat. Whisk continuously for a few minutes. You will feel the mixture thicken to a yogurt-like consistency.
Remove from the heat immediately. Stir in butter until it melts completely. Then, fold in your homemade or store-bought nut paste.
For a lighter, airier texture, try the crème mousseline technique. Once the base cools, whip cold heavy cream to stiff peaks. Gently fold it into the nut-infused cream.
| Filling Type | Texture | Best For | Preparation Time |
|---|---|---|---|
| Standard Pastry Cream | Dense, rich, and silky | Classic, robust flavor | 15 minutes active |
| Crème Mousseline | Light, airy, and stable | Elegant, piped presentations | 20 minutes active |
Creative Twists on a Chocolate Glaze
The final touch is a simple glaze. Melt dark and white chocolate separately. Use a double boiler or microwave in short bursts, stirring often.
Dark chocolate offers a bitter contrast. For a custom color, tint white chocolate with gel food coloring. A mix of green and yellow creates a natural hue.
Spoon the glaze over your assembled treats. Act quickly to garnish with a sprinkle of finely ground nuts and a flake of sea salt before the chocolate sets. This adds crunch and balances sweetness perfectly.
Piping, Baking and Assembling Your Cream Puffs
With your components ready, the assembly process transforms individual elements into elegant creations. This final stage brings together your careful work into beautiful finished desserts.
A Step-by-Step Visual Guide for Success
Hold your piping bag straight up when forming each mound. The dough expands in the direction you pipe, so a vertical approach creates symmetrical rounds.
Before baking, dip your finger in water and gently smooth any pointed peaks. These sharp bits can burn during the long oven time.
Aim for a deep golden brown color rather than pale yellow. Proper browning develops the complex flavor that makes choux pastry so appealing.
As soon as you remove them from the heat, poke each one with a chopstick. This allows trapped steam to escape, keeping the shells crisp.
| Assembly Approach | Best For | Time Required | Skill Level |
|---|---|---|---|
| Systematic Batch Method | Large quantities, parties | 25-30 minutes | Beginner |
| Individual Precision | Photography, special events | 40-45 minutes | Intermediate |
| Assembly Line | Efficiency, family baking | 20-25 minutes | All levels |
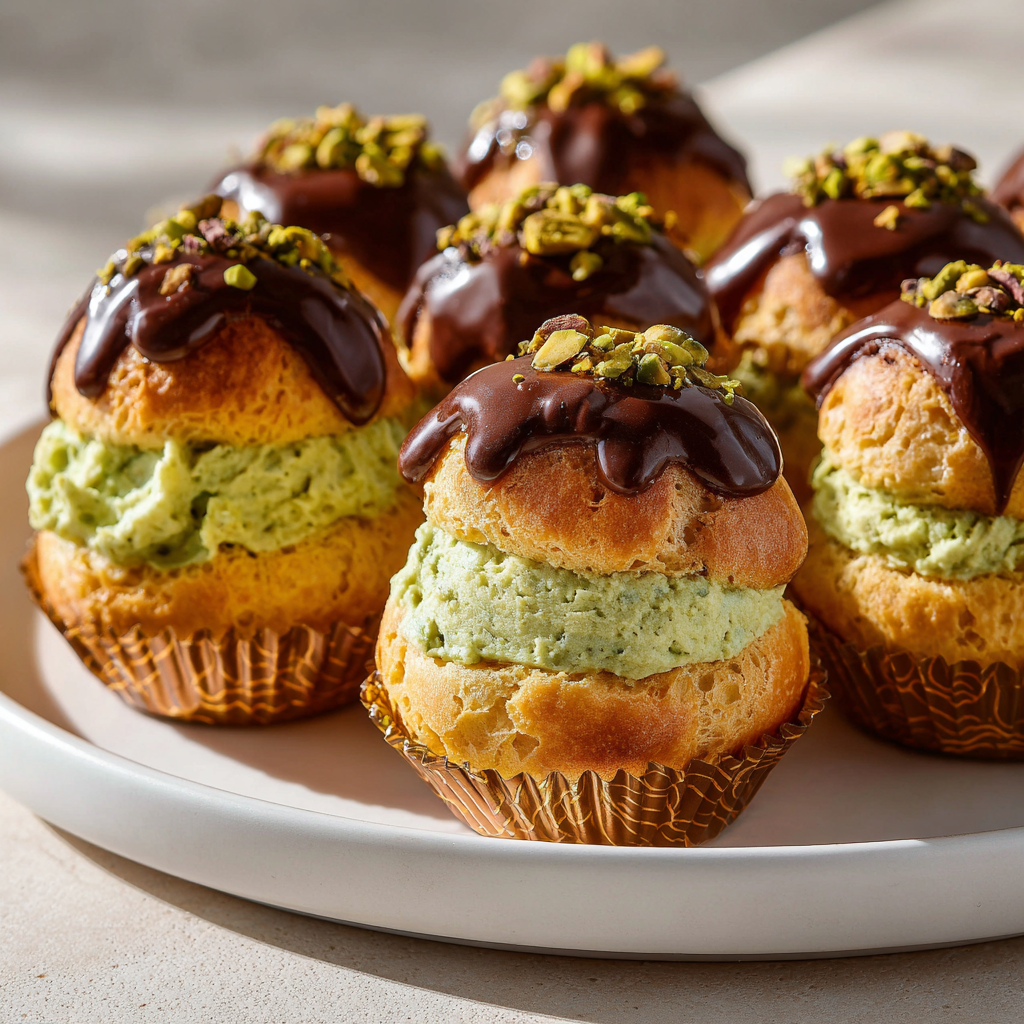
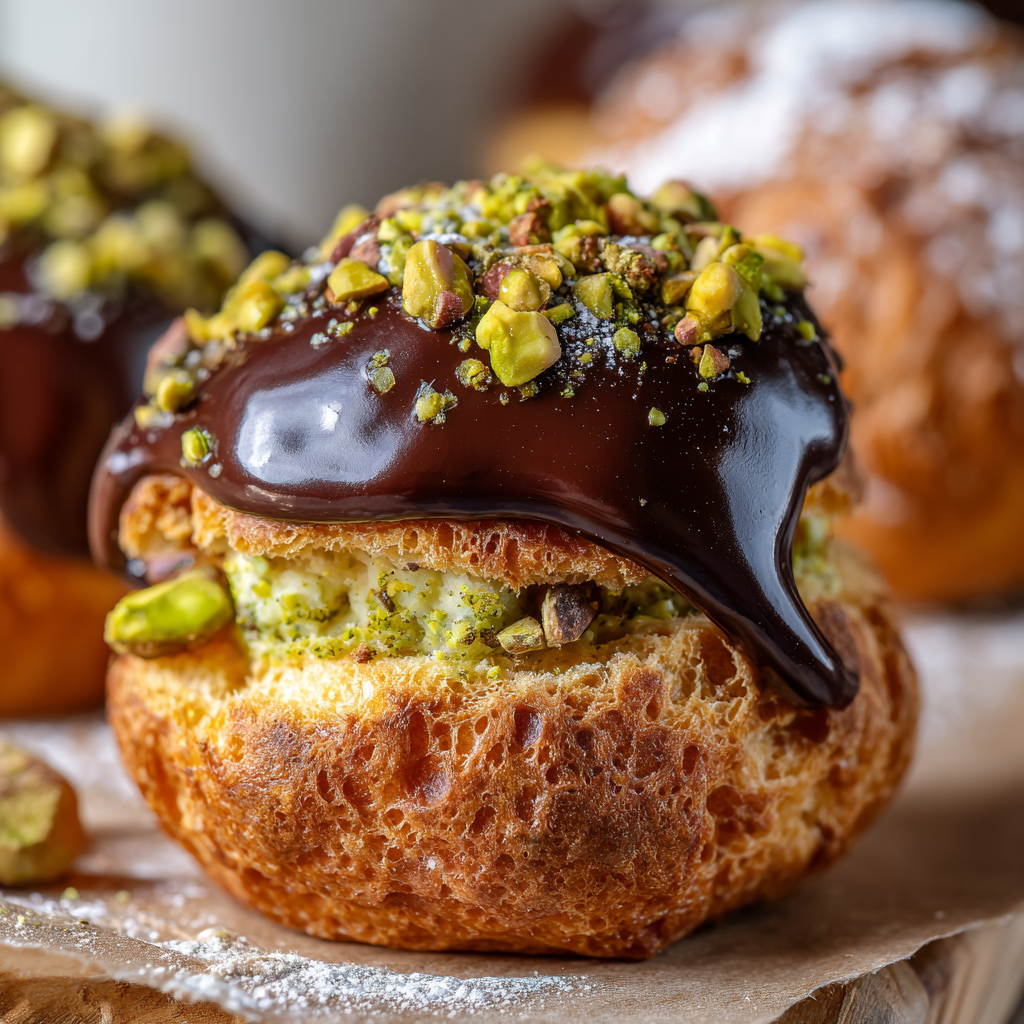
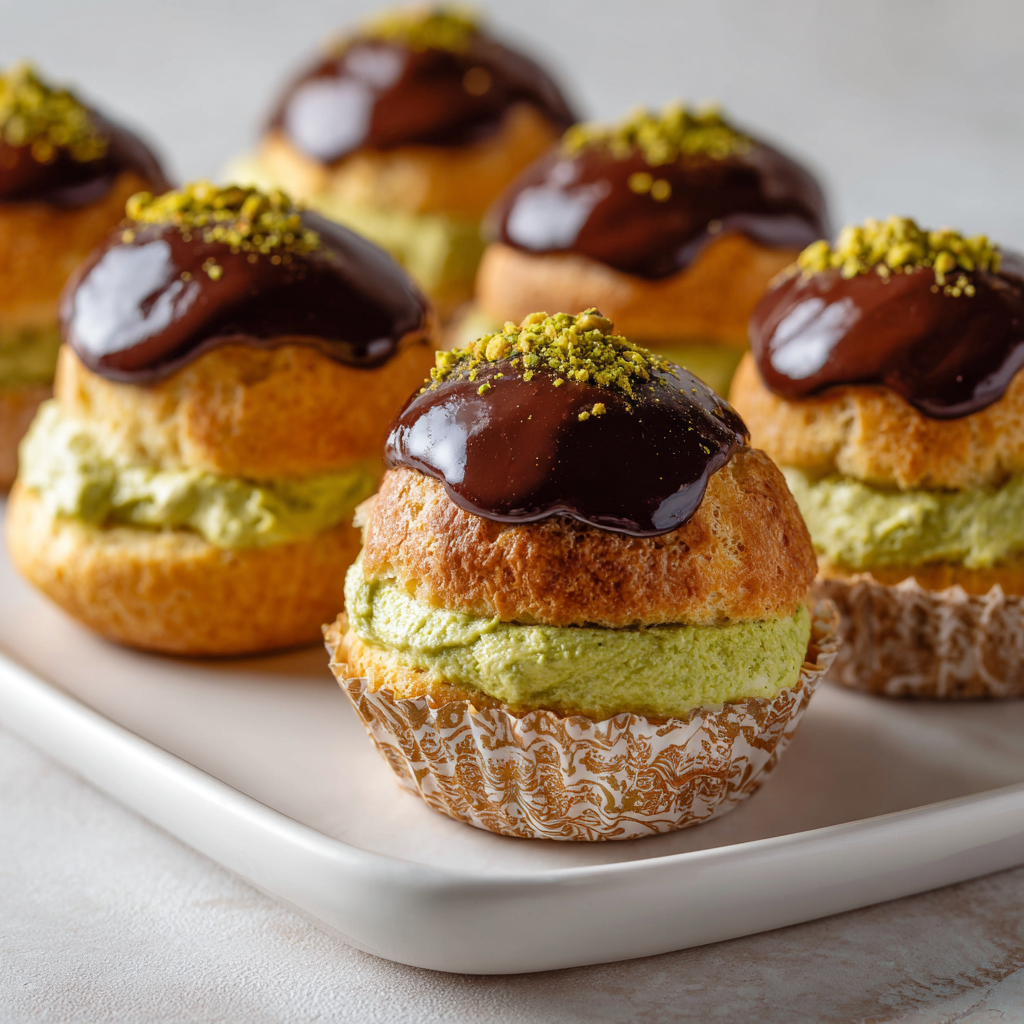
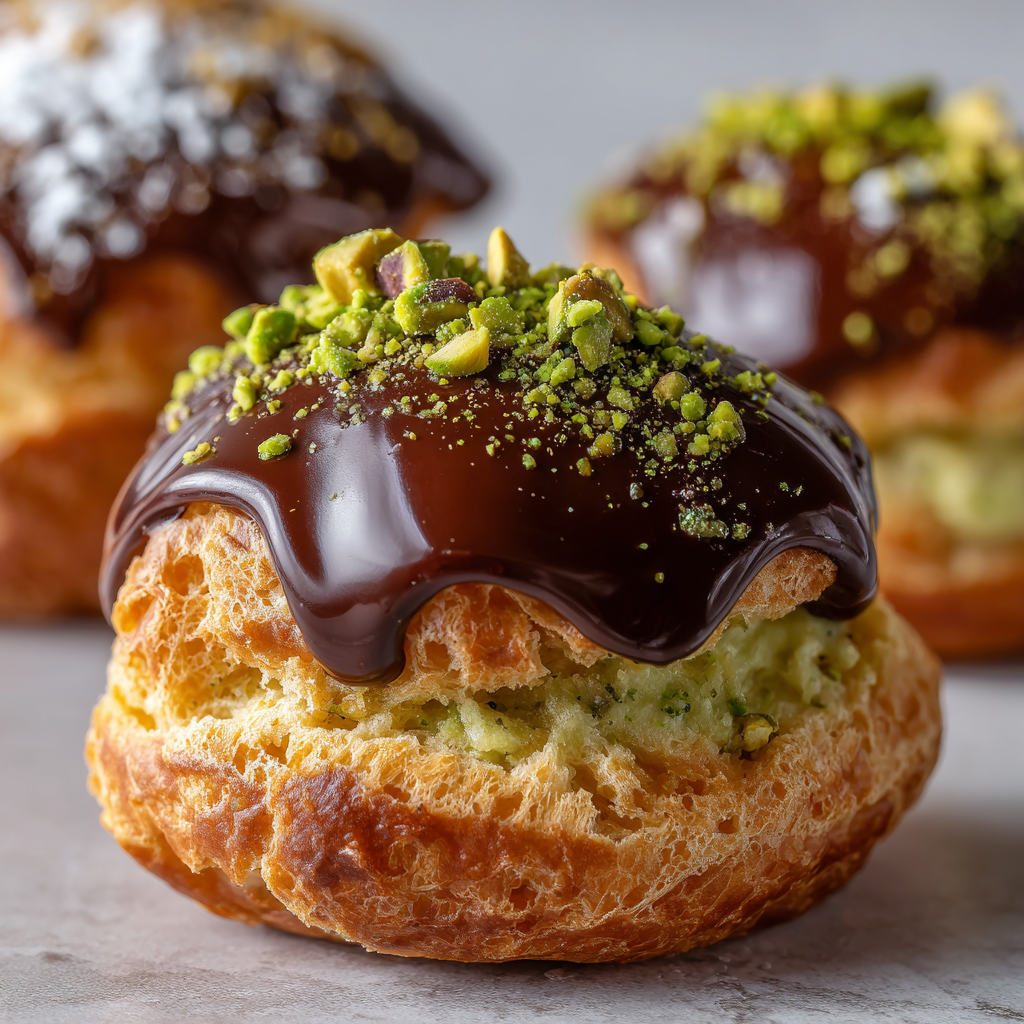
Once completely cool, use a serrated knife to slice each one horizontally. Create a larger base to hold the filling and a smaller top that perches like a hat.
Fill each base with about three tablespoons of your prepared mixture. If desired, add a teaspoon of raspberry jam first for tart contrast.
Hold each top upside down and dip into melted chocolate. Let excess drip back into the bowl for a clean finish. Work systematically through your batch.
If the chocolate glaze thickens, microwave it for five seconds and stir until smooth. Set each chocolate-dipped top gently on the filling.
Sprinkle with crushed nuts and a pinch of sea salt while the chocolate is still wet. This ensures everything adheres properly.
This preparation yields approximately thirty to thirty-six finished treats. They serve a dozen people generously or create an impressive dessert spread.
Savoring Your Homemade Cream Puffs: A Final Celebration
Your beautiful creations deserve thoughtful presentation and careful handling to maintain their quality. Plan ahead by storing unfilled shells in an airtight container for up to two days. Keep the filling separate with plastic wrap pressed directly on the surface.
While assembled treats can stay in the fridge briefly, they shine brightest when served within hours. Bring them to cool room temperature about fifteen minutes before your gathering. This allows flavors to develop while keeping everything food-safe.
Arrange your finished desserts on a simple white platter or in decorative boxes lined with muffin papers. The first bite delivers that satisfying crack, followed by cool, nutty richness balanced with dark chocolate and sea salt.
This adaptable technique works beautifully with other nut pastes or flavor variations. Mastering this recipe builds confidence for future baking projects. Each batch becomes easier than the last.
Pistachio Cream Puffs
Ingredients
Method
- Preheat the oven to 375°F (190°C).
- Line two baking sheets with parchment paper. Use a small cup to trace circles on the paper for perfect pastry spacing, then flip the paper over.
- In a saucepan, combine milk, butter, water, sugar, and salt. Bring to a gentle boil until the butter melts.
- Add the flour all at once and stir vigorously until a thick paste forms. Keep stirring for 3-5 minutes to remove excess moisture.
- Remove from heat and let the mixture cool for a few minutes.
- Gradually add eggs one at a time, beating well after each addition. Test the consistency by lifting a spoon—dough should form a loose "V" shape.
- Transfer the dough to a piping bag and pipe mounds onto the prepared parchment paper, about 2 inches apart.
- Bake for 20-35 minutes until the shells are golden brown and sound hollow when tapped. Do not open the oven during the first 20 minutes.
- Once done, remove from the oven and poke each shell with a chopstick to release steam. Let cool completely.
- Heat the milk and vanilla paste until steaming.
- Whisk egg yolks, sugar, cornstarch, and salt in a bowl until smooth. Slowly add the hot milk while whisking to temper the eggs.
- Return the mixture to the saucepan over medium heat, whisking continuously until thickened.
- Remove from heat, stir in butter, then fold in pistachio paste.
- (Optional) For a lighter filling, fold in whipped heavy cream for a crème mousseline texture.
- Slice each cooled pastry shell horizontally.
- Pipe the pistachio filling into the bottom half of each shell.
- Melt the dark and white chocolate separately. Dip the top halves of the shells into the melted chocolate.
- Sprinkle with crushed pistachios and a pinch of sea salt before the chocolate sets.
- Assemble the tops on the filled bottoms to complete the cream puffs.
Notes
- The pastry dough (choux pastry) can be made in advance and kept covered at room temperature for a few hours.
- Make sure the eggs are room temperature to ensure smooth dough.
- The chocolate glaze can be customized with food coloring for a fun twist, especially for themed occasions.