
Jump to Recipe
There’s a quiet confidence that comes from a kitchen filled with the scent of garlic and rosemary. It’s the feeling of preparing something truly special, a centerpiece that promises both beauty and flavor.
This particular preparation, a rolled and seasoned meat, holds a cherished place in tradition. In Italy, its significance is celebrated with festivals, a testament to its deep cultural roots. The beauty of this dish lies in its elegant symmetry.
Its cylindrical shape ensures even cooking. You won’t find awkward thin sections that dry out or thick parts that remain undercooked. This makes the process remarkably forgiving, a welcome relief compared to other large roasts that can be tricky to time perfectly.
Every slice is uniform, making serving straightforward and fair for everyone at the table. It’s also an accessible luxury. The main ingredient, pork belly, is often a fraction of the cost of premium beef cuts.
And the rewards extend beyond the main meal. The leftovers make for exceptional sandwiches the next day. Let’s walk through the simple steps to achieve this stunning result in your own kitchen. For a deeper look at ensuring a juicy result, you can explore this guide on making juicy Italian roast pork.
Key Takeaways
- This dish is a celebratory centerpiece with deep roots in Italian food culture.
- Its unique cylindrical shape promotes even, forgiving cooking.
- You get consistent, beautiful slices for easy serving.
- It is a cost-effective option for a impressive meal.
- Leftovers are highly versatile and make excellent sandwiches.
Getting Prepared: Selecting and Scoring the Pork Belly
The journey to exceptional results begins with thoughtful preparation and the right ingredients. Your choice of cut and proper preparation techniques will determine the final texture and flavor.
Choosing the Right Cut for Moisture and Flavor
Request a whole, boneless belly with the rind still attached. Look for one weighing 12 to 15 pounds with the rib meat included. Your local butcher can typically order this cut with simple advance notice.
Modern pork breeding has created leaner animals. This makes the traditional combination of belly and loin less ideal for home cooking. The loin requires lower temperatures to stay moist, while the belly needs higher heat for proper rendering.
| Cut Type | Moisture Level | Cooking Consistency | Best For |
|---|---|---|---|
| All-Belly Cut | Consistently moist | Even cooking | Home kitchens |
| Belly + Loin Combo | Variable moisture | Uneven results | Traditional preparation |
| Skin-On Belly | Self-basting | Perfect crispness | Authentic texture |
The abundant fat in a proper belly cut renders during cooking. This natural basting creates consistent moisture throughout the meat.
Scoring Techniques for Achieving Perfectly Crisp Skin
Score the flesh side first. Make angled strokes about one inch apart, then rotate your knife 90 degrees. This creates diamond patterns that help seasonings penetrate deeply.
For the skin, use diagonal cuts at 2cm intervals. Be careful not to cut down to the flesh beneath. Cutting too deep allows juices to escape during cooking.
Finish with a criss-cross pattern and light poking across the entire surface. These channels allow fat to render out while the skin becomes shatteringly crisp.
Marinating and Seasoning: Crafting Bold and Authentic Flavors
Building flavor is a deliberate process that starts with toasting whole spices to unlock their potential. This foundational step transforms raw ingredients into something deeper and more complex.
Mixing Fennel, Garlic, and Fresh Herbs for a Signature Rub
Begin by toasting two tablespoons of black peppercorns with three tablespoons of fennel seeds. Heat them in a dry skillet until fragrant and lightly browned, about two minutes. This quick toast releases essential oils that deepen the spice profile.
Transfer the warm seeds to a mortar. Crush them until roughly broken, not powdered. A coarse grind distributes flavor differently throughout the meat, creating pockets of intense aroma.
Layer your mixture carefully. Start with the crushed fennel and pepper on the salted meat. Then add fresh rosemary or thyme. Finally, incorporate microplaned garlic cloves that form a paste-like consistency. This paste clings perfectly to the scored flesh.
Each component plays a distinct role. Fennel seeds provide that signature anise character. Garlic adds pungency that mellows beautifully during cooking. Fresh herbs contribute piney notes that complement the rich meat.
Use your hands to rub this mixture deeply into every crevice. Work it into the diamond-shaped cuts you made earlier. This ensures maximum penetration and flavor development.
Dry-Brining and Letting the Flavors Penetrate Overnight
The science behind dry-brining is straightforward but crucial. Salt initially draws moisture from the meat. Then, that salted liquid reabsorces, carrying flavor deep into the muscle fibers.
For the skin, combine two tablespoons of kosher salt with two teaspoons of baking powder. The baking powder raises the pH, promoting exceptional browning and crisping during roasting.
Wrap the seasoned meat tightly and refrigerate for at least one night, or up to three days. This resting period allows the salt to fully penetrate and the skin to dry thoroughly. A dry surface is essential for achieving that perfect, shatteringly crisp crackling.
Cooking Your italian roast pork porchetta holiday to Perfection
This is where your preparation pays off, as controlled heat works its magic on the seasoned meat. The right approach transforms your carefully rolled and tied cut into a masterpiece.
Mastering Low and Slow Roasting Techniques
Begin by laying out 12 to 18 lengths of kitchen twine about one inch apart. Place your rolled meat seam-side down on top. Tie from the ends toward the center for even pressure.
Let the meat rest at room temperature for two hours before cooking. This relaxes the fibers and promotes even heat penetration. It’s a practical step for better texture.
Preheat your oven to 300°F. Place the meat on a rack in a roasting pan. The low temperature breaks down connective tissue gradually over about four hours.
Steps to Achieve the Ideal Crackling and Tender Meat
Baste every thirty minutes with pan drippings. This redistributes rendered fat and builds flavor layers. It also promotes even browning across the surface.
After the internal temperature reaches 160°F, increase the heat to 500°F. This final blast creates shatteringly crisp skin in 20-30 minutes.
For flexible timing, you can tent the cooked meat with foil for up to two hours. Finish crisping in a preheated 500°F oven when ready to serve.
Rotisserie cooking requires indirect heat placement. Cook to 165°F internal temperature, managing the substantial fat drippings carefully.
Creative Sides and Serving Suggestions
A great centerpiece deserves sides that enhance its flavors without overwhelming them. The goal is to create a harmonious plate where each component supports the others.
Pairing with Roasted Potatoes and Rustic Bread
For a truly practical side, consider roasting potatoes directly in the same pan. About two hours into the cooking time, add par-boiled potato chunks. They will cook in the rendered fat, becoming incredibly crisp and flavorful.
Turn them with a spatula every 45 minutes for even browning. If using a rimmed baking sheet, pour off some drippings to toss with the potatoes on a separate sheet placed on a lower rack.
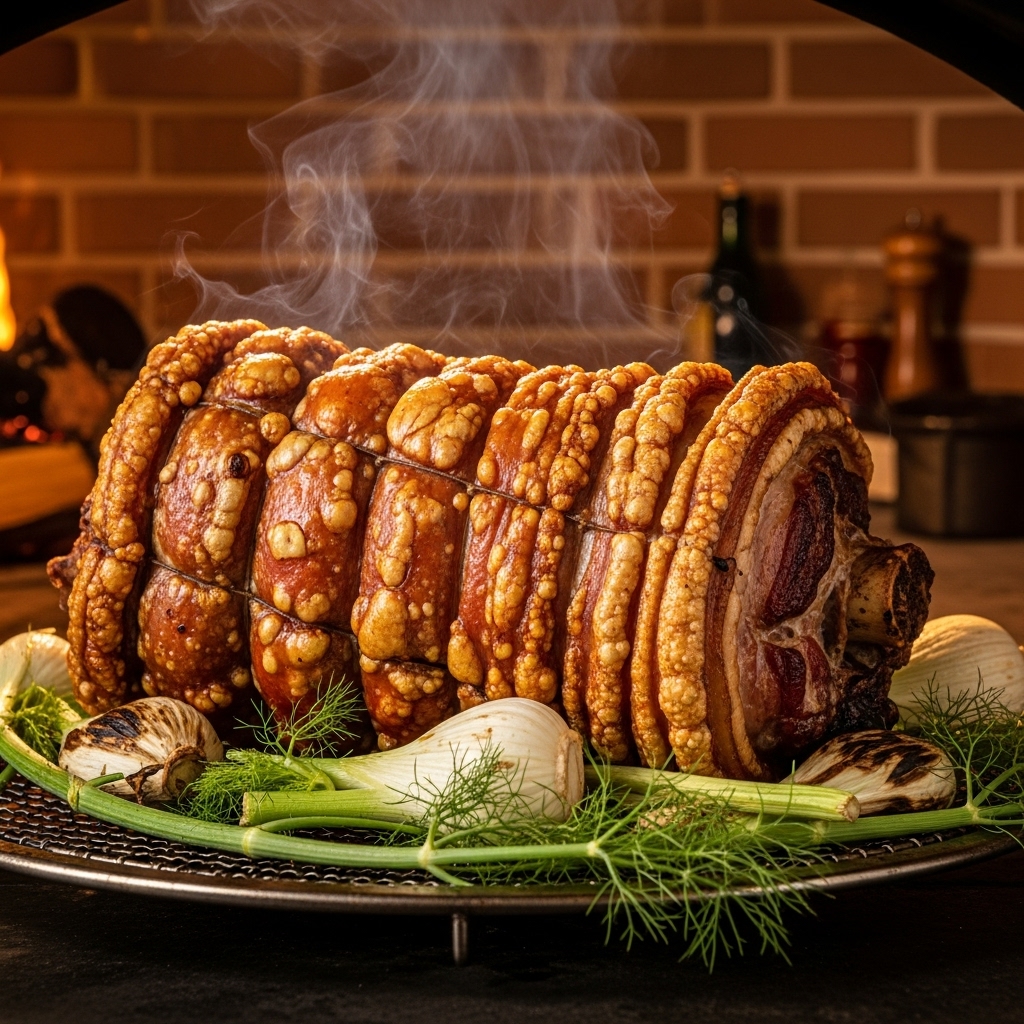
Laying halved fennel branches in the pan creates an aromatic bed. Adding a bit of wine and water to the bottom generates steam, helping to keep the meat moist.
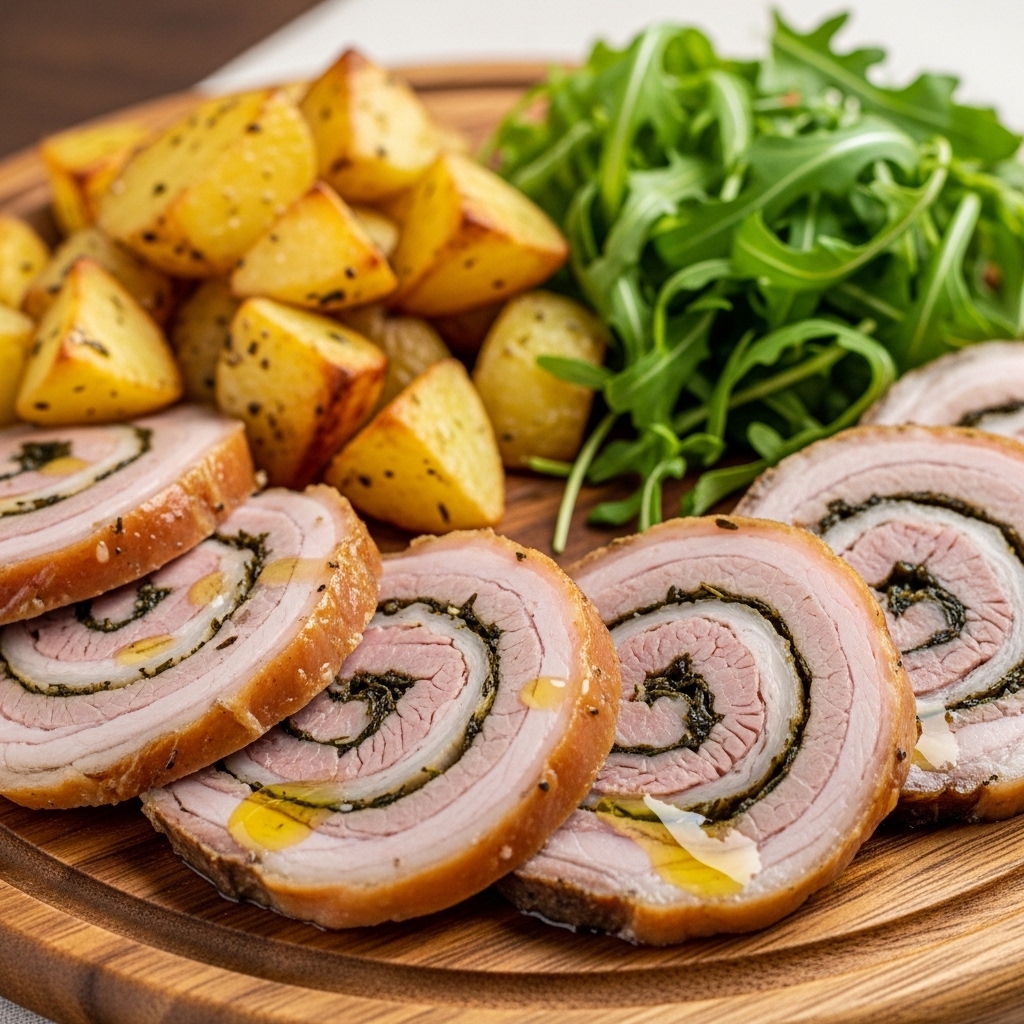
For serving, slice the meat and place it on thick slices of focaccia or ciabatta. A drizzle of olive oil and a sprinkle of salt are all you need. I suggest adding a handful of arugula for a peppery contrast that cuts the richness.
Presentation Tips for a Beautiful Table Spread
This dish is visually stunning on its own. Keep the presentation simple to let the food speak for itself.
- Use a large wooden cutting board or simple platter.
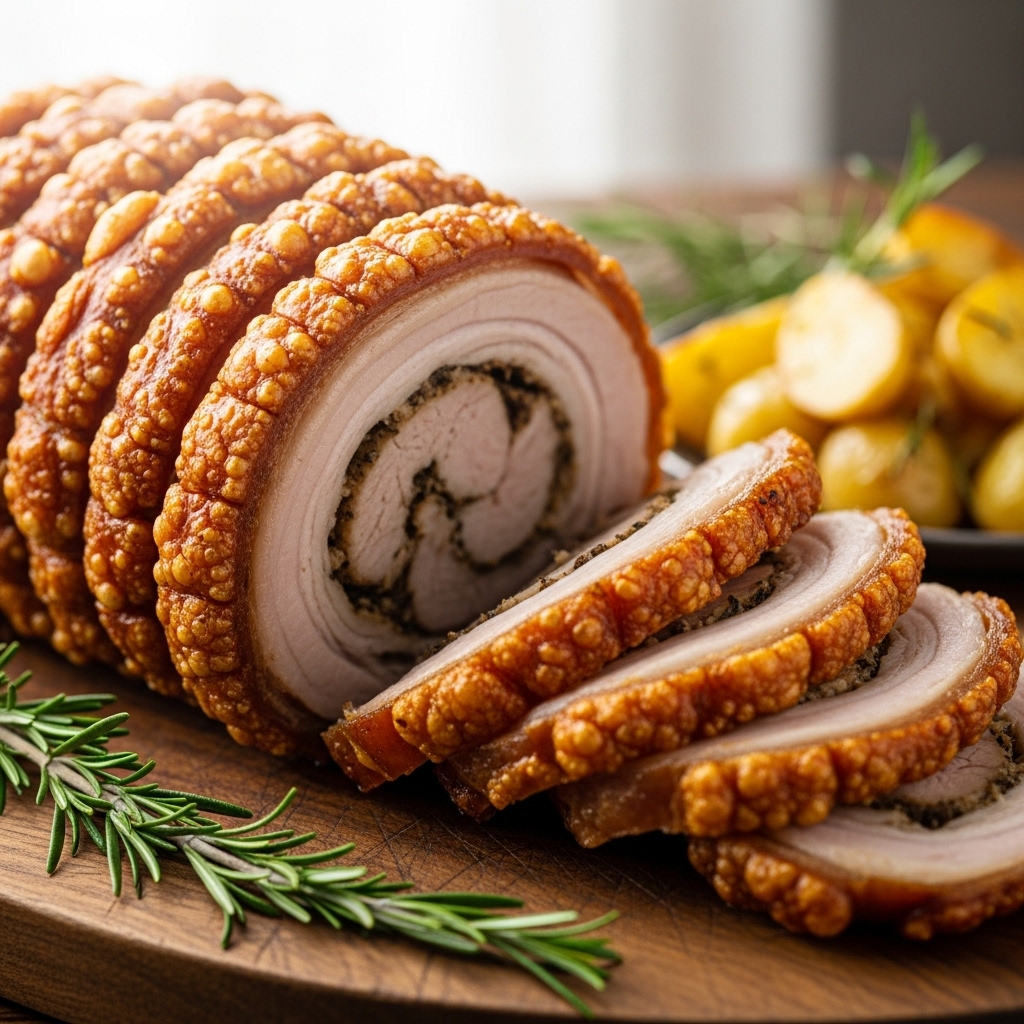
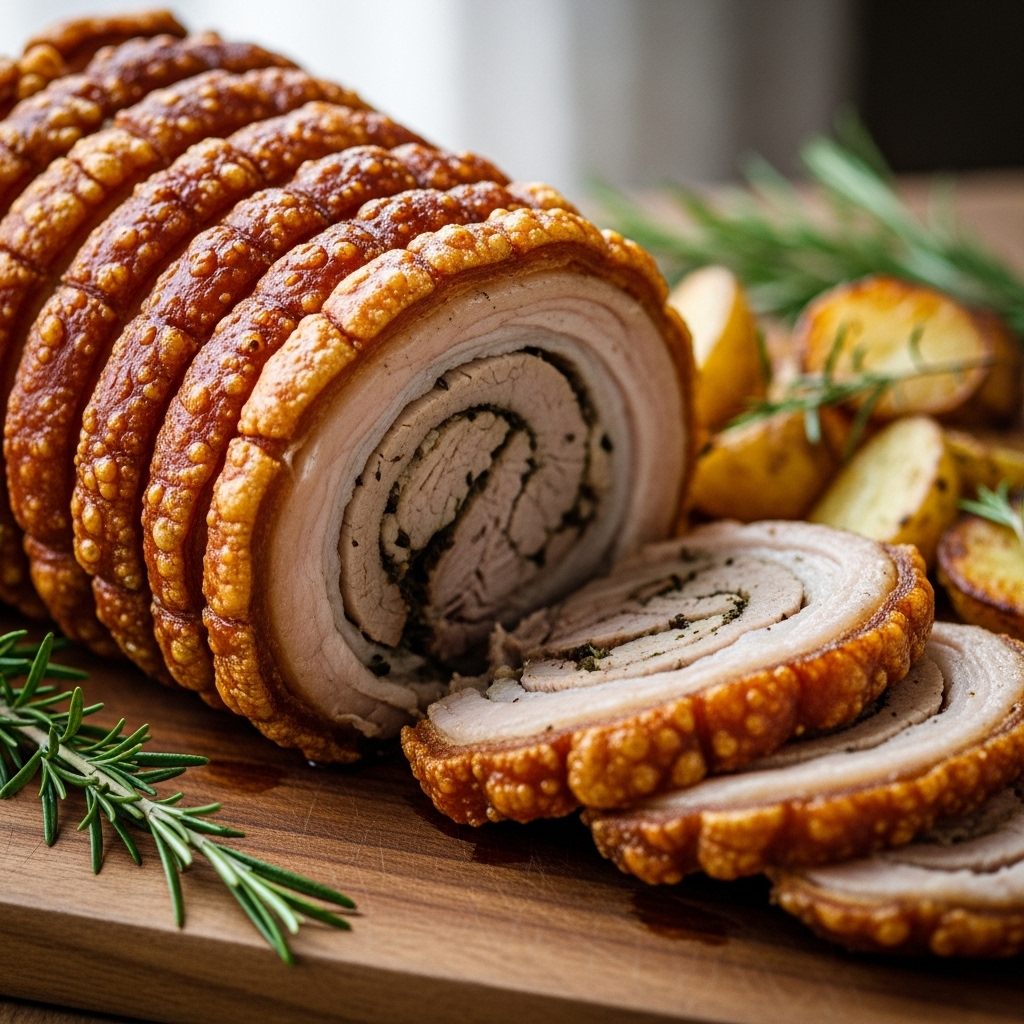
- Arrange the sliced meat neatly, showing off the beautiful spiral.
- Serve the potatoes in a rustic bowl alongside.
- Let guests build their own sandwiches for an interactive course.
Leftovers are a bonus. A cold sandwich the next day, with just bread, meat, and a bit of olive oil, is exceptionally good. It solves the question of lunch beautifully.
Final Reflections on Your Porchetta Journey
After the oven has done its work, a few simple techniques ensure perfect serving. Let the meat rest under foil for 15 to 30 minutes. This allows the juices to redistribute through the fibers rather than running out when sliced.
Use a serrated knife to cut through the crisp skin without shattering it. Aim for one-inch thick rounds that showcase the beautiful spiral. Remove the twine and break the crackling into pieces for guests to enjoy alongside their portions.
The assembled dish actually improves when refrigerated for one to three days before cooking. The salt penetrates deeper, enhancing flavor. You can also freeze it tightly wrapped for future meals.
This approach solves the dryness problem of traditional cuts. It delivers consistent results through simple cooking science. The geometric perfection and forgiving nature make it a reliable centerpiece for any special occasion.
Porchetta (Italian Roast Pork)
Ingredients
Method
- Ask your butcher for a 12-15 lb boneless pork belly with the rind still attached. If using a combo of belly and loin, be mindful of uneven cooking temperatures.
- Score the flesh side in a diamond pattern about an inch apart, rotating your knife 90° halfway.
- Score the skin diagonally, being careful not to cut too deep. A criss-cross pattern on top helps fat render and creates crispy skin.
- In a dry skillet, toast 2 tbsp of black peppercorns and 3 tbsp of fennel seeds until fragrant (about 2 minutes).
- Crush the toasted spices coarsely in a mortar and pestle.
- Rub the crushed fennel and pepper on the meat. Add fresh rosemary/thyme and microplaned garlic paste. Press the rub deeply into the cuts on the flesh side.
- For the skin, mix 2 tbsp kosher salt with 2 tsp baking powder and rub it onto the skin. Wrap the pork tightly and refrigerate for 1-3 days.
- Lay kitchen twine under the rolled pork, tie it tightly in 12-18 intervals, ensuring even pressure.
- Preheat the oven to 300°F.
- Place the meat on a rack in a roasting pan, adding water or wine to the bottom.
- Roast for 4 hours, basting every 30 minutes with pan drippings.
- Once the internal temperature hits 160°F, raise the oven temperature to 500°F and roast for an additional 20-30 minutes to crisp the skin.
- If necessary, tent the meat with foil for up to 2 hours before crisping.
- Rest the meat for 15-30 minutes before slicing.
- Cut into 1-inch rounds, serve with roasted potatoes and rustic bread.
Notes
- Make sure to score the skin carefully, as this helps achieve the perfect crackling.
- For best results, allow the meat to rest for at least 30 minutes after roasting before slicing.