
Jump to Recipe
I remember the first time I seared shrimp in a hot skillet, the kitchen filling with citrus and fragrant olive oil while corn tortillas crisped at the edge of the pan.
These tacos come together fast—shrimp cook in about two to three minutes per side—so they are perfect for weeknights when you want bold flavor without fuss.
I’ll walk you through how to keep the shrimp juicy, toast tortillas for aroma and structure, and finish each bite with a squeeze of lime and the right sauce.
This is a family method: simple tools, smart timing, and toppings that add crunch or cream—cabbage, avocado, herbs, and a salty cheese that ties everything together.
Key Takeaways
- Quick cooking: shrimp sear in 2–3 minutes per side for best texture.
- Toast tortillas for flavor and structure before assembling.
- Balance acid, salt, and herbs—lime and good olive oil make a big difference.
- Make sauces ahead—garlic-lime crema or avocado-cilantro keep dinner moving.
- Prep smart: thaw shrimp under cold water and cook last to avoid soggy tacos.
Why our family’s take on shrimp tacos leans Italian and tastes incredible
On windy nights by the coast we learned that seafood only needs a few strong, honest flavors to sing. That lesson drives how we build each taco: simple ingredients, clear technique, and a final squeeze of acid.
How coastal flavors meet taco night
Shellfish love oil, garlic, herbs, and citrus. We use a fruity olive oil and a touch of garlic to echo seaside cooking while keeping the taco spirit alive with chili, cumin, and a little heat.
Lime brightens the shrimp right after searing. Cilantro and a bit of basil add a fresh top note that cuts through richness without hiding the seafood.
E-E-A-T: decades of home cooking and tested steps
We’ve refined these recipes over years of weeknights. Hot pan, quick sear, brief rest—those tips protect tenderness and texture.
- Choose high-quality ingredients and season with intention.
- Use clear timing and logical substitutions when pantry items are missing.
- Pick a sauce—garlic-lime crema or avocado-cilantro—to lift, not mask, the shrimp.
The result is familiar and new: tacos that carry honest seaside flavor and the comfort of our family table.
Italian-inspired ingredients that make this taco recipe sing
When time is short, the right ingredients do the heavy lifting—flavor, texture, and balance in every bite.
Use medium to large shrimp for the ideal mouthful; they cook evenly and fill the tortilla without drying at the edges. Thaw frozen shrimp quickly under cold running water, then pat them dry so seasoning sticks and searing succeeds.
Shrimp basics: size, prep, and quick thawing for busy nights
Large or medium sizes both work. Rinse briefly, remove any veins, and dry with paper towels. A hot pan and a careful two- to three-minute sear per side keeps them tender.
Olive oil, garlic, and citrus: the flavor trio
Choose a fruity extra-virgin olive oil for searing and finishing; it tames heat and carries citrus and spice. Season with a pinch of cumin, black pepper, and salt. Finish with a squeeze of lime juice and a touch of garlic for brightness.
Fresh herbs and cheeses: cilantro meets basil, cotija meets pecorino
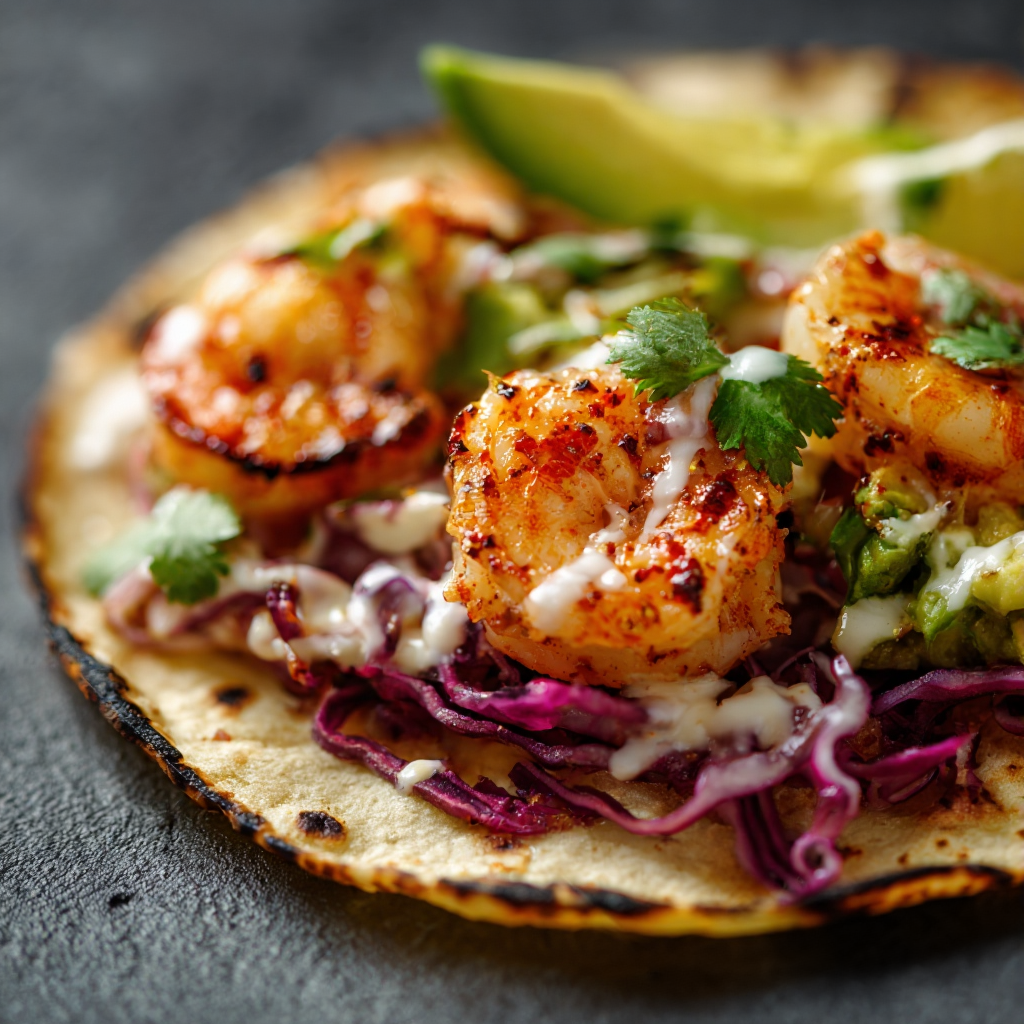
Keep herbs dry and tear basil with cilantro for a perfumed lift. Shred cabbage finely for crunch, and slice avocado right before serving to keep it silky. A sprinkle of cotija cheese or a light grate of pecorino adds that salty finish.
- Warm tortillas so they grip fillings.
- Use measuring spoons and a liquid cup—a teaspoon or a cup makes seasoning consistent.
- For more guidance, see our pasta-to-taco flavor notes here: Italian shrimp pasta guide.
italian shrimp tacos recipe: step-by-step you can trust
Start by laying out your workspace so every step feels simple and steady. A clear station makes the cooking calm and faster, and it helps you notice small cues like color and scent.
Season and marinate: chili, cumin, black pepper, and a kiss of lime juice
Pat the shrimp very dry. Toss with chili powder, cumin, black pepper, and a modest pinch of salt so the spices bloom in the pan rather than steam.
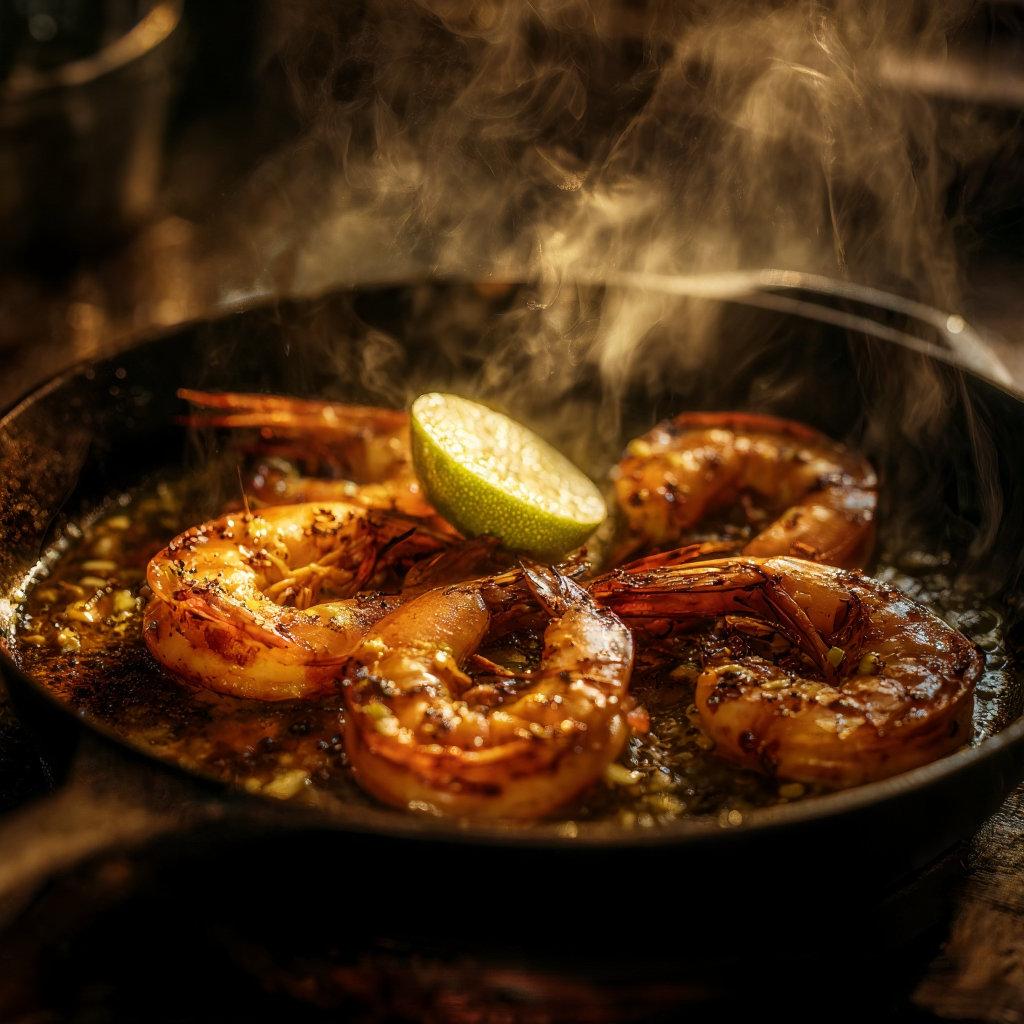
Sear the shrimp: skillet over medium-high heat in olive oil, minutes to done
- Heat a drizzle of olive oil in a preheated skillet — aim for skillet medium-high heat so you hear an immediate sizzle without burning the spices.
- Lay shrimp in a single layer and sear undisturbed for about 2 minutes, then flip; pull them as soon as they’re pink, opaque, and springy to the touch.
- Finish off the heat with a squeeze of lime juice so the acidity stays bright and lifts the pan flavors.
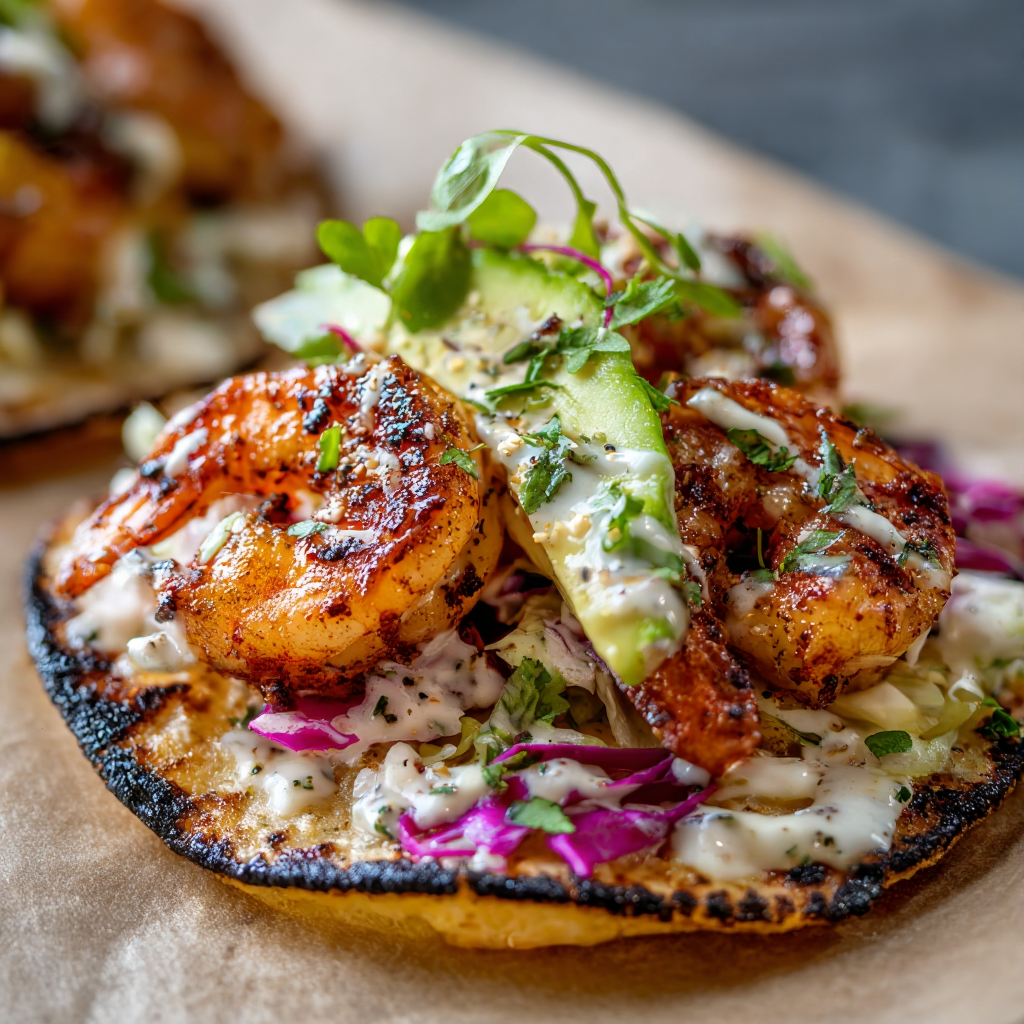
Warm the tortillas: corn tortillas toasted for structure and aroma
While the shrimp rest a minute, warm corn tortillas over a gas flame, in cast-iron, or under the broiler until lightly charred. Keep them wrapped in a clean towel so they stay soft and aromatic.
- If you like, whisk a teaspoon of pan juices into your sauce to echo the spices from the shrimp.
- Taste and adjust salt before assembling; a tiny pinch now ensures every bite lands.
- Work in batches so the pan stays hot and your sear stays crisp, then assemble quickly for contrast: hot shrimp, warm tortillas, cool cabbage, and fresh herbs.
The crema and sauce options: garlic-lime crema or avocado-cilantro
We use two simple finishes that change the whole bite: a garlic-lime crema made with sour cream or Greek yogurt, and a bright avocado-cilantro sauce. Each one plays with texture and acid to lift the warm filling and crunchy slaw.
Garlic-lime crema with sour cream or Greek yogurt
Whisk a cup of sour cream or yogurt with a squeeze of lime juice, a pinch of garlic, a drizzle of olive oil, and chopped herbs until silky. Blend if you want extra smoothness. This cream adds cool contrast and pairs especially well with shredded cabbage and cotija.
Avocado-cilantro sauce with olive oil and citrus
Puree ripe avocado, cilantro, a splash of lemon or lime, a touch of oil, and salt until lush. Let it rest briefly so flavors meld. It clings to warm tortillas and brings a herbaceous, fatty finish that complements fresh basil or pecorino.
When to dress the cabbage versus drizzling on top
Dress slaw with a few spoonfuls when you want built-in creaminess and cohesion. Reserve extra sauce in a covered bowl for drizzling so every bite feels bright. Sauces keep refrigerated 3–4 days (crema up to a week); stir and taste, then add a tiny squeeze of citrus before serving.
- Aim for a clingy texture; thin by the teaspoon with water or citrus.
- Add jalapeño or cayenne to the crema for gentle heat.
- Use the same base to make small variations and match your toppings.
Tortilla choices and technique for the best bite
Choose your tortillas with purpose — they shape texture, scent, and the first bite. Match the wrap to the filling and your mood, then warm them just before you build tacos for the freshest result.
Corn vs. flour and when to pick each
Pick corn for a toasty aroma and a gentle chew that pairs well with zesty shrimp and crunchy slaw. Double corn tortillas for extra strength and fewer tears when juices collect.
Choose flour when you want a softer, more flexible tortilla that holds extra sauce and avocado without splitting.
Three easy heat methods
Char over a gas flame for that smoky edge; keep tongs handy and rotate every few seconds so you get blistered spots without blackening.
A dry cast-iron skillet gives even browning — toast each side 15–30 seconds until warm and slightly marked. Under the broiler, line tortillas on a sheet and watch closely; about 2 minutes makes attractive browned spots for a crowd.
If you want a crisper edge, swipe a little oil in the pan and toast briefly. Wrap warmed tortillas in a clean towel to keep them pliable while you assemble.
- Match corn with citrus, herbs, and crunchy slaw; use flour for creamier builds.
- Warm just before serving — a hot tortilla brightens every element.
| Method | Time | Pros | Cons |
|---|---|---|---|
| Gas flame | Rotate every few seconds | Smoky char, fast | Requires caution; can scorch |
| Cast-iron skillet | 15–30 sec per side | Even browning, control | Small batches only |
| Broiler | ~2 minutes | Great for many at once | Needs close attention |
| Light oil toast | 10–20 sec per side | Crispy edge, richer flavor | Adds a bit more oil |
Toppings that balance flavor and texture
A well-built taco starts with toppings that give each bite contrast—crunch, cream, acid, and salt. We assemble with intention so each mouthful feels balanced and bright.
Cabbage crunch: green, purple, or a simple slaw
Use finely sliced green or purple cabbage for a crisp base. It lifts fillings and keeps the wrap from getting soggy.
For a quick slaw, toss cabbage with a splash of lime and a pinch of salt so it stays lively.
Creamy elements: avocado slices and a spoon of crema
Layer a few avocado slices for buttery richness that calms heat. Add a spoon of crema or avocado-based sauce for silk and cling.
Bright finishes: cilantro, lime wedges, and a sprinkle of cotija cheese
Scatter cilantro sparingly so it perfumes without overtaking. Squeeze lime at the table to wake the warm shrimp and add a final lift.
Finish with crumbled cotija cheese for salty pops; a light grate of pecorino can work if you prefer.
- Build with intention: cabbage, avocado, shrimp, herbs, cheese, then citrus and sauce.
- Keep toppings chilled and let everyone assemble to preserve crisp textures.
- Adjust one taco before serving the rest—more lime or cheese tunes the balance quickly.
| Topping | Role | Best use | Effect on bite |
|---|---|---|---|
| Cabbage (green or purple) | Structure | Thinly sliced, dressed lightly | Crunch and lift |
| Avocado / crema | Creaminess | Sliced or spooned last | Softens heat, adds silk |
| Cilantro & cotija | Finish | Scattered, lime on side | Fresh aroma and salty pop |
Timing, tools, and pro tips for weeknight success
When the clock is ticking, a few clear steps turn pantry items into a confident, tasty meal. Plan for about 25 minutes total so dinner stays relaxed and warm.
Total time and active minutes to the table
Budget roughly 25 minutes: 10 minutes for sauce and toppings, 8 minutes for cooking, and a few minutes to warm tortillas and assemble. Sauces can be made ahead to save time and last-minute stress.
Must-have tools
Pull out a large skillet for searing, a blender for sauces, a citrus juicer for fast squeezing, and a mixing bowl for slaw. A sharp knife and tongs speed every step.
Spice control and heat management
Keep heat gentle by removing jalapeño seeds, or add cayenne by the teaspoon for more kick. Season conservatively; taste a single shrimp before you finish the batch. A light shimmer of oil tells you the pan is ready so shrimp sear and don’t steam.
- Prep toppings first so hot protein meets cool slaw.
- Measure spices with a teaspoon for repeatable results.
- Use a store blend for a quick taco recipe shortcut, then balance with lime and salt.
| Tool | Role | When to Use |
|---|---|---|
| Skillet | Sear protein | Preheat until oil shimmers |
| Blender | Emulsify sauces | While shrimp rest |
| Mixing bowl | Dress slaw | First step of prep |
Make-ahead, storage, and safe reheating
Little steps ahead of time keep the final meal fresh and bright. A few smart moves save time and protect texture so every bite feels homemade and lively.
Blend sauces and shred cabbage earlier in the day; store them in airtight containers. Crema holds up to a week in the fridge, but don’t freeze it—the emulsion breaks and the texture suffers.
What to prep earlier and what to cook last
- Make sauces and dress slaw in the morning to cut final time at the stove.
- Cook protein just before serving for the best texture, when you can. Cooked shrimp can be refrigerated 3–4 days if you need to save time.
- Keep tortillas wrapped at room temperature or lightly refrigerated and warm them just before eating so they stay flexible.
Fridge, freezer, and safe timeframes
Store each element separately—protein, slaw, sauce, and tortillas—to protect texture and safety. Label containers with date and contents so you use things in order.
| Item | Storage | Notes |
|---|---|---|
| Cooked shrimp | Refrigerator: 3–4 days; Freezer: up to 3 months (flash-freeze) | Flash-freeze on a tray, then bag for best quality |
| Crema & avocado-based sauce | Refrigerator: up to 7 days; Avoid freezing | Stir before serving; add a little citrus if flat |
| Shredded cabbage / slaw | Refrigerator: 3–4 days | Dress lightly; keep extra dressing separate |
| Tortillas | Room temp: 1–2 days; Fridge: up to a week | Warm just before serving to restore pliability |
Reheating tips to keep texture
Reheat cooked protein gently over low heat or in a short sauté just until warm. Stop as soon as they are heated—overcooking makes them rubbery.
If you’re packing a portable meal, keep components separate and assemble on-site. That keeps slaw crisp, sauce fresh, and tortillas soft for the best final experience.
Smart swaps and variations to match your pantry
When pantry shelves are sparse, a few smart swaps keep dinner vivid and quick.
For protein, firm white fish like cod, halibut, or mahi mahi work well. Cut into strips, season as you would the shrimp, and pan-sear until flaky and opaque. These options keep texture and hold up to slaw and sauce.
For the sauce base, use sour cream, Greek yogurt, or Mexican crema. Each offers different tang and richness: sour cream is bright, yogurt is lighter, and crema is silky. For a dairy-free cream, puree ripe avocado with olive oil and lemon.
If you can’t find cotija, crumble feta or skip cheese and boost herbs and citrus. Store-bought seasoning packets save time—adjust salt and acid after cooking so flavors stay balanced.
- Lower heat by favoring black pepper and omitting cayenne.
- Sauté fresh corn when in season for a sweet, toasty topping.
- Turn leftovers into bowls with rice or greens for a next-day meal.
- Jot notes so your shrimp taco recipe becomes your own over time.
| Swap | How to use | Flavor/Texture effect |
|---|---|---|
| Cod / Mahi / Halibut | Cut strips, season, sear until flaky | Firm, flaky bite similar to seafood |
| Sour cream / Greek yogurt / Crema | Blend with lime, garlic, herbs | Ranging from tangy to silky |
| Feta instead of cotija | Scatter crumbles at the end | Salty, tangy pop; slightly creamier |
| Avocado sauce (dairy-free) | Puree avocado, oil, lemon | Lush, rich, and allergy-friendly |
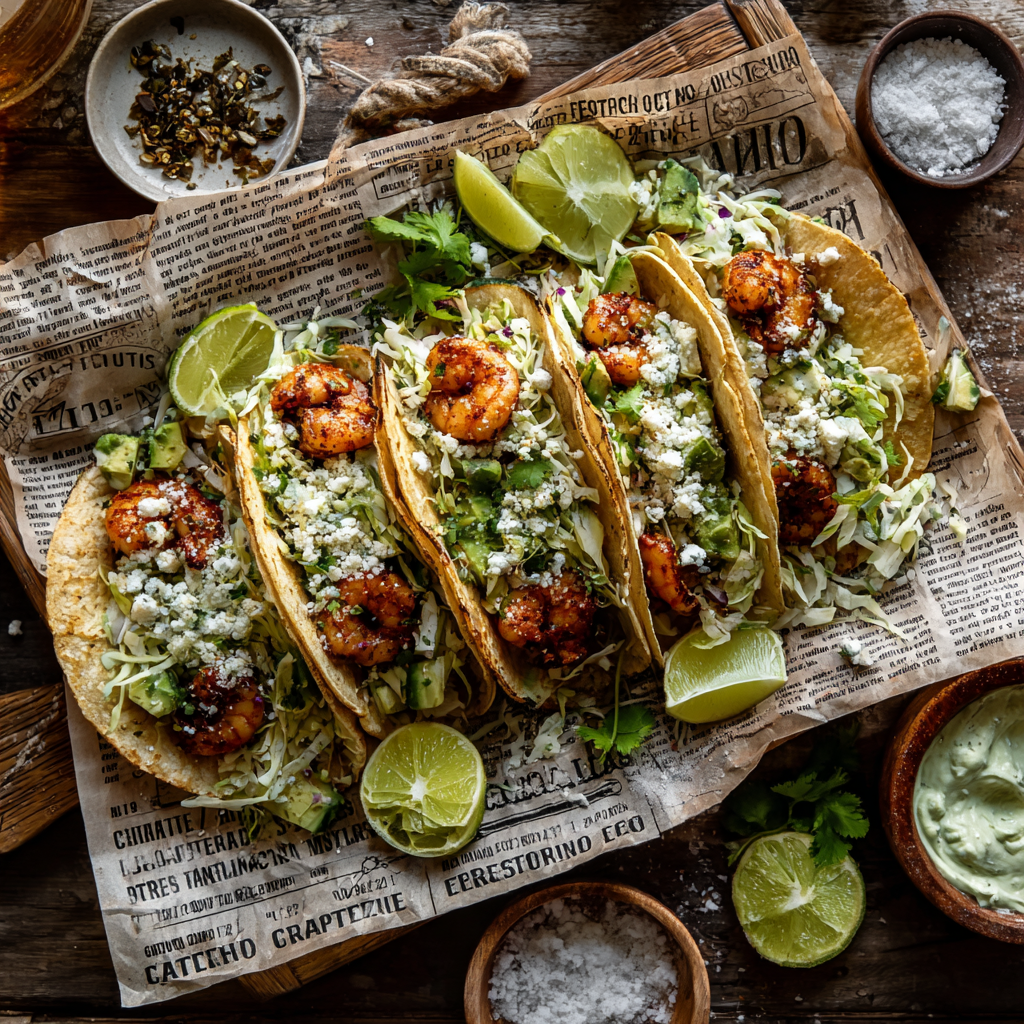
From our kitchen to your table: serve, savor, and make it yours
Bring the pan to the table and set out warm tortillas, bowls of cabbage and avocado, lime wedges, cilantro, cotija cheese, and your favorite sauce.
Invite everyone to build their own shrimp tacos: a bit of cabbage, a few slices of avocado, the spicy shrimp, a light drizzle of sauce, and a squeeze of lime makes each bite sing.
If you cooked ahead, rewarm gently in a skillet over low heat for a couple of minutes so the protein steams, not sizzles. Keep a small cup of warm sauce nearby for finishing touches.
Serve with sides like cilantro-lime rice, refried beans, or street corn salad. Taste as you go—salt, a drop of lime juice, or a teaspoon of sauce can bring everything into focus.
We make these often on weeknights and for gatherings; simple steps, olive oil to finish, and little rituals turn minutes into a meal the family remembers.
Italian Shrimp Tacos Recipe
Ingredients
Method
- Pat the shrimp very dry with paper towels. Toss with chili powder, cumin, black pepper, salt, and a squeeze of lime. Set aside while you prep toppings.
- Whisk together the garlic-lime crema ingredients until smooth.
- OR
- Blend the avocado-cilantro sauce until creamy.
- Taste and adjust salt or citrus.
- Slice the cabbage thin. Slice the avocado. Chop a little cilantro and basil. Crumble cotija or grate pecorino.
- Heat a large skillet over medium-high. Add olive oil.
- When the oil shimmers, add shrimp in a single layer.
- Cook about 2 minutes per side until pink and springy.
- Turn off heat and squeeze a little fresh lime over the pan.
- Toast tortillas over a gas flame, in a dry cast-iron pan, or under the broiler until soft and slightly charred. Keep them wrapped in a clean towel so they stay warm.
- Layer cabbage first, then avocado slices, then the hot shrimp.
- Add herbs, a sprinkle of cheese, and a drizzle of your sauce.
- Finish with a squeeze of lime.
- Add more lime, salt, or sauce as needed. Serve right away.
Notes
- Patting the shrimp dry makes the sear much better and keeps them juicy.
- Warm the tortillas right before serving—they taste fresher and hold the fillings better.
- Taste one shrimp before serving the whole batch so you can adjust salt or lime.
- Both sauces keep well, and the crema actually tastes better the next day.
- If you can’t find cotija, feta or pecorino work fine for that salty finish.
- Work in batches when searing so the pan stays hot and the shrimp don’t steam.