
Jump to Recipe
I learned the focaccia di recco recipe in Liguria from my Nonna, and the memory of warm cheese and thin, blistered dough still pulls me back to her kitchen.
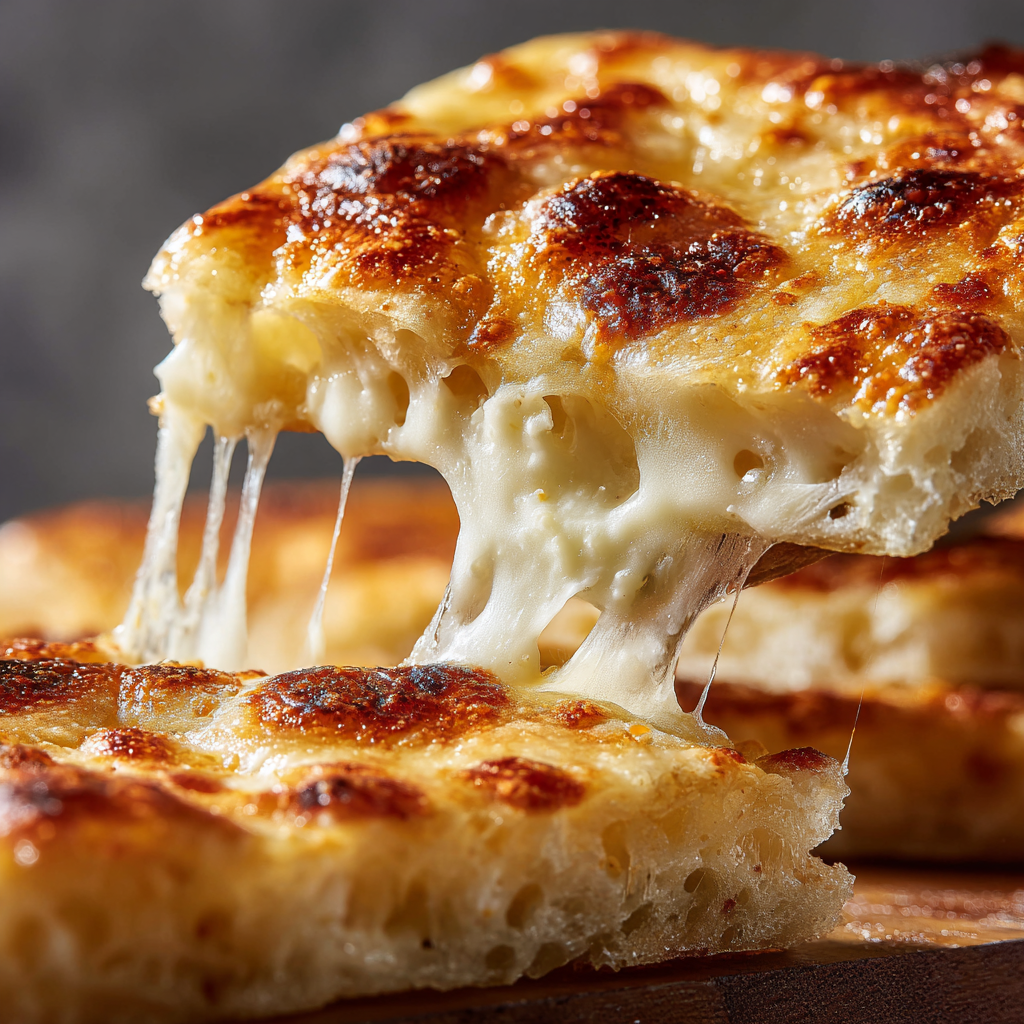
Think of this as a cracker-thin, cheese-stuffed bread that sings when it comes out of a hot oven: the top should bubble and show little brown blisters, the center molten and yielding.
I’ll walk you through simple ingredients and hands-on techniques I use at home—mixing and stretching the dough until it feels elastic, sealing the rim thin, and making tiny vents so steam escapes without deflating the top.
Along the way I share fixes for small tears, smart cheese swaps if stracchino is scarce in the U.S., and clear cues for timing and heat to get bakery-like results at home.
Key Takeaways
- Start with very thin, well-rested dough so it stretches without tearing.
- Use a generous oiling of the pan and seal edges thin to keep the center molten.
- Bake hot and fast; in home ovens aim 450–500°F for blistered top and melted cheese.
- Make small vents to release steam and prevent sogginess.
- Finish with extra-virgin olive oil and flaky salt; try honey or arugula to contrast richness.
What makes focaccia di Recco authentic, and why it’s different from fluffy focaccia
What sets it apart is simple: no yeast, two paper-thin sheets of dough and a molten cheese heart. The PGI protection ties the product to Recco, Avegno, Sori, and Camogli and keeps technique and ingredients local.
The dough is worked for strength, not rise. Bakers like Manuelina push higher-protein dough until it turns almost translucent. They add crescenza (stracchino) in small mounds, seal the edges, pinch vents and bake very hot—about 300°C/570°F—for 8–10 minutes.
- The result is a blistered, golden top and a velvety interior.
- Steam vents are intentional; small tears let pressure escape and create appetizing blisters.
- Unlike dimpled, yeasted focaccia, this version is crisp-edged, ultra-thin, and cheese-filled.
Technique and sensory cues
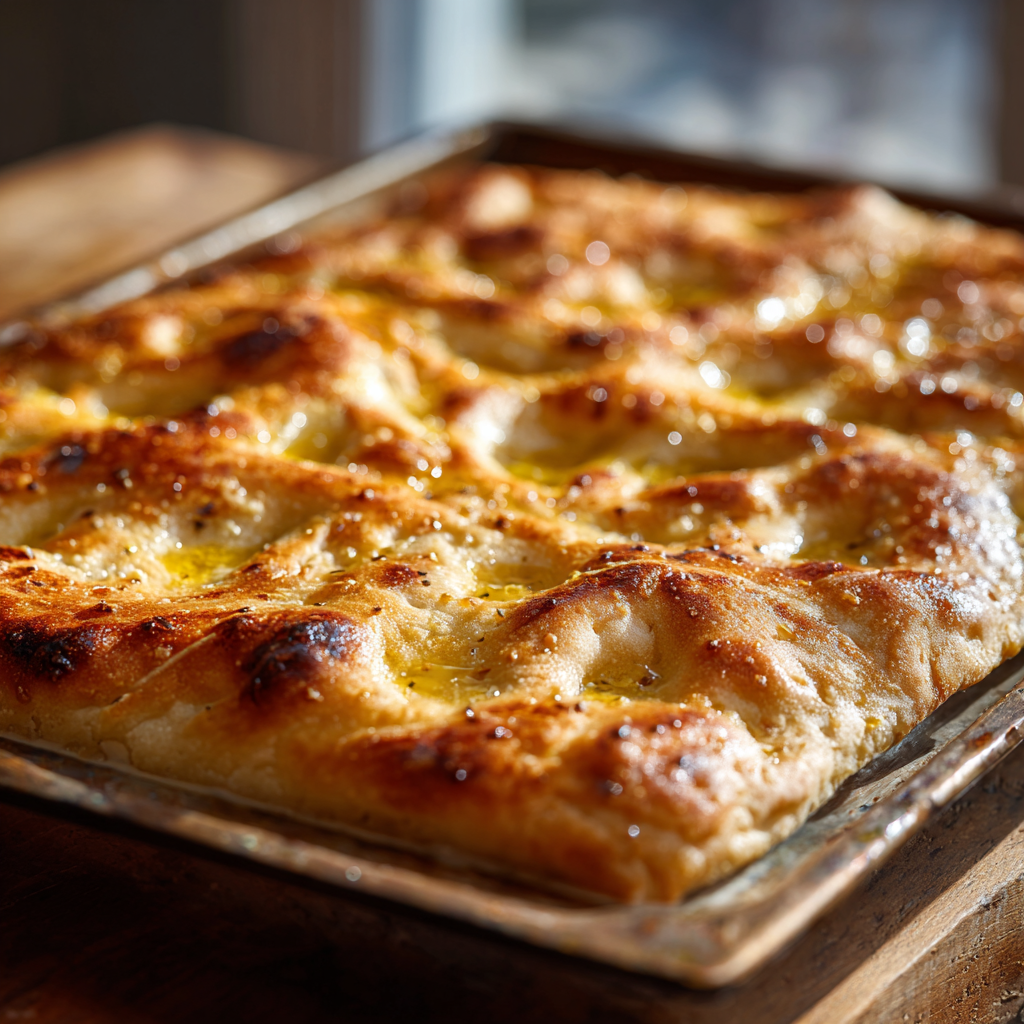
Stretch the dough until it holds and lets light through. Work quickly when assembling so the filling stays molten. Finish with extra-virgin olive oil and flaky salt for that classic shine and flavor.
| Characteristic | Pillowy focaccia | Recco-style version |
|---|---|---|
| Leavening | Yeast, rises | Unleavened, no rise |
| Dough goal | Loft and air pockets | Elastic strength and thinness |
| Bake | Moderate oven temperature | Very hot oven, quick bake (8–10 min) |
Ingredients and tools you’ll need for true focaccia recco results at home
Good results begin with flour, water, olive oil, and a soft melting cheese I trust from the market. These are simple items, but using the right kinds and tools matters more than exotic additions.

The dough essentials
For the dough you need plain flour (use high-protein if you can), a little water, a splash of oil, and a pinch of salt. Measure gently and mix until smooth; strong gluten makes the sheet easy to stretch.
Cheese choices and swaps
Traditional fillings use stracchino/crescenza if available. Taleggio, Brie, or Camembert melt well and add character. For U.S. cooks, try Fontina, well-drained ricotta, or even Laughing Cow for spreadable creaminess.
Finishing touches
Generous extra-virgin olive oil at the end and a sprinkle of coarse salt brighten the finished piece. Serve with a drizzle of honey or a handful of peppery arugula to cut the richness.
Equipment checklist
- Large bowl for mixing and resting
- Plastic wrap to keep dough moist
- Rolling pin to begin the stretch, then hand-stretch
- Sturdy sheet tray or a shallow pan for even bake
- Sharp knife to trim and seal edges
Mix, knead, and rest at room temperature for a stretchable, tear-resistant dough
Begin in a bowl, combining flour and water until the mixture looks shaggy. Add olive oil and salt, then fold gently so the mass comes together. This first stage sets the texture you’ll shape later.
Bring the dough together: combine, knead until smooth and elastic
Turn the shaggy mass onto a floured surface and knead until soft and supple. If it feels dry, add a few drops of water; you want soft, not sticky. Check by pressing a fingertip—the dough should spring back gently.
Wrap and rest at room temperature: why the rest time matters for elasticity
Wrap the dough snugly in plastic wrap so it doesn’t form a crust, then let it rest room temperature for 30–60 minutes. That pause relaxes the gluten and makes the sheet easy to stretch thin.
- I bring the dough together in a bowl, mix until shaggy, then work on the surface to finish.
- Knead until you feel that gentle spring-back; it proves the gluten is ready.
- Divide into portions before the final rest if you’re making multiple pans—smaller pieces relax faster and are simpler to handle.
When you unwrap, the dough will feel calmer and smoother. This calm dough goes a long way toward a clean, blistered finish when you assemble the focaccia for baking.
Master the ultra-thin stretch: rolling pin first, then backs-of-hands for translucency
Start at the rim and work outward with a rolling pin so the edges don’t snap back when you hand-stretch. This little step keeps the border even and prevents a thick crust later.
Dust the surface very lightly—too much flour makes the dough slip and tear. Roll until the disk is wide but still manageable, then switch tools: tuck knuckles, slide your hands under the sheet, and use the backs-of-hands to stretch gently.
From counter to pan: roll edges outward, then hand-stretch until almost see-through
Rotate as you stretch so thickness stays even. Hold the sheet up; you should see light through it like a fresh pasta sheet. Drape the dough over an oiled tray with a generous overhang to give you room to seal later.
Patchwork confidence: if the dough tears, pinch, seal, and keep going
- Start with the rolling pin to widen the disk at the edges first.
- Use a light dusting on the surface and avoid excess flour.
- Stretch with your knuckles tucked and rotate for uniform thinness.
- Pinch small tears closed—those patches vanish during baking.
- Leave some overhang on the tray so you can trim and seal without a thick rim.
Keep your aim simple: an even, translucent sheet that will blister on top and hold a molten center. If you want a visual guide, I walk step-by-step on my full page: focaccia how-to and tips.
focaccia di recco recipe: assemble, seal the edges, and bake until blistered
Work quickly once the layers meet: this is where heat, steam, and timing decide the result.
Prep the tray and pan
Generously oil the pan or sheet and, if you like, dust a little cornmeal for texture. Keep a clean dry rim so the dough grips when you seal the edges.
Build the bottom layer, cheese, and top layer
Drape the bottom layer over the oiled tray so it hangs slightly. Scatter small chunks of cheese, not a paste, to ensure even melting and pockets of molten center.
Cover with the second sheet, press the edges thin, trim excess, and reseal by pinching so the border stays crisp.
Let steam escape and finish
Make two or three small holes in the top layer to allow steam escape. Drizzle a confident olive oil sprinkle across the surface and add a pinch of coarse salt for brightness.
Preheat and bake with sensory cues
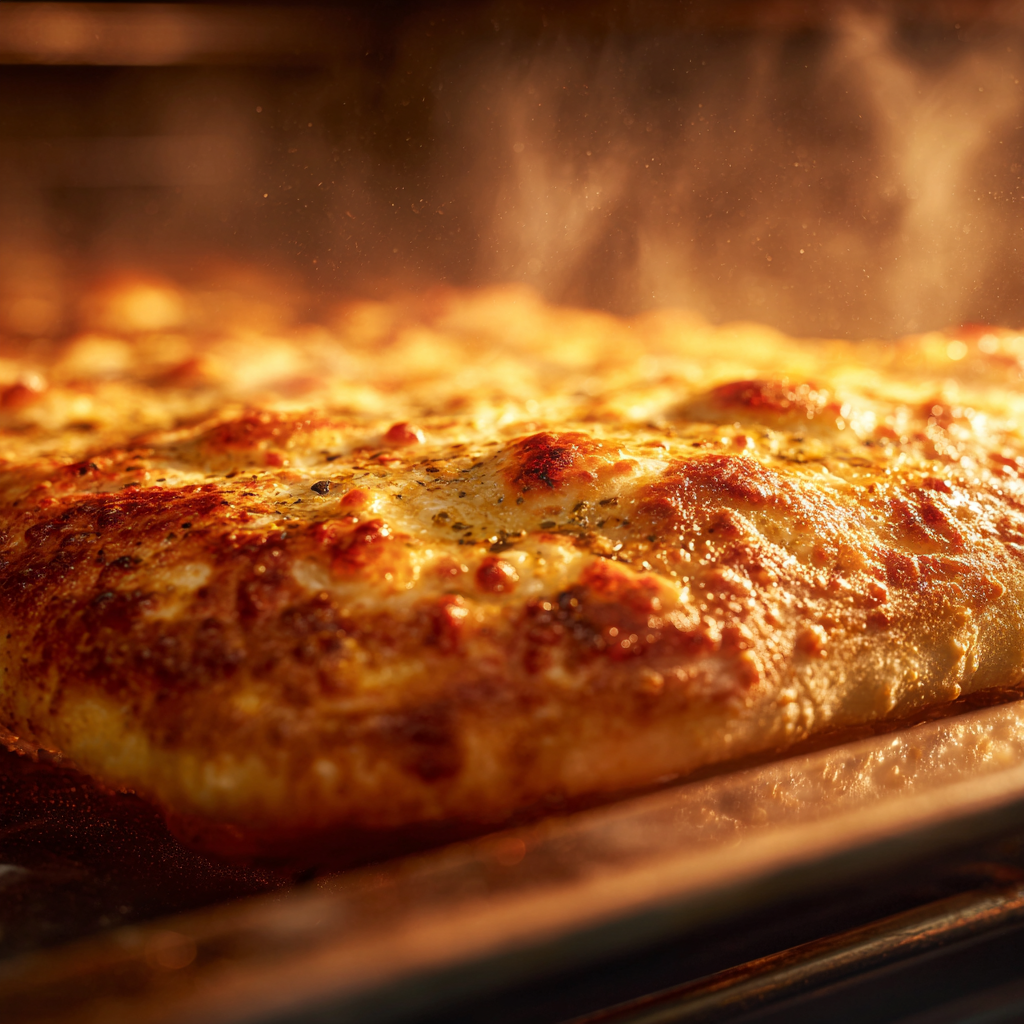
Preheat oven to 450–500°F for home baking; a hotter setup (about 570°F) shortens the bake. Slide the pan onto the lower rack. At higher heat check at 8–10 minutes; at 500°F begin checking at 12 minutes.
Look for deep golden blisters, listen for gentle sizzles as oil and cheese bubble, and smell a toasty, savory aroma. Let the piece rest a minute so the center settles, then cut and serve while the top is crisp and the cheese molten.
Cheese swaps, oven options, and versions to try without losing the soul of the dish
In my kitchen I balance a creamy base with a flavorful partner to mimic the classic melt. That approach keeps the texture true while using what’s available in U.S. markets.
Smart substitutions: balancing creamy and flavorful cheeses when stracchino is scarce
A two-cheese mix works best: one soft and spreadable, one with character. I often blend a spreadable cheese (Laughing Cow or well-drained ricotta) with Fontina or Taleggio. This mirrors the lush melt and adds gentle tang.
Drain wet cheeses well. Too much moisture will steam the sheet and ruin the crisp rim. Keep a pinch of salt and a light olive oil sprinkle after baking to lift flavors.
Home oven vs. wood-fired: temperature, rack position, and timing adjustments
For home ovens, preheat oven fully and bake on the lower rack. Plan 12–20 minutes and watch vents for bubbling and deep blisters.
In wood-fired or ultra-hot setups, aim for 8–10 minutes and rotate the pan once for even color. Choose a dark, sturdy pan or large sheet for the best heat conduction.
| Setup | Temp & position | Timing & pan |
|---|---|---|
| Wood-fired | 570°F, close to heat | 8–10 minutes; rotate once; heavy pan |
| Home oven | 450–500°F, lower rack | 12–20 minutes; watch vents; dark sheet pan |
| Tips | Vent top, oil pan | Drain cheeses, finish with salt and olive oil sprinkle |
Conclusion
Trust your senses—look for a blistered top, golden edges, and vents that whisper steam. When a piece lifts cleanly from the pan and the molten center still pulls, you’re ready to serve.
Keep the rolling pin close but finish stretching by hand. Work on a floured surface; resting the dough in a bowl or wrapped in plastic wrap makes the sheet calm and easy to handle.
Cut in half or generous squares on the tray, drizzle with olive oil, and offer a scatter of arugula or a lick of honey. These simple cues and small rituals will turn this dish into a joyful, repeatable classic.
Focaccia di Recco (Cheese-Stuffed Ligurian Flatbread)
Ingredients
Method
- In a large bowl, mix flour, water, olive oil, and salt until the mixture looks shaggy.
- Turn it onto a floured surface and knead for 8–10 minutes until soft, smooth, and elastic.
- Wrap in plastic wrap and let rest at room temperature for 30–60 minutes.
- Resting relaxes the gluten so you can stretch it thin without tearing.
- Cut the cheese into small chunks or spoon soft cheese in little mounds.
- If using a mix, make sure the cheese is well drained to avoid sogginess.
- Divide the rested dough into two equal pieces.
- Roll out the first piece with a rolling pin, then hand-stretch it using the backs of your hands until almost translucent—you should see light through it.
- Lightly oil a baking tray (or sprinkle cornmeal if you like) and drape the dough sheet over it with some overhang.
- Scatter the cheese evenly over the bottom sheet in small chunks.
- Stretch the second piece of dough and place it over the cheese.
- Press and pinch the edges together to seal thinly, then trim excess dough.
- Tear or prick 2–3 small holes in the top sheet to let steam escape.
- Preheat oven to 475–500°F (250°C).
- Drizzle the top with olive oil and sprinkle a little coarse salt.
- Bake 12–15 minutes (or 8–10 min in a wood-fired oven) until the top is golden and blistered.
- Let cool 1–2 minutes before cutting so the cheese settles.
- Cut into squares or slices. Drizzle with more olive oil and top with arugula or a touch of honey if you like a sweet contrast. Serve warm with wine or as a starter.
Notes
- The dough should be very thin and rested before stretching.
- Always oil the pan generously—this helps create a crisp, blistered bottom.
- Small vents or holes in the top are key to letting steam out and keeping it crisp.
- Avoid wet cheeses or thick rims; both make the bread heavy and soggy.
- Serve fresh from the oven—this dish doesn’t reheat well.