
Jump to Recipe
The first time I learned this sfogliatella riccia homemade recipe, the kitchen smelled of warm citrus and baking butter—and I knew I had to share the method that makes those crisp, flaky leaves sing.
I’ll walk you through why a firm dough and long rest matter, how thin rolling with a pasta roller builds layers, and the small cues that keep the semolina-ricotta filling silky without leaking.
This is a practical, hands-on approach rooted in Naples tradition: the right flour and water balance, when to choose lard or butter, and oven time to get deep golden color and crackle.
Think of it as a friendly masterclass from my family to yours—clear steps, useful troubleshooting, and the cultural notes that make this pastry more than a treat.
Key Takeaways
- A stiff dough and long rests create the signature layered structure.
- Use thin rolling and log slicing to form the shell-shaped pastry.
- Keep the filling balanced: ricotta, semolina, a touch of citrus and cinnamon.
- Brush with lard or butter for distinct texture and flavor choices.
- Bake hot, about 375–400°F, until crisp and deeply golden—watch size and time.
Why this sfogliatella riccia is worth your weekend
Set aside a weekend: this is the kind of pastry that rewards slow, steady work. The dough needs long rests, and the ultra-thin rolling makes all the difference.
Most hands-on minutes are in shaping and rolling. A pasta machine cuts that effort and keeps your sheets even, so you spend less time fighting the dough and more time sensing the right thickness.
The bake is simple: about 20–30 minutes in a hot oven. But the real investment is the day—mix, rest, roll, chill, then shape. Each pause builds structure so the layers stay distinct instead of collapsing.
- Choose fat to suit your goal: lard gives an authentic, ultra-crisp shell; butter adds a rich, familiar aroma.
- I’ll pace the process so you can have coffee breaks while the dough relaxes and still finish by evening.
- When you crack one open, the brittle, bronzed leaves and warm center make every minute feel earned.
If you enjoy technique-driven projects, this recipe makes a quiet day feel like a small celebration. Try it once, and you’ll understand why the time pays off.
The Naples backstory and how riccia differs from frolla and “lobster tails”
A convent sweet made with semolina, citrus and dried fruit evolved into a street-bakery icon. In Santa Rosa, nuns crafted a dessert called Santarosa. Later, Pasquale Pintauro in 19th-century Naples refashioned it into the shell we recognize today.
I make a point of this history because technique follows origin: the layered version uses a sturdy, rested dough rolled paper-thin. That step is why a pasta machine matters in a home kitchen; it helps reach bakery thinness without extra time or strain.
Origins and practical differences
- The convent original used semolina and lemon liqueur, giving the filling a dense, fragrant base.
- The layered classic we bake keeps the filling enclosed and bakes as one, best eaten hot for maximum crispness.
- Frolla swaps the layered sheets for shortcrust dough, so it feels more like a tart with similar ricotta-based filling.
- In the U.S., aragosta or “lobster tail” often is filled with cream or custard after baking and may use choux techniques to puff the center.
| Type | Dough | Filling | Shape & Serve |
|---|---|---|---|
| Layered shell (our bake) | Stiff, rested dough rolled paper-thin | Semolina and ricotta, mixed before baking | Shell form, best hot and crisp |
| Frolla | Shortcrust, quicker to make | Same style filling, enclosed or open | Tart-like; softer, less flaky |
| Aragosta / Lobster tail | Often choux or puff methods | Whipped cream or custard added after bake | Split and filled, American variation |
Ingredients with pro notes: dough, fat, and that creamy ricotta-semolina filling
Choose ingredients that stand up to technique. I pick strong flour for elasticity and add just enough water so the dough is firm but workable. A small spoon of honey improves browning and keeps the sheets supple. Salt tightens gluten and brightens flavor.
Dough essentials
Use a high-protein flour for stretch and resilience. Knead to a firm, stiff dough and let it rest for hours; this relaxes gluten so sheets roll thin without snapping.
Lard vs. butter for layers
Lard is traditional and gives the driest, crispiest layers. Butter is more aromatic and easier to source, producing slightly softer, fragrant leaves. Keep the fat soft, not hot, when brushing so layers stay distinct.
Filling flavors
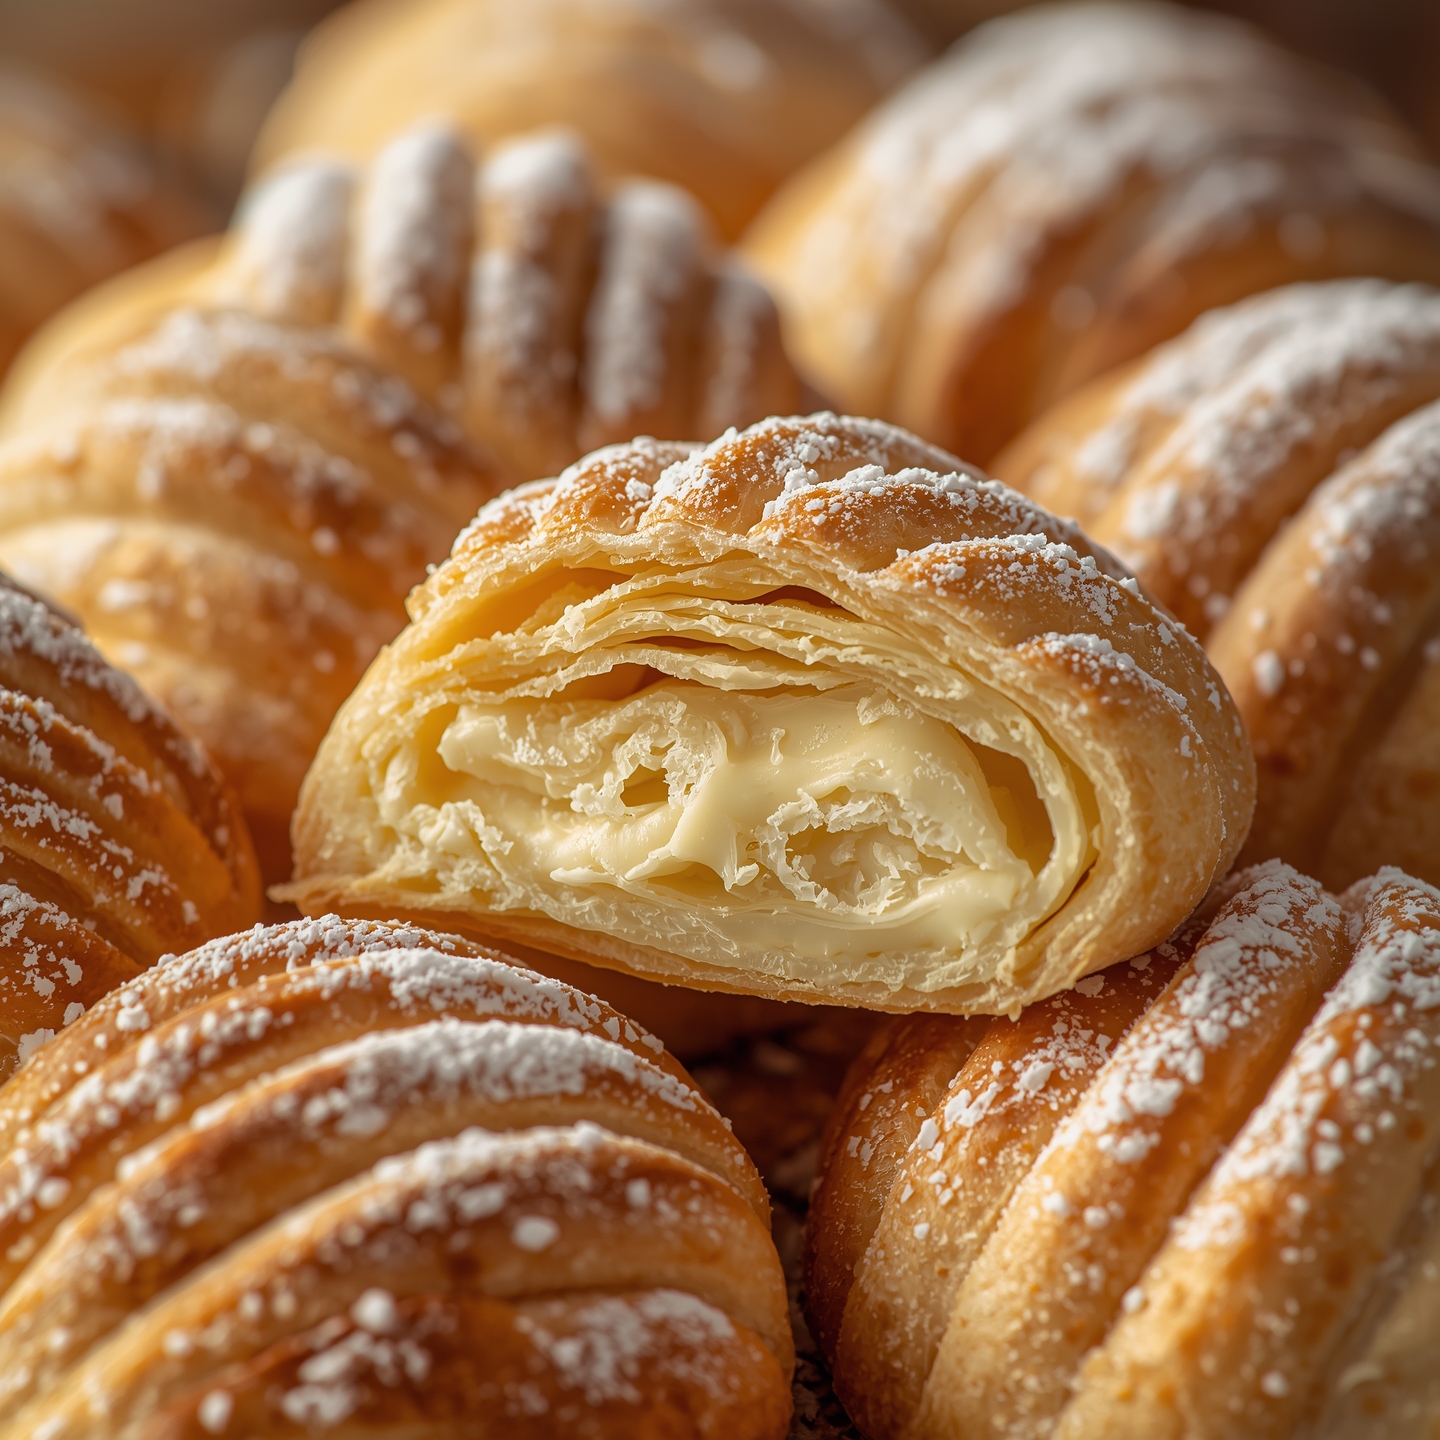
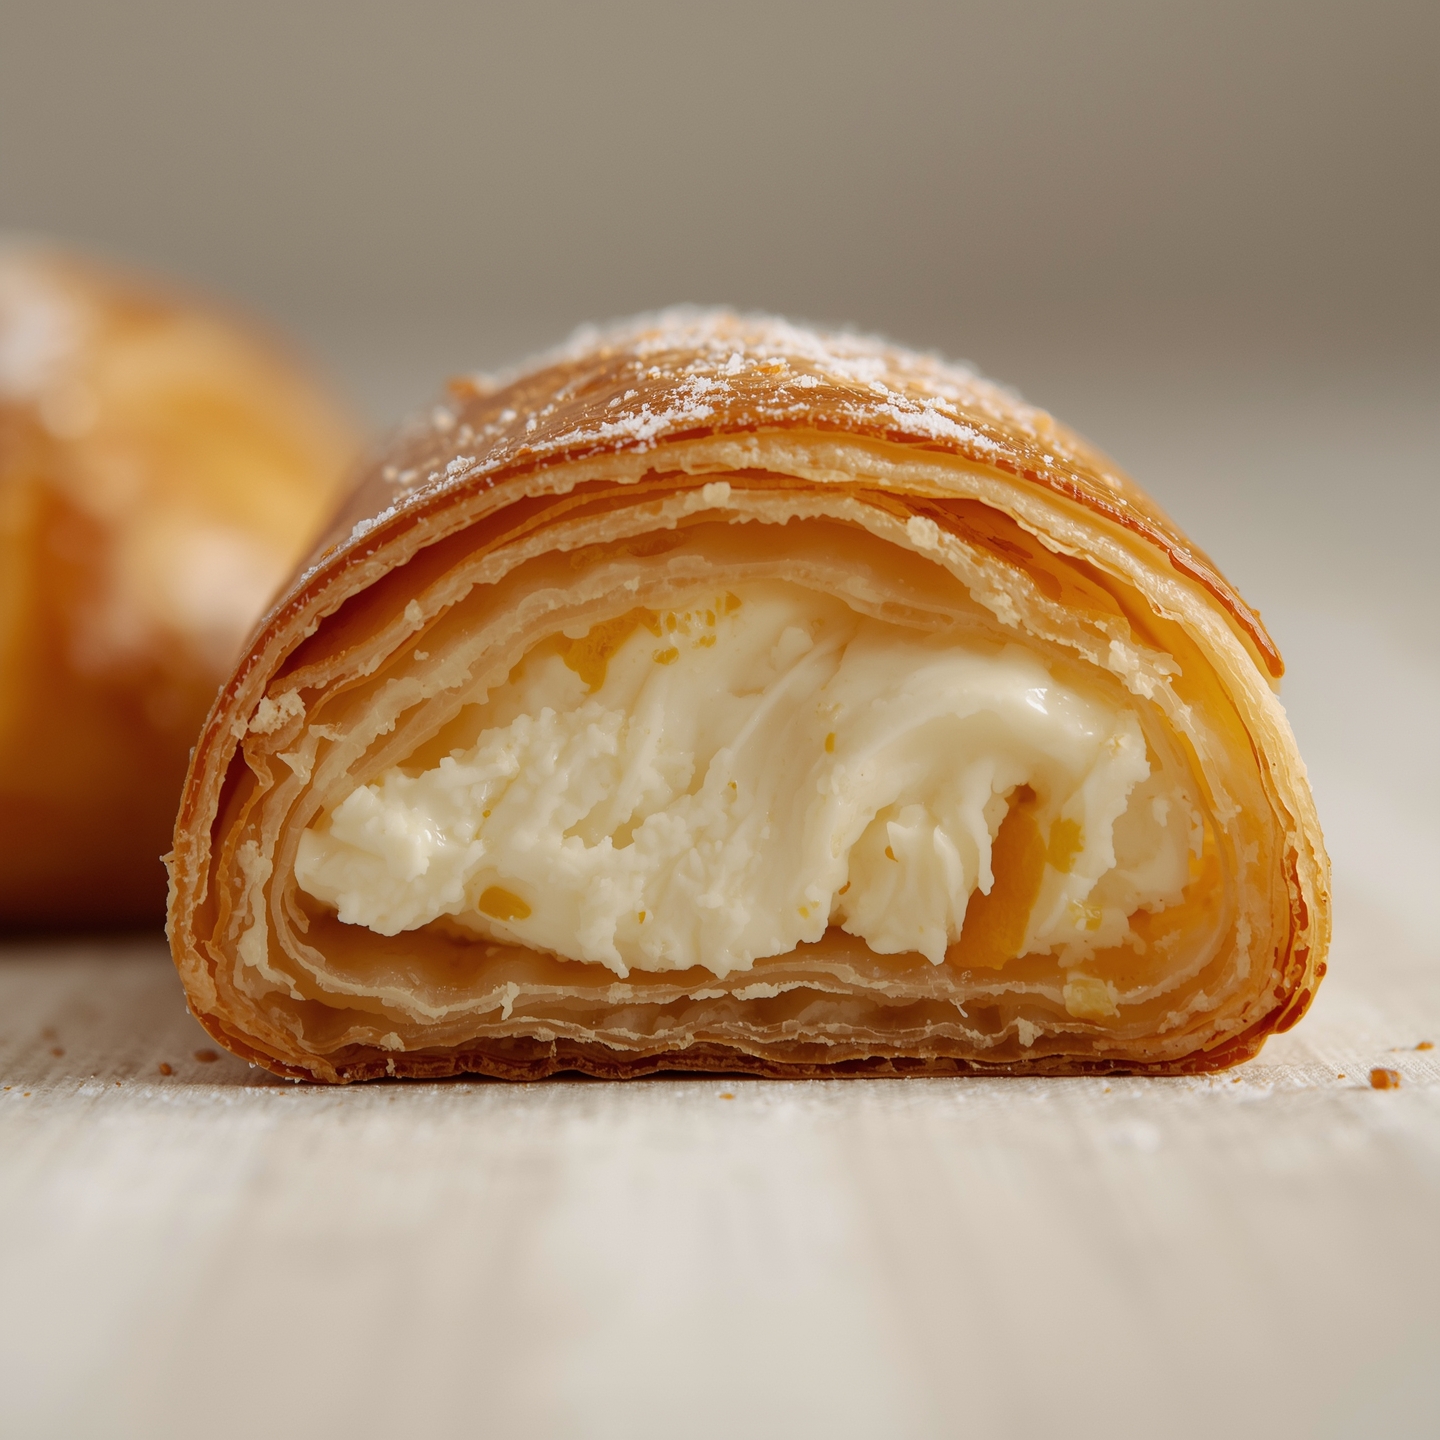
Cook semolina with milk and sugar until smooth. Fold that into ricotta with egg, candied citrus or cranberries, and a whisper of cinnamon. Aim for a thick mixture that holds shape.
- Work the filling in a bowl until satin-smooth—no grit, no lumps.
- A pasta machine helps you reach near-translucent sheets without tears.
- Plan amounts so your butter or lard is brushable at room temperature.
Tools that make the layers behave
Good tools turn fiddly dough into predictable layers and save you hours at the bench. I like to pair one reliable tool with simple habits so every pass looks the same.
Pasta machine vs. rolling pin: how thin is thin enough
A pasta machine gives consistent sheets from the widest setting down to near-transparency. It eases hand fatigue and speeds the job.
A rolling pin will work if you have patience. Expect more rests and a few more torn edges. Use small portions so the pin can flatten evenly without overheating the fat.
Work surface setup, bench scraper, and pastry brush
- Keep the work surface cool, clean, and only lightly dusted; excess flour kills layer adhesion.
- A bench scraper straightens edges, lifts sheets, and helps you repeat process with neat lines.
- Use a soft pastry brush for an even film of lard or butter so layers separate, puff, and don’t fuse.
- Keep the machine rollers clean and sparing with flour; sticky spots ripple the dough and create weak areas.
- Work in manageable portions, chill logs briefly if your kitchen runs warm, and line trays with parchment before wrapping to chill.
My step-by-step process
I’ll walk you through each step so your dough becomes pliant, your layers stay crisp, and the filling holds its shape.
Make the dough and rest it
Combine flour, salt, honey, and slowly add water until a stiff dough forms. Knead until smooth and tight. Wrap and let rest for a couple of hours so the gluten relaxes and the sheet won’t spring back.
Roll with the pasta machine
Divide into portions and work on a cool work surface. Start the pasta machine on the widest setting, fold and pass until even, then step down until the sheet is nearly translucent.
Brush, roll into a tight log, and chill
Lightly brush each sheet with melted lard or butter, then roll the sheet into a tight, even cylinder. Add more sheets around the log for length and thickness. Wrap snugly and chill 1–2 hours so the fat firms and slices cut cleanly.
Mix the filling
Cook semolina with milk and sugar until glossy. Let cool until warm, then blend into ricotta with an egg, citrus peel or chopped cranberries, and a pinch of cinnamon. Stir in a bowl until the mixture is creamy and spoonable.
- Slice the chilled log into pieces, form cones, fill, and bake 20–30 minutes until deep golden.
Shaping the shells without tearing the layers
This is the hands-on moment. Slice cold logs into even rounds so each shape bakes at the same rate and puffs evenly.
Slice the log into pieces and form the cone shape by hand
Trim the ragged ends first. Cut the log into uniform pieces on a cool board. A consistent size makes timing predictable in the oven.
With your hand lightly greased with lard, press the center of a round with your thumb. Gently coax the outer ring outward so the piece stretches into a cone shape without cracking the layers.
If a piece resists, return it to the fridge for 10–15 minutes. Cold dough stretches; warm dough tears. Practice makes this feel natural.
Fill, pinch, and seal: keeping the edges closed in the oven
Spoon just enough filling to mound slightly in the center. Leave a clean border so you can pinch the seam shut without overfilling.
Pinch firmly along the edge and run a second pinch for security. Check both tips so no filling can weep during baking. If a sheet splits, patch it with a sliver of piece dough and seal with a light brush of fat.
- Trim ends, slice even pieces—uniform cones bake and color uniformly.
- Grease one hand, press center, coax outer ring into a cone—gentle motion, not force.
- Work quickly and keep trays cool; warmth ruins lamination and makes sealing harder.
- Pinch seams twice and test tips; a neat seal prevents leaks and soggy bottoms.
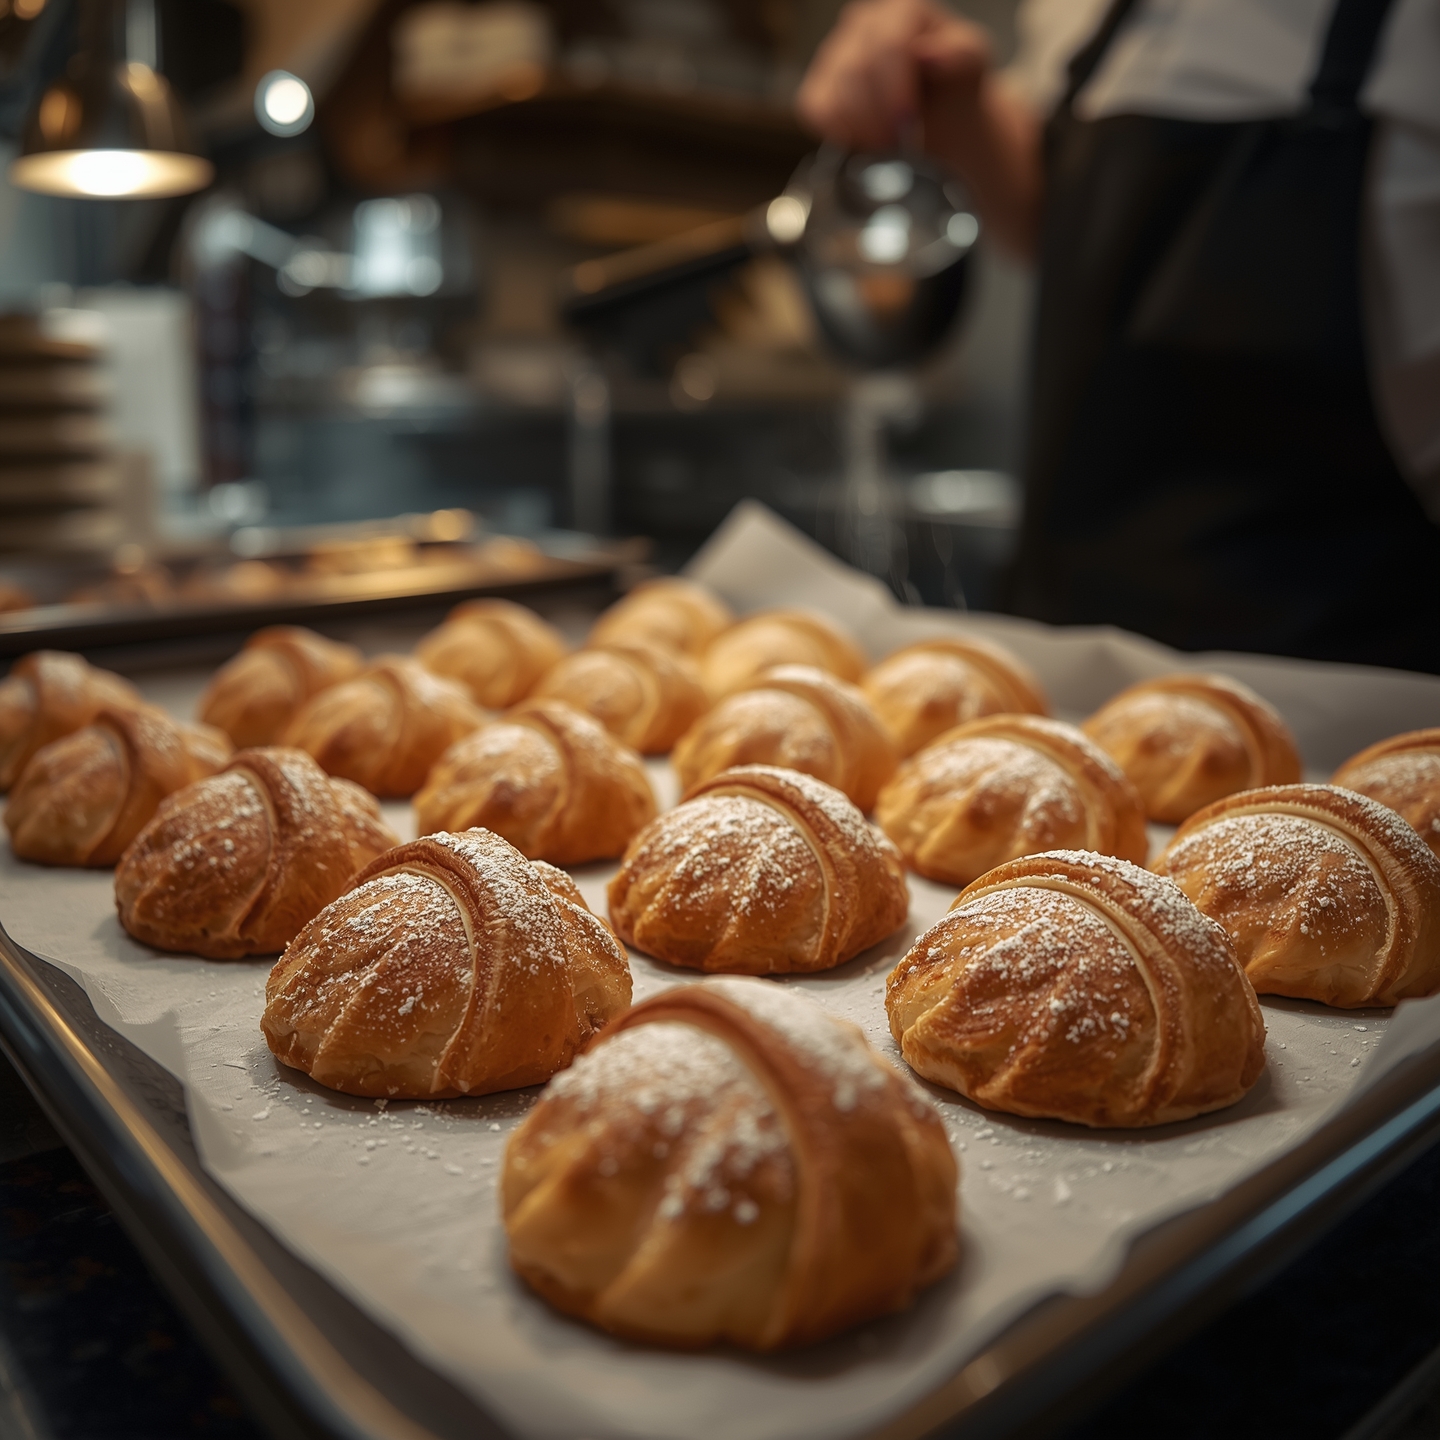
Baking for maximum crispness
A hot oven is the secret that turns layered dough into crisp, bronze shells. Give the oven a full 20 minutes to stabilize at 375–400°F before you slide the tray in. That steady heat seals layers and forces steam out fast so the pastry stays flaky, not soggy.
Preheat, tray setup, and ideal temperature range
Line a sturdy baking tray with parchment for a dry surface and even browning. Avoid silicone mats here; they trap moisture and soften bottoms. Space the pieces well so hot air can circulate and puff each roll instead of steaming it.
Timing cues: minutes, color, and avoiding soggy bottoms
Bake about 20–30 minutes depending on size. Look for deep golden ridges and dry, set seams. If bottoms look pale at 20 minutes, give them a few more minutes and rotate the tray for even color.
- Preheat oven to 375–400°F and wait 20 minutes to stabilize.
- Brush a light film of melted butter on outer ridges to deepen color—use sparingly.
- Dust with confectioners’ sugar after a short cool so the sugar clings without melting.
- If your oven runs cool, add time rather than lowering temperature; high heat locks in crispness for sfogliatella riccia.
Troubleshooting: cracks, leaks, tight layers, or collapsed cones
A stubborn dough usually tells you it needs more time, not more force. I find a calm, step-by-step check gets you back on track faster than fixing everything at once.
If the dough fights back
When the dough springs or tears, stop shaping. Wrap and rest it 20–60 more minutes. Time relaxes gluten so sheets stretch without snapping.
When filling seeps out
Leaking filling often comes from overfilling or a weak seam. Reduce the filling slightly and press the edge twice to seal. Chill shaped pieces for 10–15 minutes so the fat firms before baking.
Signs of a runny mixture or collapsed cones
A loose mixture usually means undercooked semolina or warm ricotta. Cook the semolina until thick, cool it, then blend. Collapsed cones happen when layers fuse; keep logs and slices cool, brush sparingly with lard or butter, and bake promptly.
- If edges crack, your sheets were too dry—lightly brush with fat and chill, then try again.
- If layers stay tight, roll a touch thinner and keep tension when you form the log.
- Tackle one variable at a time—hydration, thinness, rest—and repeat process with small changes.
| Problem | Likely cause | Quick fix |
|---|---|---|
| Springy dough | Under-rested gluten | Rest 20–60 minutes |
| Filling leaks | Overfill or weak seam | Reduce filling, double-pinch, chill 10–15 minutes |
| Collapsed cone | Warm layers or fused rings | Keep cool, brush lightly, bake soon |
Keep notes on minutes, feel, and results. With a little time and one focused change per bake, you’ll improve each batch and enjoy the end result every time.
Make-ahead, freezing, and storing without losing the crunch
If you want bakery texture on a weeknight, a few hours of chill time are your best ally. A short intro plan keeps the process calm and gives reliable results when you bake.
Chilling the logs vs same-day baking
Chill the roll for several hours to set the fat and sharpen the layers. An overnight rest is even better; it makes clean slicing easy and keeps shapes consistent the next day.
If you must bake the same day, build a schedule with two firm rests: one after kneading and another after you roll and brush. That spacing prevents warm dough from tearing at shaping time.
Freezing shaped pieces and oven instructions
Freeze shaped pieces on a lined tray until firm, then transfer to a labeled bag so they don’t crush one another. Note date and size; smaller pieces need less baking time than large ones.
For best results, bake from frozen in a fully preheat oven. Add a few minutes to total time and watch for rich golden ridges and crisp bottoms before you remove them.
- Short-term: keep baked pastries loosely tented at room temperature; airtight softens the crust.
- To re-crisp, pop them on a hot tray for a few minutes — quick heat revives the snap without drying the filling.
- Keep a bowl in the freezer with a few piece dough offcuts for quick patches if a frozen shell chips while handling.
Serving ideas: when to dust, what to pair, and how to re-crisp
Bring them to the table hot. Dust with powdered sugar after a couple of minutes so the sugar clings without melting. A pinch of cinnamon in the dusting sugar echoes the filling and lifts the aroma right at the table.
I love the contrast of a cappuccino’s cream against the caramelized ridges and the warm ricotta interior. Keep drinks simple: espresso, black tea, or a light amaro balance the sweetness and highlight the pastry texture.
If you serve the next day, re-crisp in a hot oven for a few minutes on a bare tray—no foil—so the shell revives rather than steams. Offer a small spoon of lightly sweetened cream on the side for guests who want extra richness without soaking the shell.
- Dust with powdered sugar after cooling 1–2 minutes so it clings.
- Pair with espresso or black tea; a light amaro works well after dinner.
- Reheat in a preheated oven for a few minutes to restore snap.
| Action | Timing | Effect |
|---|---|---|
| Dust with sugar (add cinnamon) | 1–2 minutes after bake | Clings to ridges; enhances aroma |
| Pair with beverage | Serve immediately | Creamy drinks highlight ricotta center |
| Re-crisp in oven | 2–6 minutes at 375–400°F | Restores crunch without drying filling |
| Serve with cream | At table | Extra richness; controlled portion per guest |
Nutrition and smart swaps
A single piece can range widely in calories; knowing why helps you make choices that keep flavor without excess. Below I break down where those calories come from and what swaps truly move the needle.
Understanding calories, protein, and carbs in a piece
Smaller pastries often land near 180–220 calories. Larger bakery pieces can run higher depending on butter or lard and sugar levels.
Ricotta adds useful protein and calcium, while semolina and flour supply most of the carbs. A modest egg in the filling also nudges protein up a bit.
| Component | Primary effect | Typical range per piece |
|---|---|---|
| Fat (butter / lard) | Drives flake, raises calories | 50–120 kcal |
| Filling (ricotta + semolina) | Protein, calcium, carbs | 40–100 kcal |
| Flour and dough pasta hydration | Structure and carbs | 60–140 kcal |
Lighter tweaks: portion size, filling balance, and sugar control
Portion control is the simplest tool: smaller pieces cut calories but keep the ritual intact. Serve with espresso so a smaller piece feels special.
Use ricotta to boost protein and reduce sugar slightly. Bright elements like citrus peel or dried cranberries add perceived sweetness without extra sugar.
- Brush layers lightly with butter or lard — one thin pass keeps texture but trims fat.
- Cook semolina until thick so you need less sugar for body.
- Adjust water and salt so your dough stays stiff and rolls thinner, giving more crisp layers per bite.
My final tip: make swaps that protect texture first. That keeps the pastry honest and lets you enjoy a smaller piece without missing the point of all that work and time.
Conclusion
Simple choices make the difference. Make a firm dough, rest it, and use a pasta machine to roll dough thin so layers bloom.
Brush sheets lightly with lard or butter, roll into tight logs, chill for hours, then slice and coax each cone into shape. Work with a pin and a cool bowl on hand.
Cook semolina into a silky mixture, let it cool, then fill pieces carefully. Bake hot for minutes that lock color and crisp the ridges.
Follow these steps, trust the machine, and try the recipe again on another day. The historic method from Santa Rosa and Naples rewards steady work with a satisfying crackle at the end.

Sfogliatella Riccia (Traditional Neapolitan Shell Pastry)
Ingredients
Method
- In a large bowl, mix flour, salt, and honey.
- Gradually add water while kneading until a stiff, smooth dough forms.
- Wrap and rest for at least 1–2 hours, or refrigerate overnight. This rest relaxes the gluten.
- Cut the dough into smaller pieces.
- Roll each piece through a pasta machine, starting at the widest setting and moving down to the thinnest until almost transparent.
- Brush each sheet lightly with softened lard or butter.
- Roll the first sheet tightly into a log, brushing and adding more sheets until you have a thick roll.
- Wrap tightly and chill 1–2 hours until firm.
- In a saucepan, heat milk and sugar until warm.
- Add semolina while stirring; cook until thick and smooth.
- Cool slightly, then mix in ricotta, egg, zest, cinnamon, and fruit if using.
- Stir until creamy and uniform.
- Slice the chilled dough log into ¾-inch (2 cm) rounds.
- Lightly grease your fingers with lard or butter.
- Press the center of each slice gently to open it into a small cone or shell shape without tearing the layers.
- Spoon in some filling (about two-thirds full).
- Pinch edges closed firmly and place on a parchment-lined tray.
- Preheat oven to 375–400°F (190–200°C).
- Bake 20–30 minutes until deep golden brown and crisp.
- Let cool a few minutes, then dust with powdered sugar.
- Best served warm with coffee, espresso, or black tea. If reheating, pop them in a hot oven for 5–8 minutes to bring back the crunch.
Notes
- Rest time matters. Don’t rush the dough; long rests make the layers flexible and strong.
- Lard = crisp, butter = rich aroma. Choose depending on your preference.
- Keep everything cool. Warm dough tears and collapses; cold dough puffs beautifully.
- Bake hot for even color and crackling layers.
- Freeze unbaked shells for up to 2 months; bake straight from frozen.